> ## Content Index
> Fetch the complete content index at: https://blog.addpipe.com/llms.txt
> Use this file to discover other available public pages before exploring further.
# Integrating Pipe with Ninja Forms 3
- URL: https://blog.addpipe.com/integrating-pipe-with-ninja-forms-3-hfcm/
- Published: 2024-08-21T12:57:01.000Z
- Updated: 2026-05-21T08:06:30.000Z
- Author: Alexandru
- Tags: Ninja Forms, Tutorials, WordPress, #Import 2026-05-22 13:18
With [Ninja Forms](https://ninjaforms.com/) and [Pipe](https://addpipe.com/), you can easily set up a form that allows users to record videos directly from your website. This guide walks you through integrating Pipe with [Ninja Forms](https://wordpress.org/plugins/ninja-forms/) version 3.8.10 using the free [Header Footer Code Manager](https://wordpress.org/plugins/header-footer-code-manager/) plugin for [WordPress](https://wordpress.org/). An [older, deprecated article](https://blog.addpipe.com/how-to-add-video-recording-to-your-ninja-forms/), covers how to integrate with Ninja Forms 2.
## Part I: Creating the form in Ninja Forms
We'll start by creating a simple form with Ninja Forms.
#### **Step 1: Create a new form**
1. **Navigate to Ninja Forms**: In your WordPress dashboard, go to **Forms > Add New**.
2. **Add Fields**: Create a new form and add the necessary fields. For our example, we’ll start by adding a required Text field for the user’s name and a required Email field for their email address.
### Step 2: Add an HTML field to hold the Pipe recording client
0:00
/0:12
1×
Adding the HTML field
1. **Add HTML field**: Click on **Add new field** and choose the **HTML** field from the list.
2. **Edit Inline Code**: In the HTML field settings, insert the following code:
```html
```
### Step 3: Add a Hidden field for the recording URL
This will hold the location of the recording, on our complimentary storage, after it is processed by us. When the form is submitted, the value will be saved together with all the other values.
0:00
/0:18
1×
Adding the hidden input field
1. **Add Hidden Field**: Add a new **Hidden** field to your form with the label `video_url`.
2. **Publish the Form**: We need to publish the form in order for the newly created hidden field to get a permanent `id` so click on **Publish**.
3. **Inspect Element**: Hover over the newly added hidden field, right-click, and select **Inspect**. Note the `id` of the hidden input field (e.g., `field-16`).
Your form now contains 4 fields:
1. name
2. e-mail
3. HTML field which will hold/display the recording client
4. hidden field to hold the final recording URL
The form is ready to be embedded.
### Step 4: Embed Your Form
Embed your form into a page from your website using the generated shortcode for the form (e.g., `[ninja_form id=1]`)
## Part II: Adding the Pipe JS script and style tags
### Step 1: Install the Header Footer Code Manager Plugin
Install and activate the [Header Footer Code Manager Plugin](https://wordpress.org/plugins/header-footer-code-manager/) (HFCM) on your WordPress website.
We will be using it to:
1. add the `pipe.js` and `pipe.css` libraries to the header of the pages containing our form
2. add the JS code needed to insert the actual Pipe recording client in the above HTML filed: ``
3. add the JS code that hooks into the recording client's JS API and populates the hidden URL field
We'll be doing all 3 with one big piece of code.
### Step 2: Add the Required Code Using the Header Footer Code Manager
1. Go to **HFCM** in your WordPress dashboard.
2. **Add New Snippet**: Click on **Add New Snippet**.
1. **Snippet Name**: Enter "Pipe tags".
2. **Snippet Type**: Choose **HTML**.
3. **Site Display**: Select **Specific Pages**.
4. **Page List**: Choose the page where your Ninja Form is displayed.
5. **Location**: Set to **Header**.
3. **Paste the Code**: In the "Snippet / Code" section, paste the following code:
```html
```
1. **Save Changes**: Click **Save** or **Update** to apply the changes.
2. **Update Values**: Make sure to update the following values:
- **YOUR\_ACCOUNT\_HASH**: Enter your valid addpipe.com account hash from [Dashboard](https://dashboard.addpipe.com/embed) \-> [Account](https://dashboard.addpipe.com/account) \-> Account Hash.
- **YOUR\_EID**:Enter a valid environment code from one of your addpipe.com [environments](https://dashboard.addpipe.com/environments).
- **HIDDEN\_INPUT\_ID**: Replace it with the hidden field's ID created in "Part I *Step 3: Add a Hidden field for the recording URL*" (do not remove the `nf-` prefix).
## Part III: Testing and verification
### Step 1: Fill and submit the form
1. **Visit the Page**: Go to the page where the Ninja Form is displayed.
2. **Fill Out the Form**: Enter your details (name, email), and make a recording
3. **Submit the Form**: Ensure that you have stopped the recording and that it has finished uploading. Click **Submit**.
### Step 2: Verify form submission
1. **Check Form Submissions**: Go to **Ninja Forms > Submissions** in your WordPress dashboard.
2. **Review Submissions**: Ensure the hidden field contains the URL of the new recording.
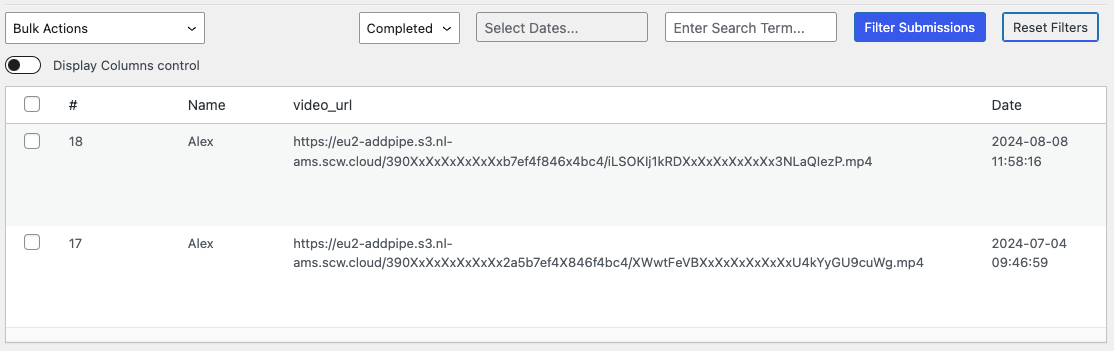
Preview of the Ninja Forms submissions
## That's it!
You’re now recording content from your website's visitors through a simple form created with [Ninja Forms](https://ninjaforms.com/) and [Pipe Video Recorder](https://addpipe.com/video-recorder).