Reducing FFmpeg Memory Usage
Our video recording platform handles tens of thousands of recordings every day, processing recordings from different sources with varying resolutions, codecs, and sizes.
We use FFmpeg to process the recordings, and our servers are well optimized to handle this kind of load and input.
But every once in a while, a wrench gets thrown into our gears, which benefits us by improving and optimizing how we process recordings even more.
This time, that wrench was a specific type of recording: an 8K video (7680x4320) with ~60 Mbps bitrate, encoded with the HEVC video codec.
The Problem
For broad compatibility, we convert all our videos to H.264 encoding, which in this case meant converting from the HEVC video codec to H.264, frame by frame, with a targeted output back to 8K resolution.
To get a better picture (pun intended), the YUV420p pixel format (the one we use) stores 1 byte of luma (Y) per pixel, plus 0.5 bytes of chroma (U and V are each subsampled to quarter-resolution), for a total of 1.5 bytes per pixel.
This means that a single raw uncompressed frame at 8K in YUV420p is:
7680 × 4320 × 1.5 bytes ≈ 47 MB per frameYou can see how that is a BIG problem for memory usage, especially when transcoding multiple recordings in parallel.
FFmpeg needs to hold multiple frames in memory simultaneously for decoding, scaling, overlay compositing, and the x264 encode pipeline. With lookahead and B-frames buffering, you can easily have 10-20 frames in flight at once, that's 470MB-940MB just for frame buffers from a single conversion job.
This particular 8K video (20 seconds long, so not much) caused FFmpeg to rapidly consume ~9GB of virtual memory during conversion. That is A LOT for just one recording, and can quickly lead to OOM issues!
OOM issues are logged directly in the OS logs. In our case, Rocky Linux logs it in /var/log/messages.log
Here is what our Grafana dashboard showed during the transcoding, where you can easily see the rapid growth in memory usage:
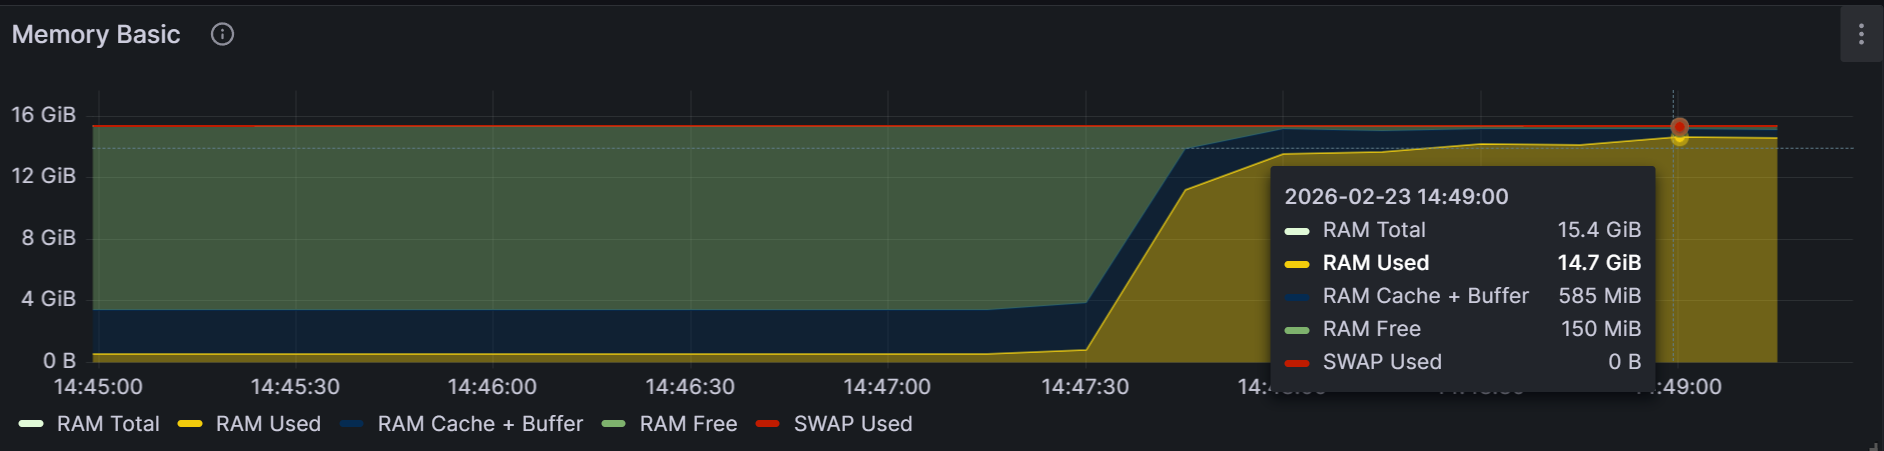
Note: Several recordings were transcoded at the same time (as shown in the chart above), including the 8K recording.
The Solution
Clearly, we had to make some changes to our FFmpeg pipeline to optimize its memory usage during conversion for video recordings like these.
There is no single FFmpeg flag that says "use max N GB of RAM", but there are several angles of attack, so the solution is multilayered.
Scaling
First, we can scale down the video. A simple, yet very effective solution.
For our use case, we decided to cap the converted video recording at 4K resolution. This reduced memory usage by 4x, from 9GB to 2.25GB of virtual memory.
This may seem counterintuitive, but think about it: to go from 8K to 4K resolution, you are dividing the width by 2 AND the height by 2, so the area (and the memory used per frame) drops by 2 x 2 = 4.
In FFmpeg, the scaling can be done directly or within filter_complex in both cases, using the scale filter:
# Scaling down to 4K standalone with -vf
ffmpeg -i input.mp4 -vf "scale=-2:2160" output.mp4

# Scaling down to 4K using -filter_complex
ffmpeg -i input.mp4 -filter_complex "[0:v]scale=-2:2160" output.mp4
One important consideration when scaling is video rotation. We use FFprobe to detect video rotation.
The commands above work for landscape videos. For portrait oriented videos (rotated 90 or 270 degrees), you have to switch the scale around, scale=2160:-2 for the math to be correct.
Also, take note of the order of operations in the pipeline. If you have other filters chained (deinterlace, overlay, etc.), make sure scale is first applied, so that the following expensive filters work with the lower resolution frames.
Reducing Encoder Buffers
One other area with leverage over how much memory FFmpeg uses is the encoder buffers. These buffers are common for most video codecs, and all use lookahead, B-frames, and reference frames.
In your case, for the H.264 video codec, these can be specified via the -x264opts flag and are the following:
rc-lookahead(default value: 40) controls how many future frames the rate control algorithm can look ahead to allocate bits. The higher the value, the better it can 'see the future' to view a complex scene coming and save bits on the easier frames before it. For our 8K video, 40 frames × 47 MB = nearly 2 GB of memory just for the lookahead buffer.bframes(default value: 3) controls the number of consecutive B-frames the encoder can insert between reference frames. B-frames are predicted bidirectionally (from past and future frames). More B-frames = better compression, more memory.ref(default value: 3) controls how many previously encoded frames the encoder can reference when compressing the current frame. More references = better compression, especially for repetitive motion, but at the cost of more memory.
You can quickly see how these buffers compound to use up memory, especially when dealing with very high resolution videos.
We decided to reduce the default values from 40, 3, 3 to 5, 1, 1. This significantly shrinks the working set and directly correlates with memory usage, with the trade-off being slightly lower compression; for our use case (user-uploaded recordings), the quality difference is minimal.
# Reducing encoder buffers for H.264 encoding
ffmpeg -i input.mp4 -c:v libx264 -x264opts rc-lookahead=5:bframes=1:ref=1 -c:a aac output.mp4
Reducing the Thread Count
In FFmpeg, there are three flags that control the number of threads that FFmpeg uses and they all have the default value 0 , which means auto. These are the flags:
threadsis the main thread count and controls the encoder/decoder threading. With the default value, it lets the codec decide the number. Forlibx264, the codec chooses to use 1.5x the logical core count by default.filter_threadscontrols how many threads an individual filter can use. It usually maps to the number of logical cores.filter_complex_threadscontrols how many filters within a-filter_complexgraph can run in parallel. This also aligns more closely with the logical core count.
Each thread allocates its own frame buffers. You can quickly see using the htop command how threads are working behind the scenes:
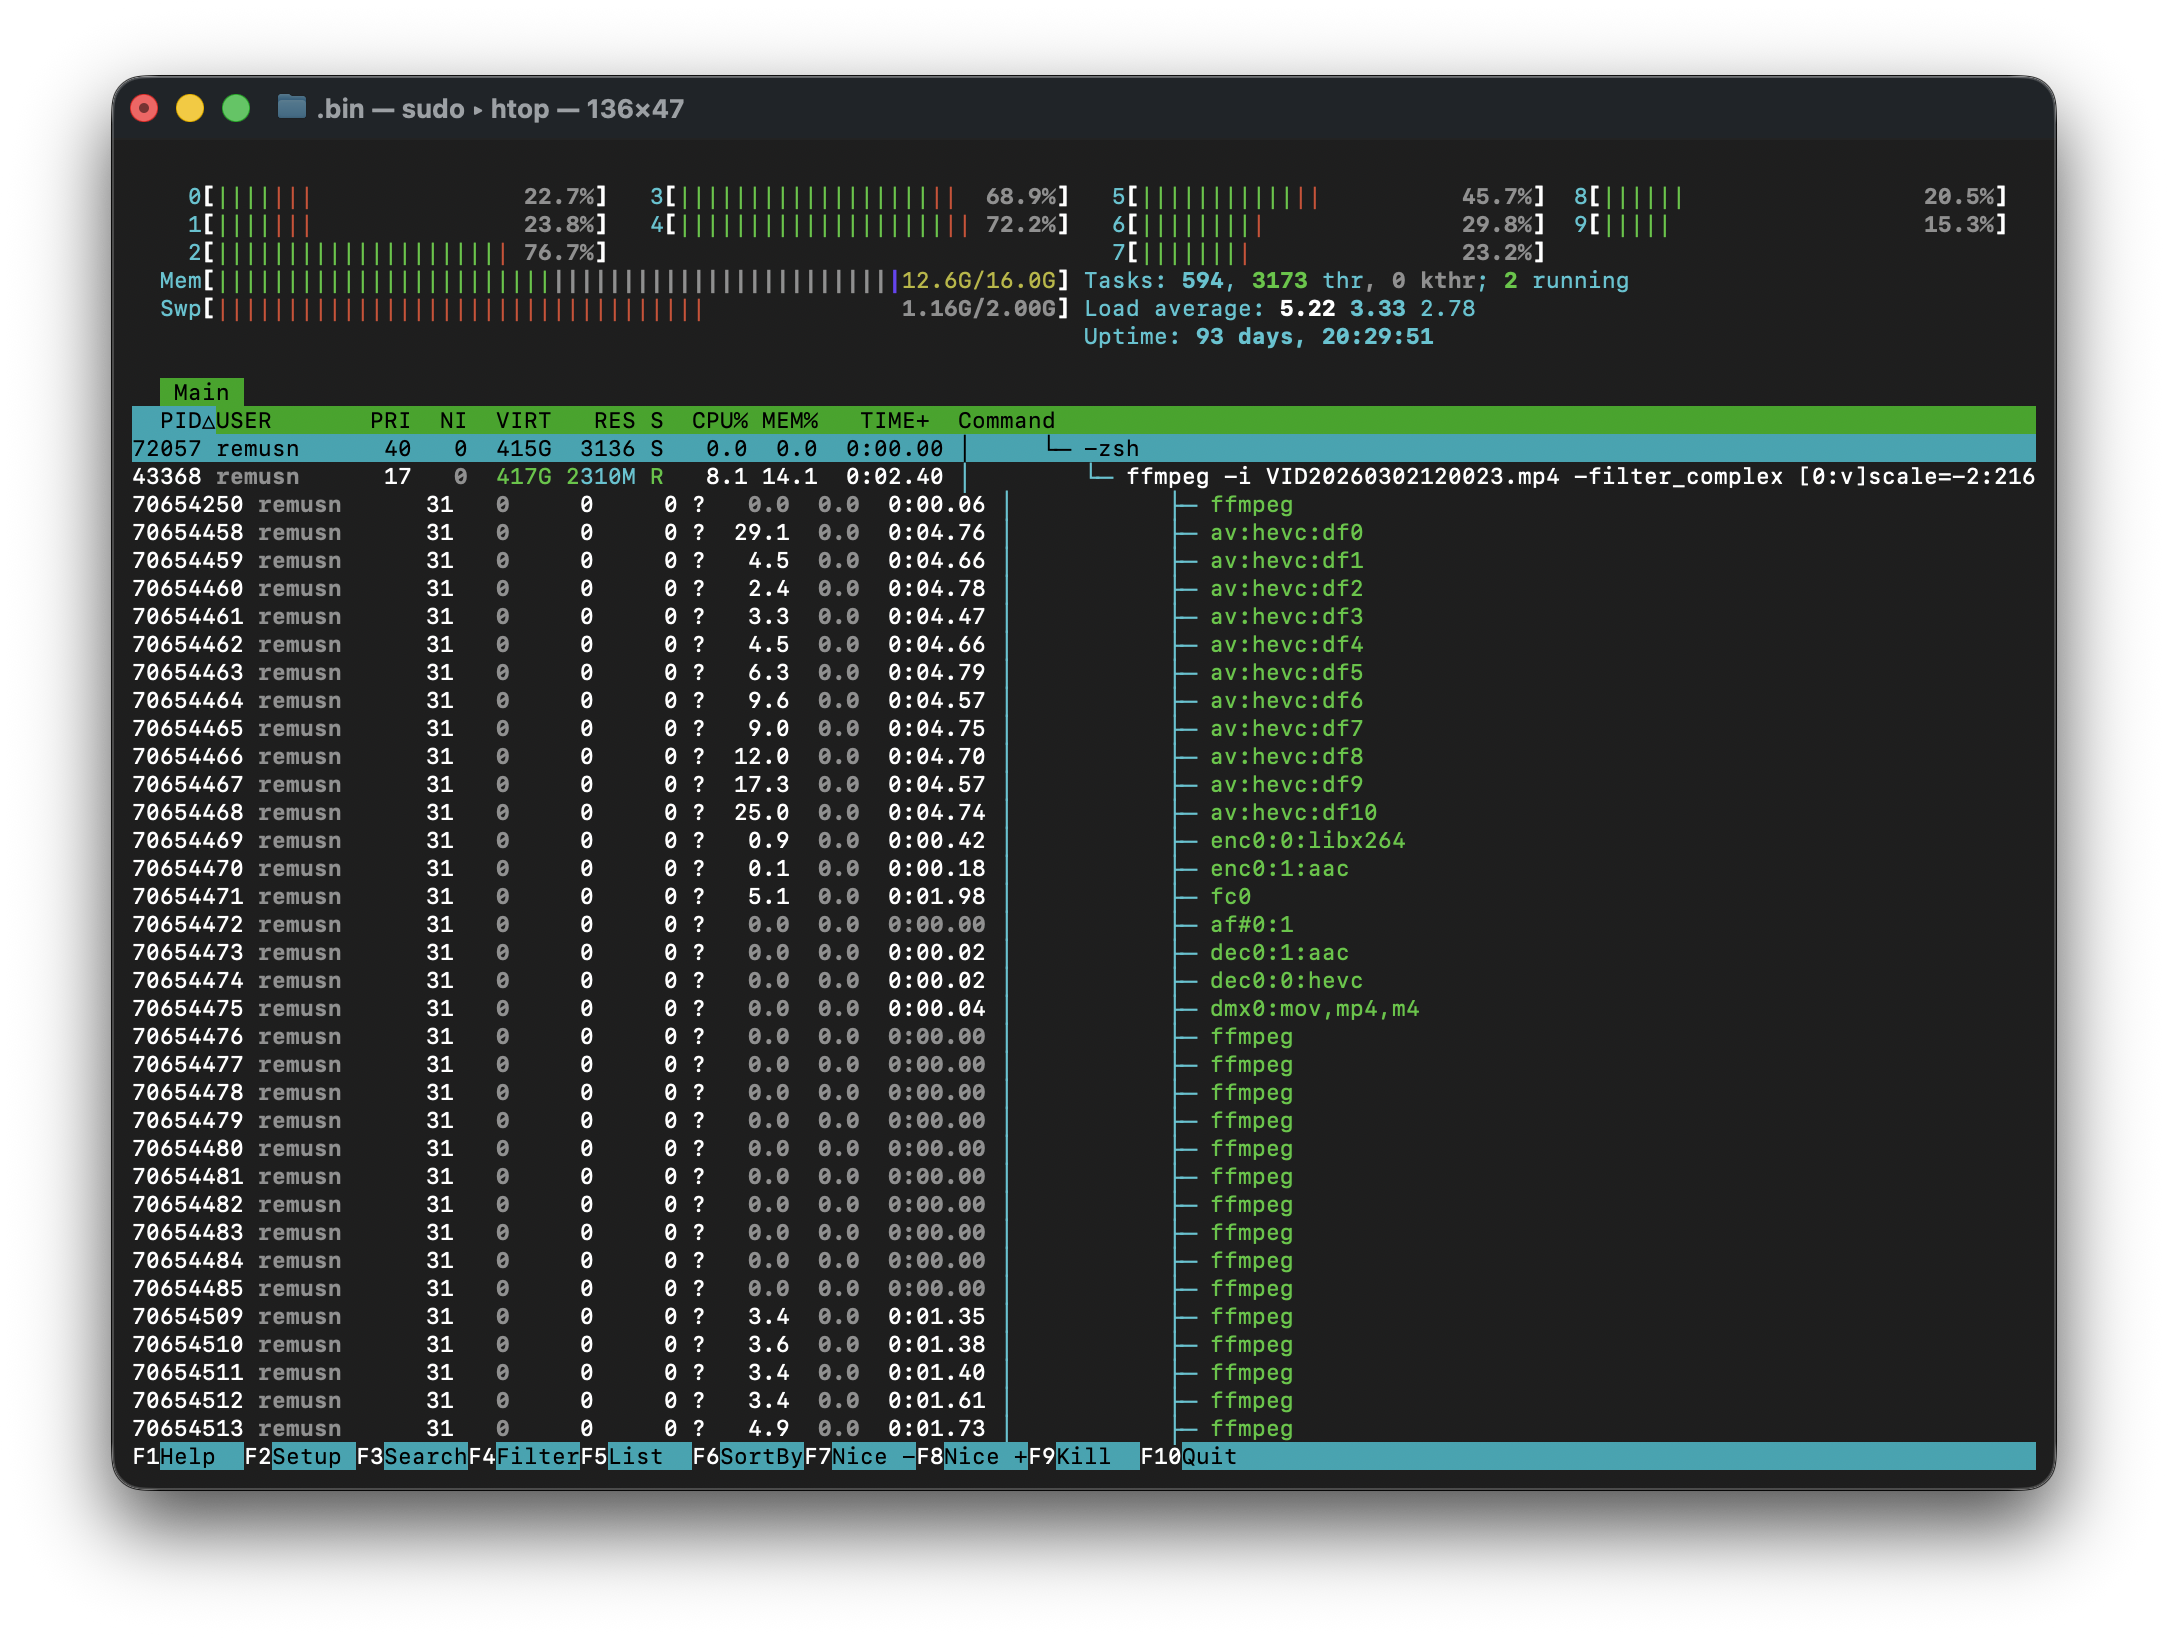
Not all filters are multithreaded, but in our case scale is, so tinkering with all of the three flags will affect memory usage.
Here's a FFmpeg command where we reduced the number of threads:
# Reducing the Thread Count
ffmpeg -i input.mp4 -threads 3 -filter_threads 2 -filter_complex_threads 2 output.mp4
Note that tinkering with the thread numbers will affect CPU usage, not just memory usage, leading to a known compromise: lower memory usage but longer transcoding duration.
Another important aspect is whether we would have just upgraded our hardware to mitigate the issue, by default FFmpeg would've just auto scaled the number of threads, possibly making the problem even worse.
The Final Effect
After applying all 3 solutions described above, we reduced memory usage from ~9GB to ~1.7 GB. That is a 5x reduction!
Here is the FFmpeg command with all the flags applied, which can serve as a template:
ffmpeg -i input.mp4 -filter_complex "[0:v]scale=-2:2160" -c:v libx264 -x264opts rc-lookahead=5:bframes=1:ref=1 -c:a aac -threads 3 -filter_threads 2 -filter_complex_threads 2 output.mp4