Integrating Pipe Webhooks with AWS Lambda
Webhooks are a powerful way of integrating between different software services. Thanks to the recent Pipe webhook update, which allows you to send webhooks with content-type application/json, you can integrate them with serverless platforms such as AWS Lambda.
I'm assuming you already have an AWS account setup so let's get started.
So What is AWS Lambda?
Lambda allows you to run code without needing to create and manage actual servers, and as a bonus, you are only charged for compute time, aka when your code is running.
Lambda works excellent together with AWS API Gateway, which will be the link between Pipe webhooks and AWS Lambda, as we will see further on.
Part 1: Setup Lambda
- The first thing you will need to do is head over to the AWS Console and search for Lambda to get to the Lambda dashboard.

2. In the dashboard select Create Function

3. Select the option to Author from Scratch

4. Choose a function name and choose any runtime you wish. I've chosen the latest version of NodeJS. For this example, I've selected for the execution role the option to create a new role with basic Lambda permissions, but if needed, you may choose to use IAM roles.

With this, your new Lambda function is up and ready. Now, all we need is the code that will be executed to handle the incoming Pipe webhook data.
You can choose to write your code directly using the provided inline code editor. Suppose you need anything fancier with additional packages/modules. In that case, you can write and test your code locally and then zip it alongside those specific modules/packages and upload it to Lambda.
For this example, we will keep it simple and use the inline code editor. Here is a basic handler code that parses the received Pipe webhook data and returns a response:
exports.handler = async (event) => {
    let webhookData = JSON.parse(event.body);
    const response = {
        statusCode: 200,
        body: webhookData.data.videoName
    };
    return response;
};
Inside the inline code editor, it looks like this:

For this example, the response is simply returning the name of the recording by parsing the application/json payload data sent by the webhook with this simple line of code: webhookData.data.videoName, where webhookData is the parsed JSON.
Part 2: Plug in the API Gateway
- In the AWS Console search for API Gateway

2. In the API Gateway select Create API

3. In the following section select REST API ( the simple one, NOT the private one)

4. Once you've selected, you'll be met with another setup screen. The Endpoint Type (default Regional) is essential to note here, which means that Lambda will be deployed in the current AWS account region. Chose a name for your API and leave the remaining options to their defaults and click Create API.

5. After your API is created, you need to create a method for your API. For this example, we will create a POST method. In the API Resources section, go to Actions and select Create Method.

6. After this, you need to make this new method a POST method. Click the checkmark beside it to create it.

7. In the POST Setup, select Integration type to be Lambda Function and make sure to check Use Lambda Proxy Integration. This will redirect the endpoint provided by the API Gateway to your Lambda function created earlier. When selecting the Lambda function, the form should automatically detect the Lambda function name once you start inputting it. Click Save when you are done setting it up.

8. Last thing we need to do before completing the AWS setup is to deploy our API to a stage. From Actions select Deploy API.

9. If you already have created a stage, you can choose the already existing one. Else you can create a new one right here in the deploy screen

10. Click Deploy!
An invoke URL will be generated:

We will use this generated URL with our Pipe webhook.
There are many other settings in the API Gateway that you can mess around, such as cache, throttling, web apps firewalls, etc., but those go beyond the scope of this tutorial.
Part 3: Plug in the Pipe Webhook
- In your Pipe webhooks dashboard click
Add New Webhook. - For the Webhook URL, input your API Gateway Invoke URL we've just generated.
- Select the events for which you want to be notified.
- Make sure the Content type is
application/json, for the integration to work. - Click
Save webhook.

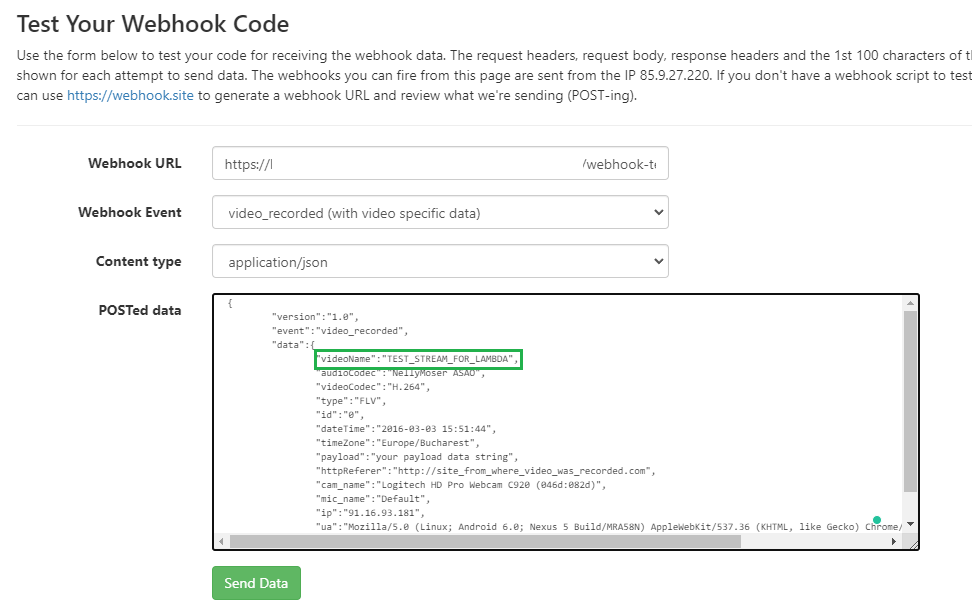
You can also run a quick test with the Pipe webhook simulator to check that everything works as expected:
- For the Webhook URL, input your API Gateway Invoke URL you've also entered when creating the Pipe Webhook.
- Select the Content type to be
application/json. - You can modify the POSTed data, I've modified mine to make it more clear by changing the
videoNametoTEST_STREAM_FOR_LAMBDA.

4. Click Send Data.
5. In the Response tab you should receive the test data videoName that was sent.

This way you can easily debug your integrations.
That's it! The Pipe webhook is now successfully integrated with AWS Lambda, and from here, you can further integrate with other AWS services. The possibilities are endless!
