How to build a no code video-based Know Your Customer app using Bubble.io and Pipe Video Recorder - Part 1
We are going to cover how to build a video KYC user verification system without writing code using Bubble.io and the Pipe Video Recorder.
Updated December 2024
Know your customer (or KYC) is the process of verifying the identity of your users. If you opened an account with an online bank such as Revolut or a crypto wallet/exchange like Coinbase or Binance, you may have already experienced some sort of KYC process when you had to provide information about your physical address, government-issued documents like Passport or ID card or even electricity bills.
KYC is mandatory for some type of online businesses, especially in the financial sector because they have to comply with regulations about anti-money laundering (AML) and fraud prevention but there are many other use cases and industries which can benefit from it. For example, if you have a B2B business you may want to implement a KYC process to verify the identity of your suppliers or your clients in order to avoid economic and/or reputational risks. If you have a B2C business and you plan on expanding internationally, knowing who your users or customers are may help you identify bad actors that you don’t want to do business with.
The bottom line is that if you think your business would benefit from knowing who you are dealing with, then implementing a KYC process is an option you should seriously consider.
Historically this process has been very cost-intensive due to factors like:
- Cost of building and maintaining an online system to collect, store and manage this info from the user.
- Cost of hiring someone to actually verify the documents and information provided by the user, which in some extreme cases requires to actually go to the physical address of the user to perform the final verification in-person.
In recent years though we have seen major improvements both from the technology and regulatory front. A clear example comes from the Reserve Bank of India (RBI), which amended the KYC norms allowing banks and other lending institutions regulated by it to use video-based Customer Identification Process (V-CIP), a move which will help them to onboard customers remotely. Basically they ruled that video KYC is comparable to in-person verification.
As a result, the interest in video KYC is growing every day according to Google Trends.

In this article, we are going to cover how to build a video KYC user verification system without even writing code using Bubble.io and the Pipe Video Recorder.
The system will allow users to record a short video directly in the browser during signup. Once the user submits all the information, another person responsible for KYC on new signups will be able to see all the users who recently signed up and their data & recording through a personalised dashboard.
Ready? Let’s jump into it!
Table of Contents
- Requirements: Bubble.io and Pipe Video Recorder
- Bubble.io App settings and plugins required
- Creating a multi-step signup form
- Troubleshooting
Requirements: Bubble.io and Pipe Video Recorder
In this tutorial we will use:
- Bubble.io (a powerful no code app builder, which is a great tool to build your MVP and iterate faster on your learnings) to create a hypothetical app which requires video KYC during the signup process
- the Pipe Video Recorder to actually implement the video recording feature in the signup process.
To get started you will need to create an account with:
- Bubble.io (sign up for a free account here but you’ll have to upgrade to a paid account as explained below)
- Pipe (sign up for a free trial here)
Although Bubble offers a free account, we will need to be able to:
- personalise the HTML Header of some pages
- have an SSL certificate (to allow the browser to request permission to access the camera and microphone of the user) .
Both are paid features in Bubble. If you don't have a paid Bubble account already, the cheapest option, per their pricing page, is the Personal Plan at $25/mo which we signed up for to do this tutorial.
Pipe offers 14 days free trial, signing up takes just 1 minute and no credit card is required.
Bubble.io App settings and plugins required
Before doing anything we need to enable custom IDs for the HTML elements and add the free Toolbox plugin to our project.
Enabling custom IDs for elements
By default, Bubble doesn’t allow you to use custom IDs for HTML elements, but we can enable this option. From the Bubble editor go to Settings> General and in the General appearance area, enable the Expose the option to add an ID attribute to HTML elements option. You can enable it by clicking on the checkbox button on the right.

The Toolbox Plugin
To be able to add custom JavaScript in Bubble (which we will need in order to save the video URL of the users’ recordings), we will need to install the free Toolbox plugin for Bubble. It is a popular plugin used in many Bubble applications.
To install it go to the Plugins section of the Bubble editor, click the + Add plugins blue button on the top of the screen and type “Toolbox” in the next view’s search field. In the results section of the Install New Plugins popup find the Toolbox and click on the Install button to add it to your Bubble project.

Now that we have all we need, we’re ready to start building!
Creating a multi-step signup form
In order to create a video KYC user verification process, we will need a way to capture users’ email, password and a video recording of them.
Bubble has built-in Signup/Login features, but for our use case, we are going to create a custom multi-step signup form to allow the users to provide both an email, password and the details required for KYC including a video recording. The signup form will eventually have 3 steps, and this is what it is going to look like:

I am going to assume that you have a basic knowledge of how to build things in Bubble, so I may skip some steps (for example creating a new page etc.). If you are completely new to Bubble, you can go to their lessons page where they have plenty of interactive tutorials that will teach you the basics in no time.
index page and the GET STARTED button
The index page is the 1st page of any Bubble project. In this page, we will place all the elements needed to create our multi-step signup form. If your index page contains the boilerplate Bubble content you can remove it. If you have an existing project with a signup form, just follow along and you’ll learn how to add the video recording part to your existing signup form.
Let’s start by adding a Popup element. To do that, go to the Design section of the Bubble editor and click on the Popup element (it is in the Containers category under the UI Builder tab). Draw a decently sized Popup in the Page area. I’ve resized mine to 800x600 which is enough for all our sign up elements.

Pro Tip: You will realise soon that a page can become pretty overcrowded, so make sure to rename each element with a meaningful name so that you will easily find it in the Elements tree section of the UI Builder. I have renamed my Popup Signup Popup.

This Popup won’t be visible when the page is loaded, so we also need to place a Button element in the Index page. Users will click it to open the Popup.
To add the Button to the page select the Button element from the Visual elements category in the UI Builder tab, and draw it in the index page where it makes sense according to your design. With the button placed in your page, double click it and change the label, I’ve used the label “GET STARTED”. The button will automatically take the name of whatever text you typed, in my case it is called GET STARTED Button.
When the user clicks on the GET STARTED Button we want to show the Signup Popup. To build this interaction we will need to create a Workflow, which is the way to build app logic in Bubble. To build this Workflow, click on the GET STARTED Button and in the Appearance tab click on the Start/Edit Workflow button. In the Workflow editor click on the Click here to add an action… box, hover with the mouse on the Element Actions option and click on the Show action. In the popup that will show up click on the Element dropdown and choose the Signup Popup element.
Click on the Preview button on the top right of the Bubble editor to test your newly made workflow. If everything was implemented correctly, you should see the Signup Popup when clicking the GET STARTED button.
Congrats! You have built the first interaction of the video KYC process.
Step 1: Capture Users’ Email and Password
Now let’s start adding the actual Input elements. We’ll need these to capture the basic information required to create an account: email and password.
In the Elements tree section of the UI Builder tab click on the Signup Popup you created before. The pop up will show up in the Bubble editor and we will be able to add other elements to it.
Now, in order to be able to create a multi-step signup process within the Popup, we need to add a Group element which will help us group elements together in a step and move among the three steps easily. You’ll find it under Containers. Click on the Group element, draw it inside the Popup and rename it. I have called this Group STEP 1.
Next, let’s add the following Input elements:
- Password
- Password confirmation
Go to the Input forms category in the UI Builder tab, click on the Input element and draw one in the STEP 1 Group you have added before. Using the Appearance tab of the newly drawn Input element rename it (I have renamed it Input EMAIL), select the Email Content format and type in a placeholder text (Email).

To add the Password and Password confirmation Inputs just repeat the same process you just did for the Email and make sure to set the Content format to Password for both of the Inputs.
To allow the users to navigate to the other 3 steps that’ll follow, we also need to add a NEXT button in the STEP 1 Group.
Draw another Button element just under the last Input you placed in the STEP 1 Group. I’ve labelled mine “NEXT”. We’ll add a workflow to this button later when we have the STEP 2 Group ready.
This is how the STEP 1 Group should look like.

Step 2: Integrate the Pipe Video Recorder and get the video URL
We are now ready to jump into the core of this tutorial. In short we will create a new group, add the video recording client, add some JavaScript to calculate the video URL and save that info in an Input element.
So let’s start by adding another Group element in our Signup Popup.
In the Containers section of the UI Builder tab click on the Group element and draw a new group in the Signup Popup on top of the STEP 1 Group that is already there. In the Appearance tab of the new Group unflag the option called This element is visible on page load and rename the group: I have called it STEP 2.
Pro Tip: Make sure to keep the STEP 2 Group at the same level as STEP 1. It should be directly under the Signup Popup. You can verify the level in the Elements tree section of the UI Builder tab. Here’s how mine looked after finishing the tutorial:

Now, let’s place a HTML element in our STEP 2 Group. This element will house our Pipe video recording client. You can find the HTML element among the Visual elements of the UI Builder tab. Click the HTML element and draw a new HTML element inside the STEP 2 Group. I have called it: Pipe Video Recorder.
Below the HTML element, add the buttons for navigating back and forward. I have called mine: BACK and NEXT.
With the group, HTML element and BACK and NEXT buttons in place we are finally ready to embed the Pipe video recording client. This process consists of four simple steps.
- Copy the first part of the Pipe Video Recorder 2.0 JS embed code from your Pipe account area.
- Paste the first part of the embed code in the Index page’s HTML Header.
- Copy the second part of the Pipe Video Recorder 2.0 JS embed code
- Paste the second part of the Pipe Video Recorder 2.0 JS embed code in the HTML element inside the STEP 2 Group.
Go to your Pipe account area, scroll down and in the bottom-right part of the page click on the 2.0 JS tab copy the first part of the embed code. Back in the Bubble editor click somewhere where you don’t have any elements so that the Index page settings will show up. Go to the Appearance tab of the Index page, scroll down to the HTML Header section and paste the first part of the Pipe Video Recorder embed code.

Now, let’s copy the second part of the embed code and let’s paste it in the HTML element (called Pipe Video Recorder) we placed in the STEP 2 group.

This is how the code you just pasted in the Pipe Video Recorder HTML element in the STEP 2 Group should look like
<div id="custom-id"></div>
<script type="text/javascript">
  var pipeParams = {
    size: {
      width: 640,
      height: 390
    },
    qualityurl: "avq/360p.xml",
    accountHash: "YOUR_ACCOUNT_HASH",
    eid: "YOUR_ENVIRONMENT_ID",
    mrt: 120
  };

  PipeSDK.insert("custom-id", pipeParams, function(recorderObject) {});

</script>
Pro Tip: to make sure that the recorder will look good on the page you can change the embed code in the HTML element and set the value of the width inside the pipeParams object to “100%”. With this change, the video recorder will take all the horizontal space available in the STEP 2 Group.
Awesome! You have now integrated the Pipe Video Recorder in Bubble, so let’s test if that worked out.
That was it! Now let’s build the interaction needed to navigate from the STEP 1 Group to the STEP 2 Group.
In the Elements tree click on the STEP 1 Group so that it will show up in the Bubble editor. Click on the NEXT button and in its Appearance tab click on Start/Edit workflow. In the Workflow editor click on the Click here to add an action… box, hover with the mouse on the Element Actions option, click on the Hide action and choose STEP 1 as the Element to hide. In the same workflow click again in the Click here to add an action… box, hover with the mouse on the Element Actions option, click on the Show action and choose STEP 2 as the Element to show.
Done! Now we are ready to perform our 1st video recording test.
Click on the Preview button on the top right of the Bubble editor and, in the page that will be opened in a new tab you should be able to:
- Click on the GET STARTED Button and open the Signup Popup
- Click on the NEXT Button in the STEP 1 Group and reach the STEP 2 Group
- Record a video with the Pipe Video Recorder in the STEP 2 Group

Pro Tip: if you want to review the video KYC recordings you can use your Pipe Account Area. Go to the Recordings section through this link https://addpipe.com/recordings and check them out!

Let’s move on!
The Pipe Video Recorder is embedded and we can record a video but we still need to retrieve the video URL and save it together with the other info collected during the sign up (name, e-mail, password). Technically, next, we will:
- Use Pipe’s JS Events API to generate the video URL It’s OK we will give you the entire code.
- Save that URL as the value of an (invisible) Input element
- Use the Javascript to Bubble plugin to pass the URL info from the Input to the db
Let’s replace this line of code
PipeSDK.insert("custom-id",pipeParams,function(recorderObject){});With the following code which is based on Pipe’s JS Events API:
PipeSDK.insert("custom-id", pipeParams, function(recorderObject) {

  recorderObject.onSaveOk = function(recorderId, streamName, streamDuration, cameraName, micName, audioCodec, videoCodec, fileType, videoId, audioOnly, location) {
    //onSaveOK is part of the desktop recorder's JS events API (recording from camera or screen)
    var args = Array.prototype.slice.call(arguments);
    console.log("onSaveOk(" + args.join(', ') + ")");
    document.getElementById("pipeInput").value = "https://" + location + "/YOUR-ACCOUNT-HASH/" + streamName + ".mp4";
  };

  recorderObject.onVideoUploadSuccess = function(recorderId, filename, filetype, videoId, audioOnly, location) {
    //onVideoUploadSuccess is part of the native mobile recorder's JS events API (upload new or existing recording)
    var args = Array.prototype.slice.call(arguments);
    console.log("onVideoUploadSuccess(" + args.join(', ') + ")");
    document.getElementById("pipeInput").value = "https://" + location + "/YOUR-ACCOUNT-HASH/" + streamName + ".mp4";
  };

  recorderObject.onDesktopVideoUploadSuccess = function(recorderId, filename, filetype, videoId, audioOnly, location) {
    //onDesktopVideoUploadSuccess is part of the desktop recorder's JS events API (upload existing file from desktop)
    var args = Array.prototype.slice.call(arguments);
    console.log("onDesktopVideoUploadSuccess(" + args.join(', ') + ")");
    document.getElementById("pipeInput").value = "https://" + location + "/YOUR-ACCOUNT-HASH/" + streamName + ".mp4";
  };

});
The above code covers three possible cases:
- User recording from a desktop device using a webcam.
- User uploading a video from a desktop device.
- User uploading a video from a mobile device.
In the code above, make sure to replace the 3 instances of YOUR-ACCOUNT-HASH with your actual Account Hash, which you can find in your account area at this link https://addpipe.com/account.
In each scenario, that code will generate the video URL (to the recording hosted by Pipe).
Now let’s add the Input element. We will use it to store the video URL so that we will be able to easily save it to the database later on. This element will not be visible on the page. For this reason, it is not really important where you place the Input, just add it in a corner of the STEP 2 Group where you don’t have any other elements. We also need to assign a custom ID to this Input because will use it to store the video URL as the value of the Input in the next steps.
Scroll down in the Appearance tab of the video URL Input and in the ID Attribute field type pipeInput (we have used this name in the code above, so make sure to use exactly this name for the ID Attribute).

Finally, we need to hide the video URL Input so that the users won’t be able to see it. To do that we will have to actually make it invisible through styling rather than hiding it through the Bubble options because, when hiding it through Bubble, the Input will not be added to the page content and we need it to be in the page so that we can assign it the video URL of the users’ recordings.
To make the Video URL Input invisible we can use some styling tricks and make the Input’s borders and text the same colour as the background as well as removing the Placeholder text. In the Video URL Input Appearance tab click on the Remove style button and in the next view you will be able to change the styling to make it invisible. In my case the Popup background is white, so I made the borders and the text of the Input white as well.
Now, let’s add a Javascript to Bubble element. This is included with the Toolbox plugin we’ve installed at the beginning of this tutorial. It should be in the Visual elements section of the UI Builder tab. Click on it and draw it in the STEP 2 group. In its Appearance tab, there are three options we have to set:
- Bubble_fn_suffix: set this to url
- Publish value: make sure the corresponding checkbox is flagged.
- Value type: set this to text

Congrats on reaching this point! You have completed the hardest part of the tutorial and successfully integrated the Pipe Video Recorder.
This is how the STEP 2 Group should look like at this point.

Step 3: Additional info
You can keep adding as many steps as you need in order to get all the information required by your use case. The process is always the same:
- Add a new Group element on top of the last one
- Add all the Inputs you need
- Add the buttons to let the users navigate the signup form
- Make sure to keep each Group at the same hierarchical level as the others
I have added just one more Group (STEP 3) to collect:
- Name (Input)
- Country (Dropdown)
- Birth Date (Date/Time Picker)
You can find all these elements in the Input forms section of the UI Builder tab. Finally, I have added 2 more buttons. One to go back to the previous step and one to complete the process, I have called them BACK and COMPLETE.
This is how my STEP 3 Group looks like:

Building the logic of the app
Now that the UI is ready we can jump into the next chapter of the tutorial: creating the database where we will store the users’ data and building all the interactions needed to sign up the users.
Creating the Database
To create the database go to the Data section of the Bubble editor and click on the Data types tab. This is the place where we will create and manage all the tables of the database. By default, Bubble provides us with a table called Users and in this table, we will find three Built-in fields:
- Modified Date
- Created Date
We will need to add all the fields necessary to save the information we request from the users in the signup form. These are:
- videoURL (collected in STEP 2)
- birthDate
- Country
- Name
- role
The role field is required to create different types of users since we are going to have “normal users” who want to use the service and “KYC moderators” who need to review the videos submitted by normal users during sign up.
To add all these fields, click on the Create a new field button and in the popup that will open up, insert the:
- Field name: this is the name of the field (i.e birthDate, Country, etc..)
- Field type: this is required to tell the database which type of data we want to store (i.e. text, number, boolean, etc..)
In our case, we can set all the fields type to text, except for the birthDate which will be set to date.
You may be wondering why we didn’t add the fields to store the password data and this is because Bubble already handles it for us under the hood.
The last thing we want to do in our database is to set a default value for the role field to user. In Part 2 we will create separate signup and login processes for the admins and for them, we will set a different role. To set this value, just type user in the default field next to the role field.
This is how the User table should look like:

Remaining Workflows
We have already added some workflows to make the Signup Popup appear when clicking the GET STARTED button, as well as moving from the STEP 1 Group to the STEP 2. Now let’s add the rest! This is the list of high-level interactions we will need to build to make our App work:
- Allow the user to navigate back and forth each step of the Signup Popup using the corresponding buttons in each step.
- Store the video URL in the Javascript to Bubble element when the user clicks the NEXT Button in the STEP 2 Group.
- Store all the information we collected in the database when the user clicks on the COMPLETE Button in the STEP 3 Group.
Let’s start from where we left before: the STEP 2 Group. In this Group, we have 2 buttons: BACK and NEXT. When the user clicks on the BACK button we need to hide the STEP 2 Group and show the STEP 1 Group. We have already done this before, so here it is the same process.
When the user clicks on the NEXT button in the STEP 2 Group we need to:
- Add an action to receive the video URL of the recording and store it in the Javascript to Bubble element.
- Hide the STEP 2 Group
- Show the STEP 3 Group.
In the STEP 2 Group click on the NEXT button and then click on Start/Edit workflow. In the Workflows editor click on the Click here to add an action... box, go to the Plugins option of the menu and select the Run javascript action. In the Run javascript window paste this snippet of code:
let videoURL = document.getElementById("pipeInput").value;
bubble_fn_url(videoURL);
This piece of code will get the video URL from the video URL Input which is hidden in the STEP 2 Group and it will store it in the url variable that we defined previously when we added the Javascript to Bubble element. This will allow us to save the video URL in the database when the user clicks on the COMPLETE button in the STEP 3 Group later on.
The last step is to add the actions to hide the STEP 2 Group and show the STEP 3 Group. This process is the same as before.

Save the data to the database
We are finally ready to save the data in the database. To do that, let’s go to the STEP 3 Group where we have two buttons: BACK and COMPLETE.
When the user clicks on the BACK button we need to hide the STEP 3 Group and show the STEP 2 Group. You should be familiar with this process by now.
When the user clicks on the COMPLETE button we will have to write in the database all the data we collected so far. To save the data click on the COMPLETE button, go to the Workflows editor through the Start/Edit workflow button and click on the Click here to add an action… box. In the actions menu, go to the Account option and click on Sign the user up. In the Sign the user up popup we will have to fill in all the fields we have in the database. Let’s start with Email and Password.
By clicking on the Email input you will see the list of all the elements we have added in the multi-step signup form. Go to the Input EMAIL element and select the option ‘s value. Do the same for the Input Password. Since we added a Password confirmation input, flag the Require a password confirmation checkbox, so that we will be able to fill in this value as well in the field that will appear. For this field select the Input Password Confirmation’s value.
Now it’s time to fill in four more fields that we have in the database:
- birthDate
- country
- name
- videoURL
To do that click on the + Change another field button, select each field and assign the following values:
- birthDate: Birth Date’s value
- country: Country’s value
- name: Name’s value
- videoURL: JavascripttoBubble A’s value

Testing the multi-step video KYC user verification process
It’s now time to test our multi-step video KYC user verification process. Click on the Preview button on the top right of the Bubble editor and go through each step of the Signup form. Make sure to perform the following tests:
- The navigation buttons should allow you to move easily through each step of the form.
- In the STEP 2 Group click on the Record button of the Pipe Video Recorder and record a short video.
- Fill in all the required data and click Complete in the last step.
If everything worked correctly you should be able to see a new entry in the Users’ table. To verify that go to the Data section of the Bubble editor and click on the App data tab. You should see the data as in the picture below:

Troubleshooting
In this part of the tutorial, we will troubleshoot some issues that might appear while integrating Pipe with newer versions of Bubble.
The Pipe Recorder Is Not Showing Up
If you’ve followed the integration steps but the Pipe recorder isn’t showing up in your Bubble.io application, here are some troubleshooting steps to help you resolve the issue:
- Check the “Wait to render this element until it is visible” Setting
- Navigate to the HTML element where the Pipe recorder is embedded.
- Ensure the “Wait to render this element until it is visible” checkbox is enabled. This setting helps optimize performance and ensures the Pipe recorder is loaded only when the element is visible on the page.
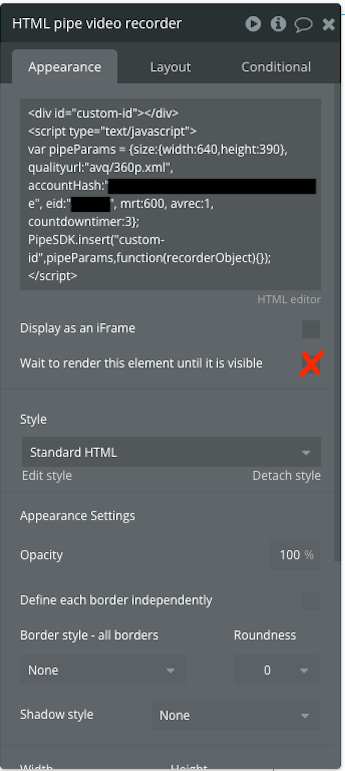
- If this option is not checked, the recorder may fail to initialize correctly, especially on pages with dynamic rendering.
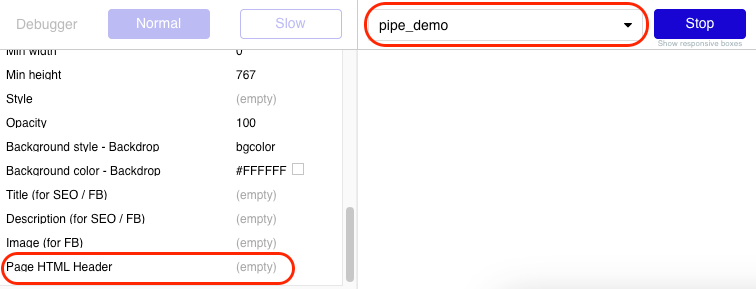
- Use Bubble’s Inspector
- If the recorder still isn’t showing, open Bubble’s Inspector to check whether the necessary scripts (pipe.js and pipe.css) are loaded into the page header.
- If the scripts are not loaded, the Pipe recorder will not render.
- Update Your HTML Integration Code
- If the scripts are missing, update your HTML element code to insert the Pipe recorder to ensure pipe.js and pipe.css are included.
- Use the following updated example code for your Pipe recorder’s HTML element, and make sure the “Wait to render this element until it is visible” option is still checked:
<div id="custom-id"></div>
<script type="text/javascript">
  // Pipe.css
  const link = document.createElement("link");
  link.rel = "stylesheet";
  link.href = "https://cdn.addpipe.com/2.0/pipe.css";
  // Pipe.js
  const script = document.createElement("script");
  script.type = "text/javascript";
  script.src = "https://cdn.addpipe.com/2.0/pipe.js";
  // Run the code after the script loads
  script.onload = function () {
    var pipeParams = { size: { width: 640, height: 390 }, qualityurl: "avq/360p.xml", accountHash: "YOUR_ACCOUNT_HASH", eid: "YOUR_EID", mrt: 600, avrec: 1, countdowntimer: 3 };
    PipeSDK.insert("custom-id", pipeParams, function (recorderObject) {});
    // Add other custom code only inside this function
  };
  // Append pipe.css and pipe.js to the head
  document.head.appendChild(link);
  document.head.appendChild(script);
</script>- Verify the Fix
After updating the HTML code and ensuring the “Wait to render this element until it is visible” checkbox is checked, reload your Bubble application. You should now see the Pipe recorder being appropriately displayed.
This is the end of the first part of this tutorial. In the second part, we will go through the process of creating the dashboard to be able to review all the video KYC of the users.
Please let us know what you think about the Pipe Video Recorder and if you have any questions, don’t hesitate to contact us. We’ll be happy to help you!