
Supercharge Your Qualitative Research Toolbox with Video Surveys Using Pipe Video Recorder and Qualtrics XM
Updated April 2025
In a data-driven world, it's necessary to remember the importance of qualitative research. While analyzing large sets of data can help us explain the "What" behind a particular phenomenon, very rarely will that data also explain "Why" that phenomenon happens in the first place, which is where qualitative research shines.
Surveys are still one of the best ways to gather all the information from your target audience, and you can use many tools to implement them in the format that best fits your needs.
One problem with these tools is that it's not always easy to gather video responses, which are increasingly the go-to format for qualitative research.
This article will show you how to add multiple questions that require a video (or audio) answer to your Qualtrics XM survey and save the video answers along with the rest of your survey's response data.
Table of Contents
- Requirements
- Build your 1st Qualtrics survey that includes a video answer
- Use Qualtrics’ Embedded Data to collect the URLs of the video answers
- Using Pipe’s payload option to send the ResponseID to Pipe
- Simple Layout - New Survey Taking Experience
- Playing Back a Saved Recording Later in the Survey
- BONUS: Capture Audio Only Recordings in your Qualtrics Survey
Requirements
To follow this guide you will need an account with:
Although Qualtrics provides a free account and a free 30 days trial of DesignXM, to follow this guide and add a Pipe video recorder to your survey, you will need a paid Qualtrics account, which includes the ability to add custom code/JavaScript. Adding JavaScript to your Qualtrics survey is a paid Qualtrics feature, and it is required to add the Pipe recording client to a survey.
So if you have a paid Qualtrics account, keep reading. Otherwise, visit our integrations page for the complete list of alternative tools. We have written guides for several other survey and form tools.
Build your 1st Qualtrics survey that includes a video answer
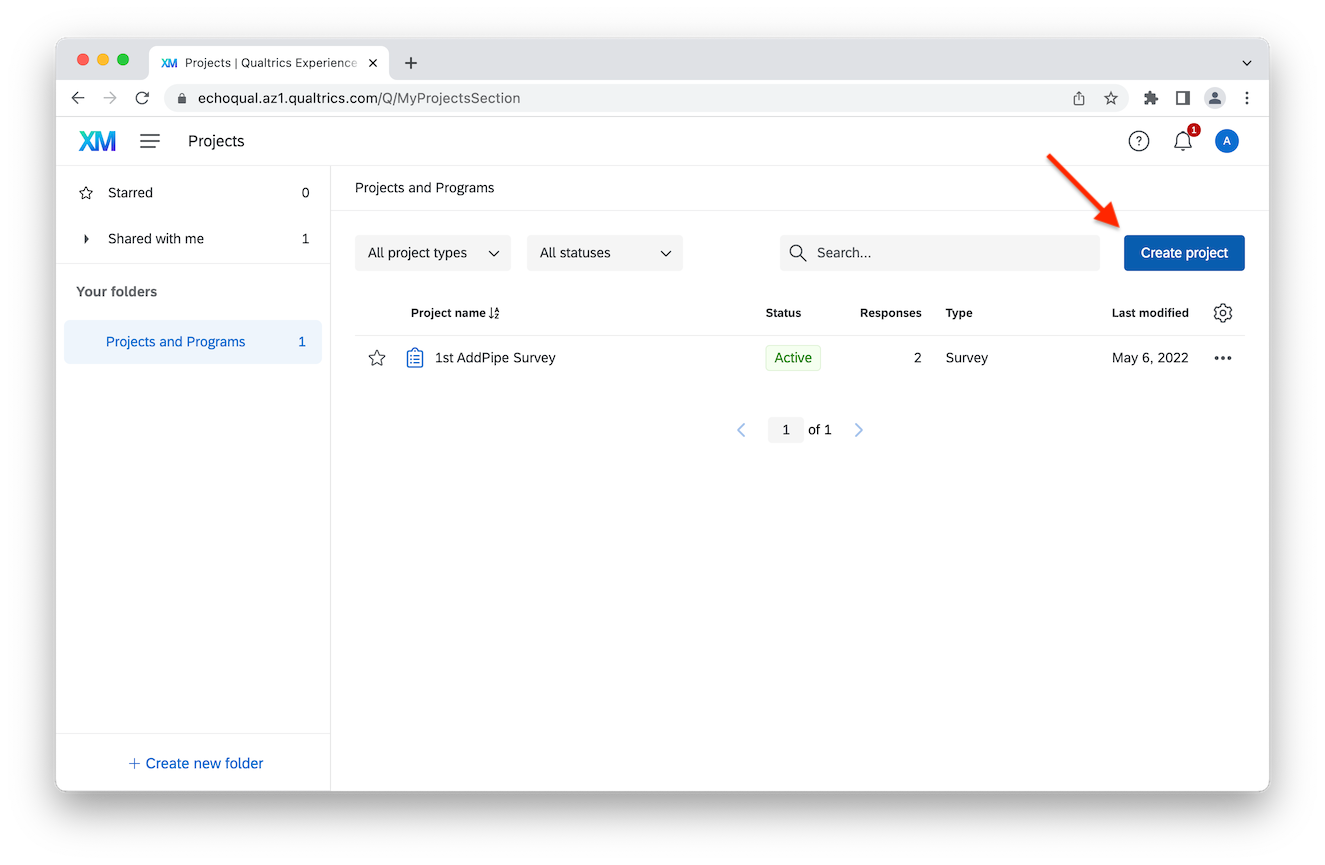
Create a new survey
To start, from your Projects page, click on the Create New Project button at the right and select Survey. After choosing the name of your survey, click on Get Started, and you will be sent to the survey's editor. I will use a blank form for this tutorial, but feel free to use a template if that is better for you.
Prepare the survey to accept video inputs through the Pipe recording client
Now that we have our survey, we'll need to add the Pipe JavaScript library and its CSS stylesheet.
In your survey's editor, click on the Look and Feel button, go to General, and edit the Header. In the pop-up that will appear, click on the Source button/icon and add the following line:
<script type="text/javascript" src="//cdn.addpipe.com/2.0/pipe.js"></script> 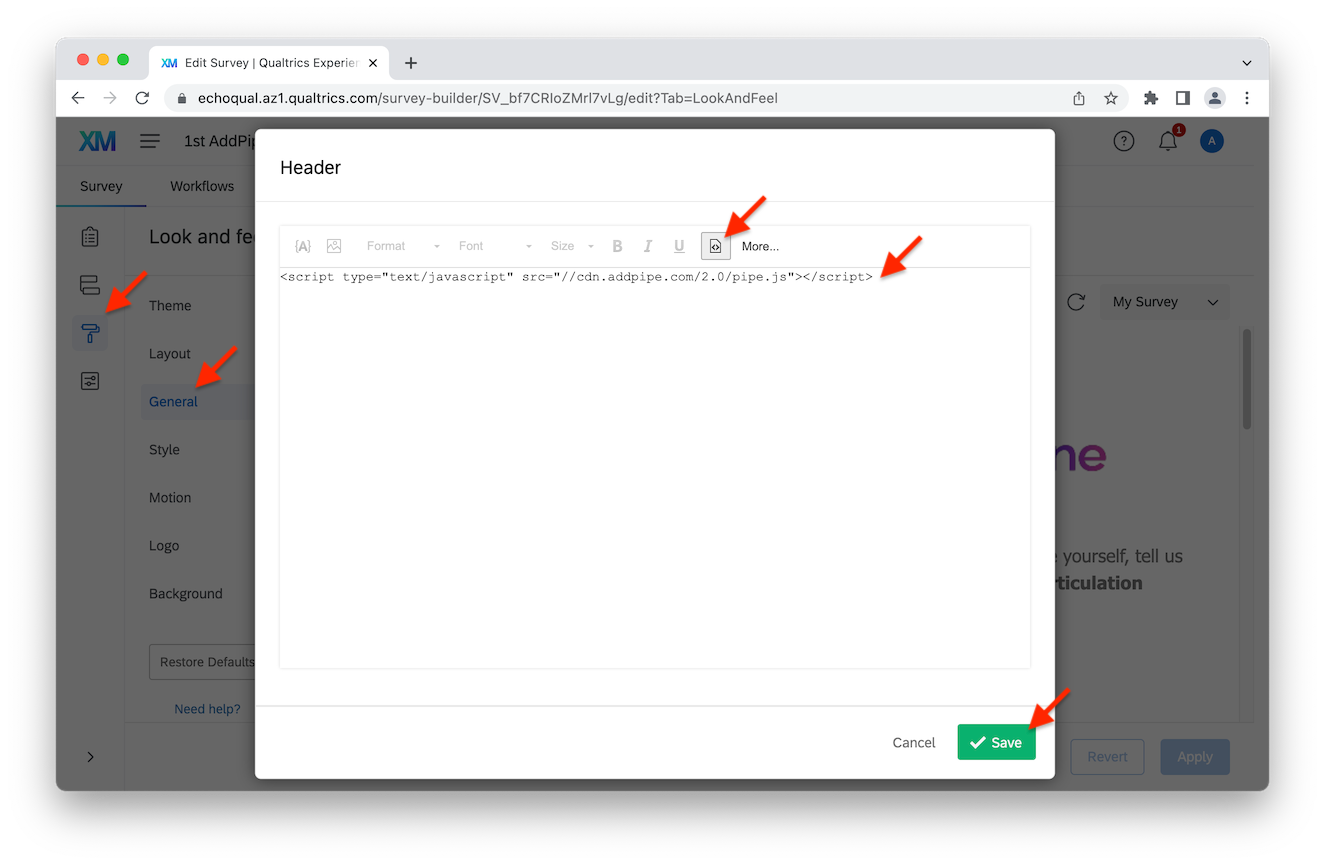
Back in the Look and Feel modal go to the Style section and add the following link in the External CSS field: https://cdn.addpipe.com/2.0/pipe.css.
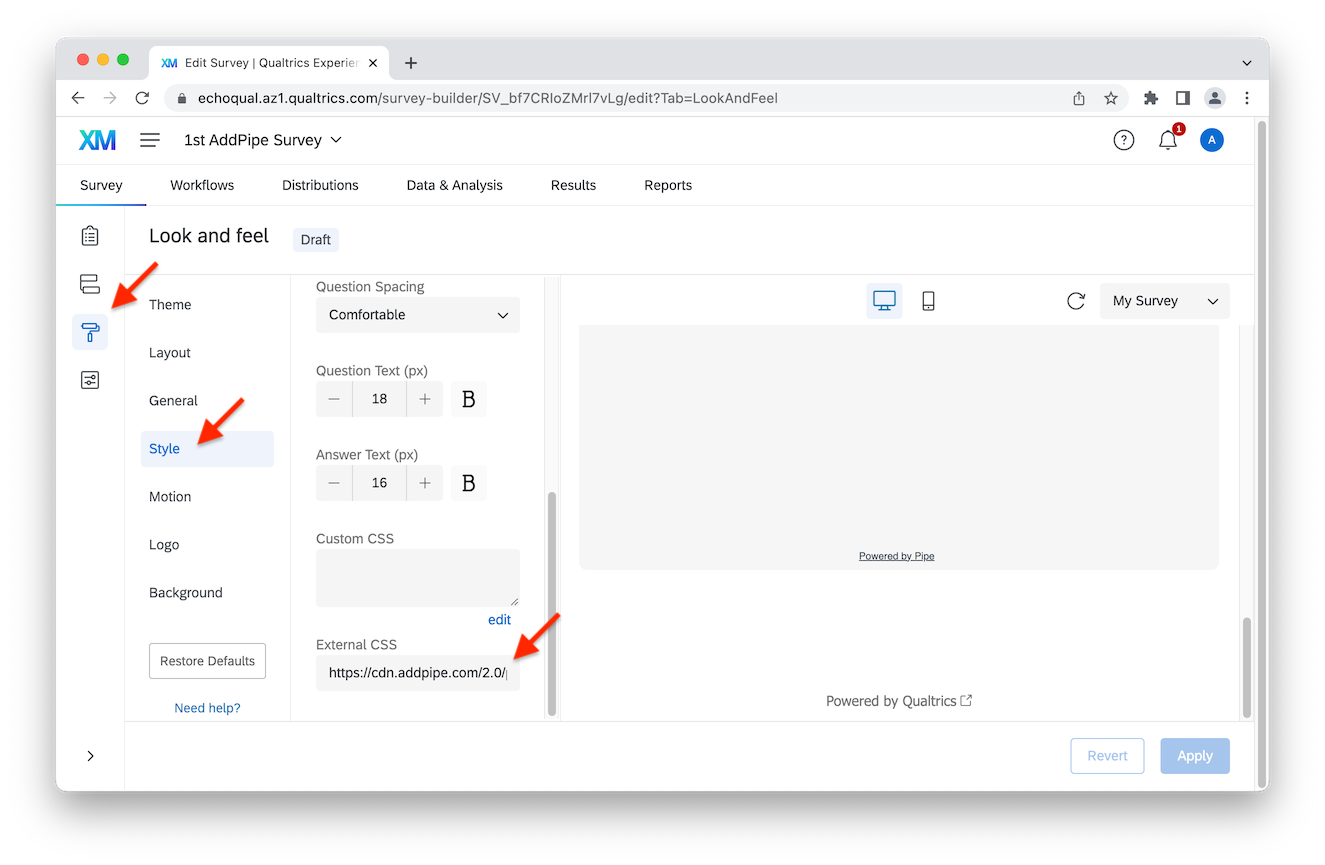
Note: the General and Style sections under Look & Feel are not accessible with a free Qualtrics account. You'll need a DesignXM trial or a paid account.
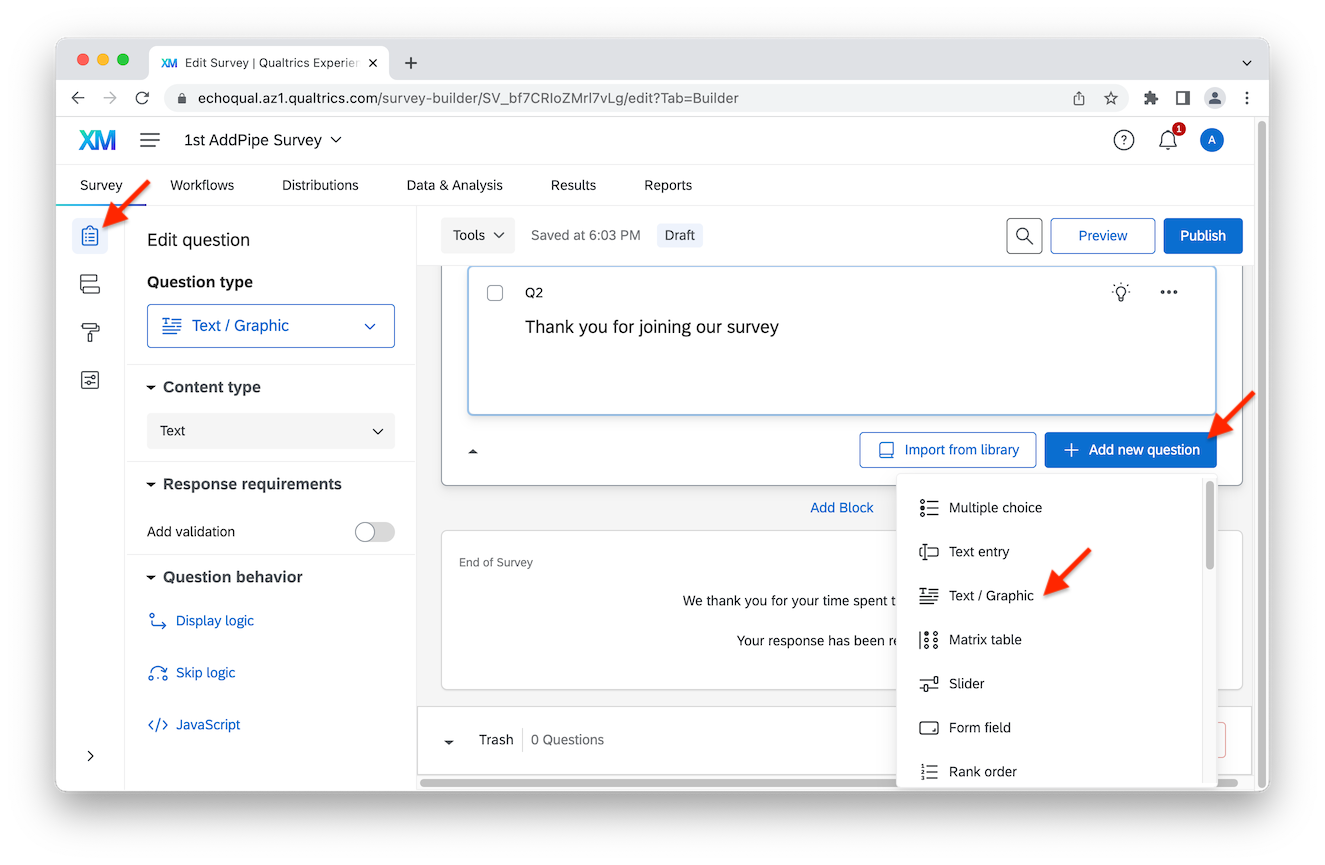
Add the 1st question that requires a qualitative video answer
Now we can go back to the survey builder and start adding our 1st question, which requires an answer using video (or audio).
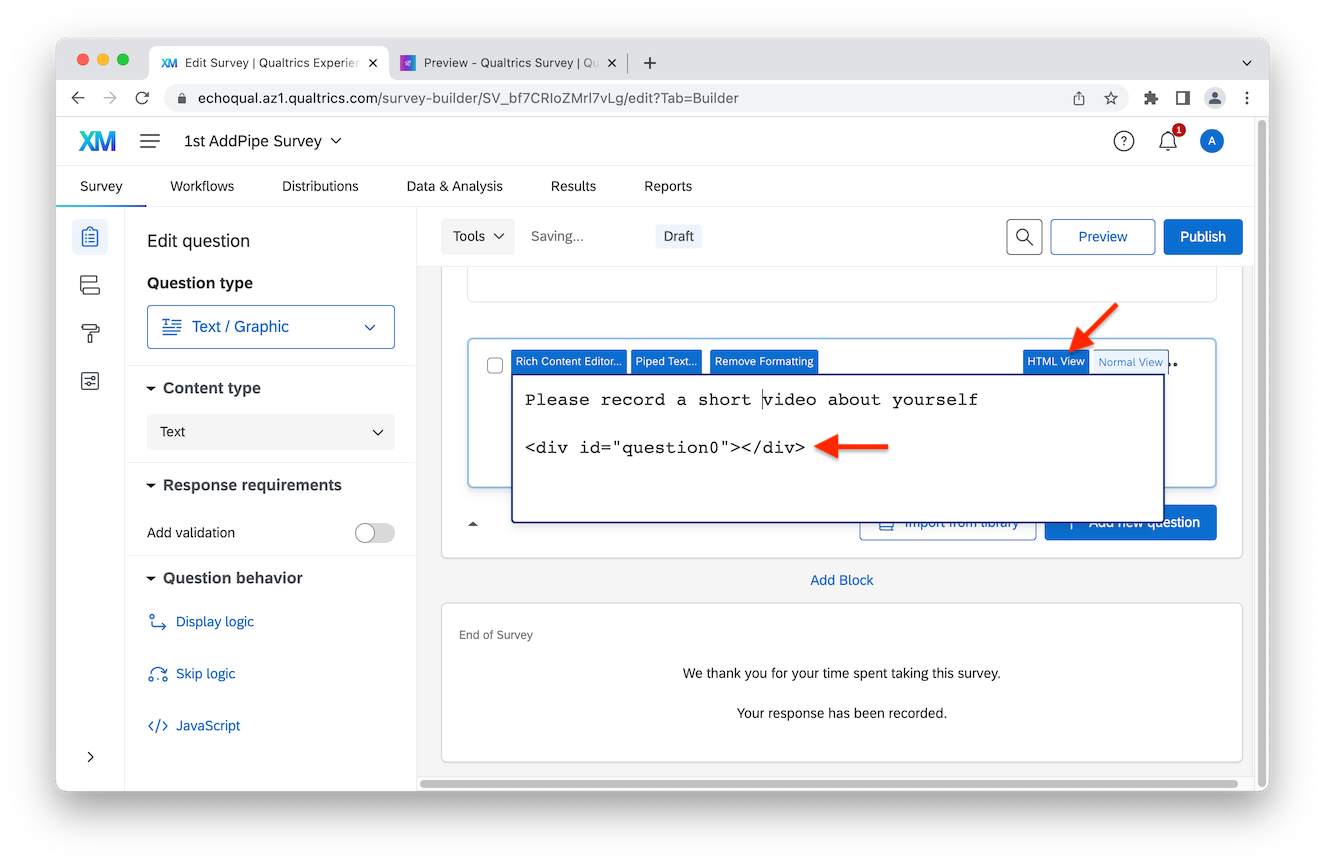
So, back in the survey builder, click on Add new question and add a Text / Graphic block. After typing your question, switch to HTML View and add the following HTML code:
<div id="question0"></div>This is the HTML div element we’ll replace with JavaScript later. It will be replaced with the actual rectangular audio or video recording client.
Here’s my HTML View:
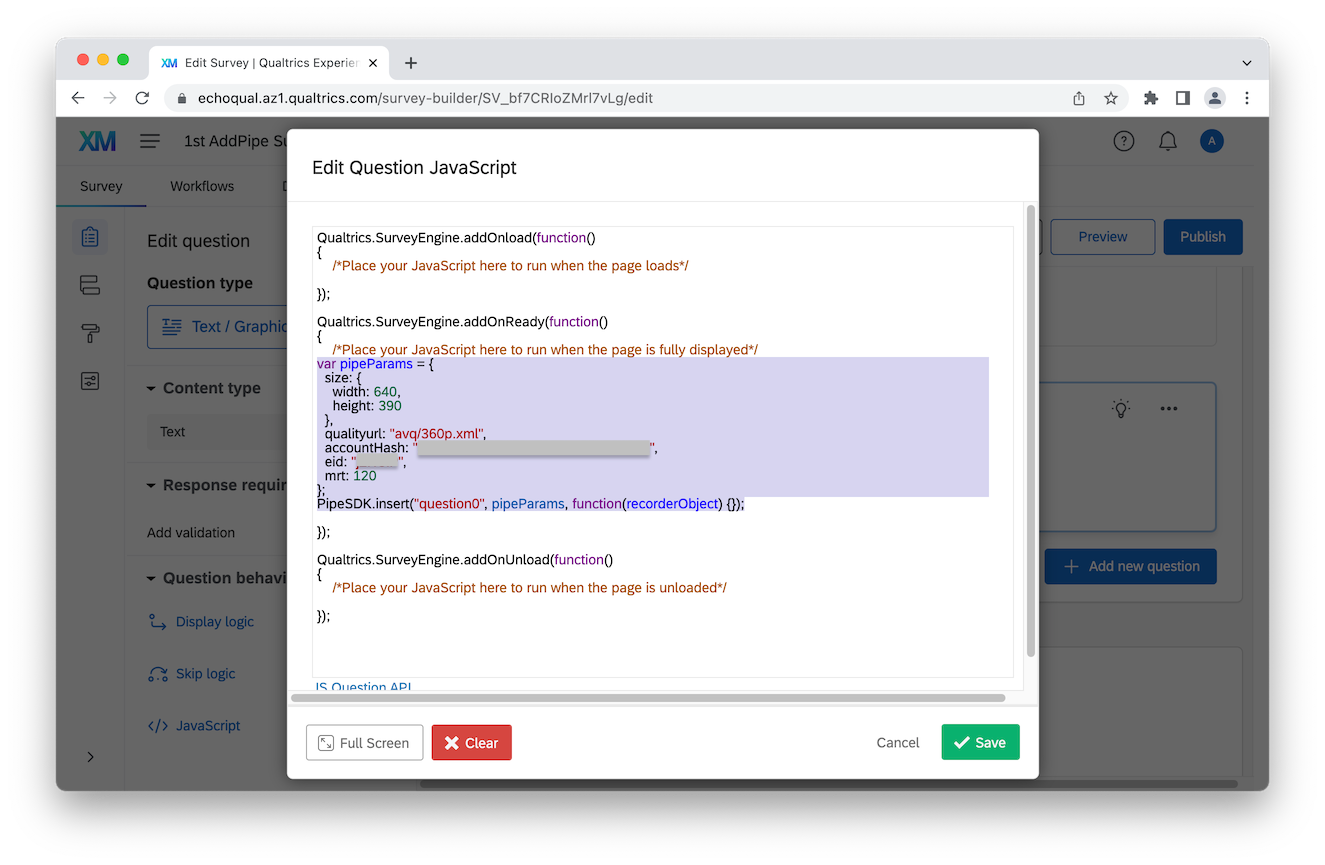
Next, let’s add the JavaScript. Click on the question and then on the JavaScript button at the bottom left under Question behavior.
In the modal that shows up, in the addOnReady function, paste the following code:
var pipeParams = {
  size: {
    width: 640,
    height: 390
  },
  qualityurl: "avq/360p.xml",
  accountHash: "ACCOUNT_HASH",
  eid: "ENVIRONMENT_ID",
  mrt: 120
};
PipeSDK.insert("DIV_QUESTION_ID", pipeParams, function(recorderObject) {});
Now, in the code above, you need to replace 3 parts:
- ACCOUNT_HASH with the account hash found on your account page
- ENVIRONMENT_ID with the alphanumeric environment id found on your environments page
- DIV_QUESTION_ID with the
<div>id used before (question0)
Once you’re done with the replacements, click on Save.
Here’s how my code looked:
You should now see the recording client in your survey preview. All recordings (audio or video) made with it will show up in the Pipe account dashboard’s Recordings section.
⚠️ Important:
Make sure to remove the recording client after the question is answered. For this, the following code needs to be added inside Qualtrics.SurveyEngine.addOnUnload(function () { : PipeSDK.recorders["DIV_QUESTION_ID"].remove(); This is how it will look:
Qualtrics.SurveyEngine.addOnUnload(function () {

  /*Place your JavaScript here to run when the page is unloaded*/
  PipeSDK.recorders["DIV_QUESTION_ID"].remove();
});
Add two more questions that require video answers to the survey
To add more questions that require a video or audio answer, you will need to repeat what we did in the previous section. For our survey, we'll add 2 more Text / Graphic questions. In each question, add the actual question text, switch to HTML View, and add the HTML DIV element to be replaced with the recording client. I have added the following:
<p>Tell us a bit more about you</p>
<div id="question1"></div>
<p>Tell us a bit more about a project that made you grow</p>
<div id="question2"></div>With the questions up, you’ll have to add the JS code we used before and place it inside each question’s JS field.
Don’t forget to replace the ACCOUNT_HASH, ENVIRONMENT_ID , and DIV_QUESTION_ID with the proper values in the JS code. Our DIV question ids this time are question1 and question2.
Use Qualtrics’ Embedded Data to collect the URLs of the video answers
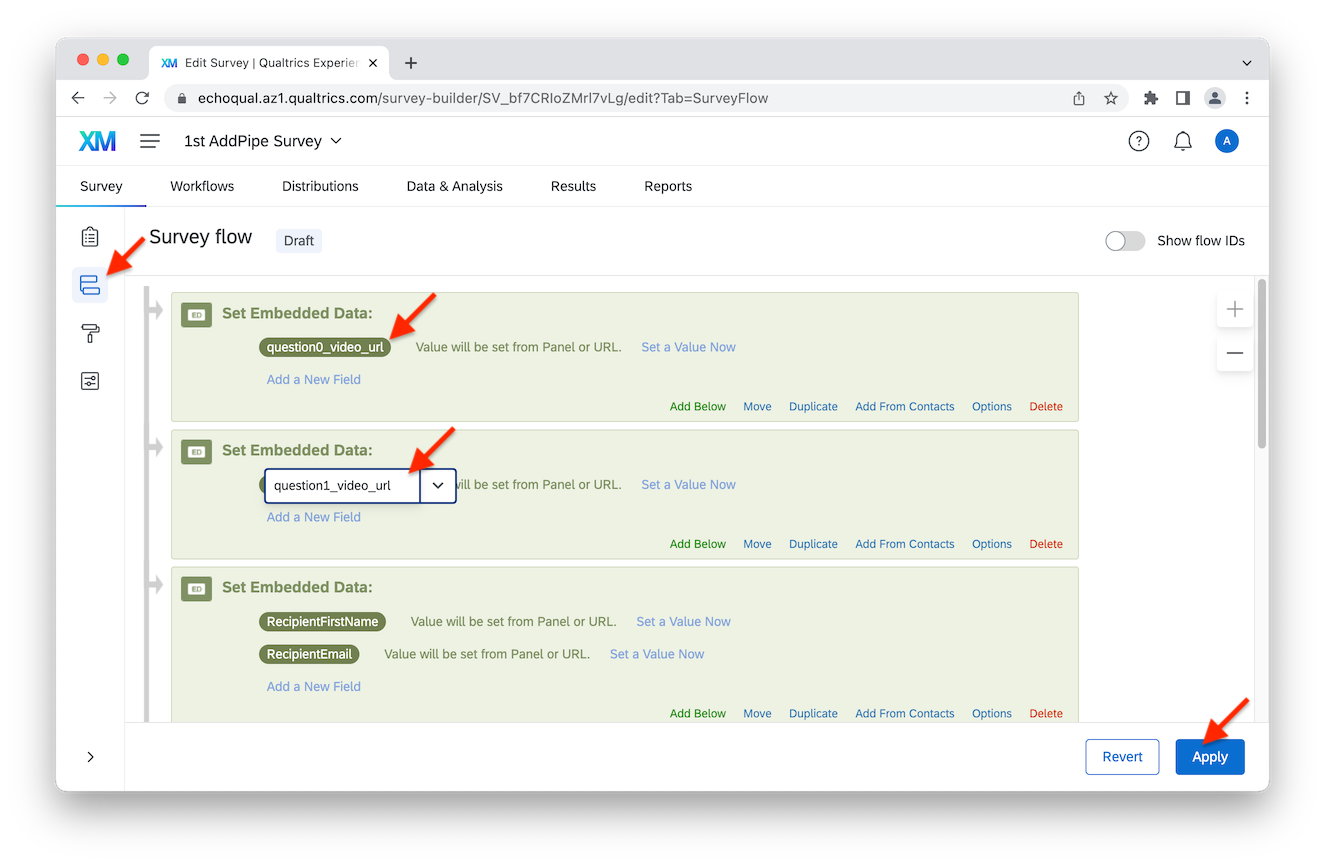
In the Survey flow section, you can add objects known as Embedded Data, then assign them values using JS code. We will use these objects to store the URLs of the video answers and save them along with all the other survey's responses.
So click on Survey Flow and add a new Embedded Data element by clicking on the Add a New Element Here or Add Below. Give it a name to identify it in your survey responses.
I’ve named mine “question0_video_url”.
Do not set a value for it as we’ll set one dynamically. You can go ahead and add one Embedded Data element for each recorder in the survey. Should you need additional info about Embedded Data elements you can find the official Qualtrics documentation at this link. With your new element added, click Apply in the bottom right.
Now let’s add the JS code that populates our new Embedded Data element with a value. Back in the Survey Builder, click on the JS/code icon for your 1st question, you should see your previously added JS code.
Qualtrics.SurveyEngine.addOnReady(function() {
  /* Place your JavaScript here to run when the page is fully displayed */
  var pipeParams = {
    size: {
      width: 640,
      height: 390
    },
    qualityurl: "avq/360p.xml",
    accountHash: "ACCOUNT_HASH",
    eid: "ENVIRONMENT_ID",
    mrt: 120
  };
  PipeSDK.insert("question0", pipeParams, function(recorderObject) {});
});
In the JS code: replace the line
PipeSDK.insert("question0",pipeParams,function(recorderObject){});with
PipeSDK.insert("question0",pipeParams,function(recorderObject){
    recorderObject.onSaveOk = function(recorderId, streamName, streamDuration, cameraName, micName, audioCodec, videoCodec, fileType, videoId, audioOnly, location){
        //onSaveOK is part of the desktop recorder's JS events API (recording from camera or screen)
        var args = Array.prototype.slice.call(arguments);
        console.log("onSaveOk("+args.join(', ')+")");
        Qualtrics.SurveyEngine.setJSEmbeddedData("question0_video_url", "https://"+location+"/ACCOUNT_HASH/"+streamName+".mp4");
    };
    recorderObject.onVideoUploadSuccess = function(recorderId, filename,filetype,videoId,audioOnly,location){
        //onVideoUploadSuccess is part of the native mobile recorder's JS events API (upload new or existing recording)
        var args = Array.prototype.slice.call(arguments);
        console.log("onVideoUploadSuccess("+args.join(', ')+")");
        Qualtrics.SurveyEngine.setJSEmbeddedData("question0_video_url", "https://"+location+"/ACCOUNT_HASH/"+filename+".mp4");
    };
    recorderObject.onDesktopVideoUploadSuccess = function(recorderId, filename, filetype, videoId, audioOnly, location){
        //onDesktopVideoUploadSuccess is part of the desktop recorder's JS events API (upload existing file from desktop)
        var args = Array.prototype.slice.call(arguments);
        console.log("onDesktopVideoUploadSuccess("+args.join(', ')+")");
        Qualtrics.SurveyEngine.setJSEmbeddedData("question0_video_url", "https://"+location+"/ACCOUNT_HASH/"+filename+".mp4");
    };
});
⚠️ Important:
If your survey is using Qualtrics’ Simple Layout (explained below), you must use setJSEmbeddedData (like in the code above), not setEmbeddedData. Otherwise, you will encounter the following console error: setEmbeddedData deprecated, please use setJSEmbeddedData (https://api.qualtrics.com/82bd4d5c331f1-qualtrics-java-script-question-api-class#methods) .
The above code makes use of Pipe’s JS Events API. It is quite hefty because it covers all 3 possible scenarios:
- record through the desktop recorer (onSaveOk)
- upload through the desktop recorder (onDesktopVideoUploadSuccess)
- upload through the mobile recorder (onVideoUploadSuccess)
In each scenario/function, we populate the Embedded Data element with the final URL to the newly recorded/uploaded recording.
In the above code, you need to replace:
- The ACCOUNT_HASH with the correct value for your account, you'll find it in the account section of your account dashboard.
- If you’ve used a different name for your Embedded Data element, replace question0_video_url in the code above with the name you chose.
⚠️ Important:
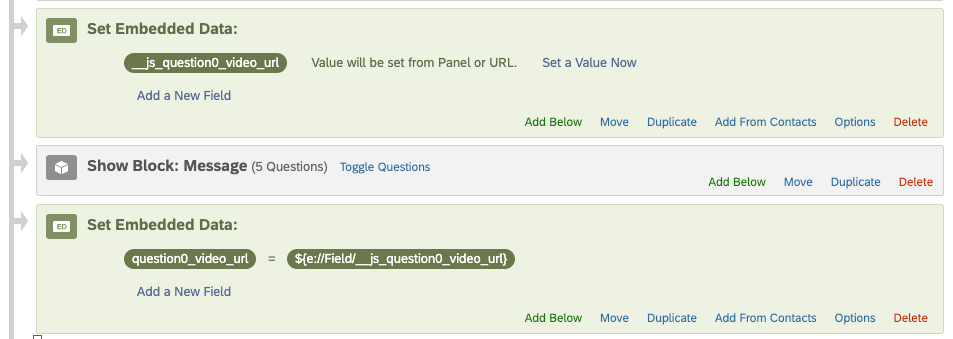
When using setJSEmbeddedData, your key will automatically have a __js_ prefix. For example, if you set: Qualtrics.SurveyEngine.setJSEmbeddedData("question0_video_url", recordingURL); , it will be saved under the key __js_question0_video_url. If you want to use the value without the __js_ prefix, you can assign it manually in the Survey Flow using a Set Embedded Data action, like in the following image:
The Embedded Data values will show up in your Qualtrics survey results and in the exported results data. Here's the Qualtrics Results section showing the 3 clickable URLs to the 3 video answers made by the 3 responders to this demo survey.
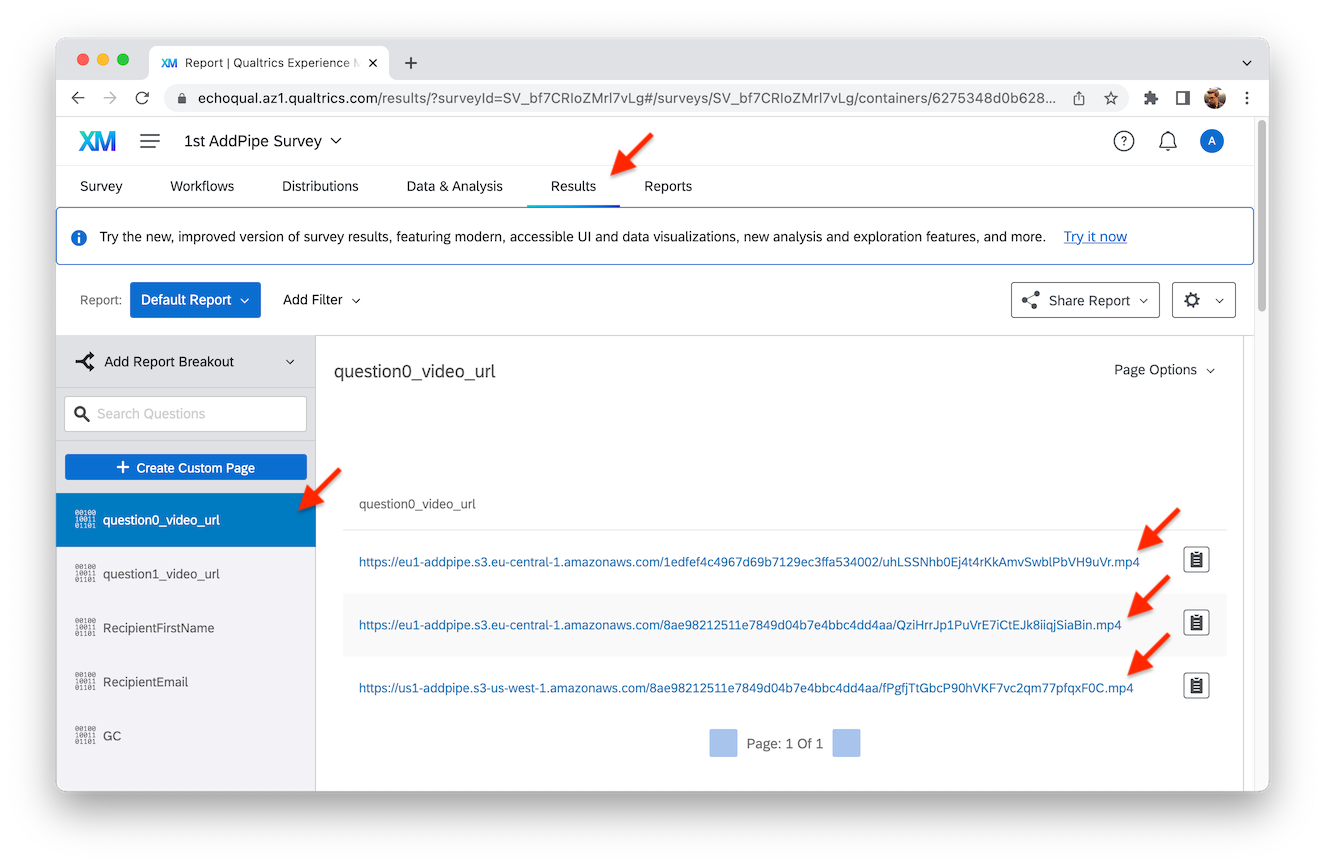
The above recording URLs point to the final processed .mp4 recordings as stored by us. If you're using your own storage, the URL will be different and you need to adapt the URL.
Also, it takes time to process recordings and push them to our and your storage, so keep in mind that the final, processed .mp4 recording will not be available on our or your storage immediately after recording/uploading. Bigger recordings are slower to process.
Making the video answer mandatory
Now that the recorder is shown in the survey and the recording URL will be present in the survey results, you may want to make the video answer mandatory.
You can do that by hiding the NEXT button to prevent the user from moving to the next survey section until he completes one video answer.
Let's start by hiding the NEXT button. Adding these 2 lines of code below immediately after the Qualtrics.SurveyEngine.addOnReady(function() { line will do the job.
var qobj = this;
qobj.hideNextButton(); //hides the NEXT button by default
With the NEXT button hidden we now have to activate it when a recording is made. In the JS code of the question that you want to trigger the activation of the NEXT button add the following line:
qobj.showNextButton();before the closing curly bracket of the following functions:
recorderObject.onSaveOkrecorderObject.onVideoUploadSuccessrecorderObject.onDesktopVideoUploadSuccess
With the changes above, the NEXT button is activated under all 3 scenarios (desktop recording, desktop upload, mobile upload).
Automatically Proceeding to the Next Question After Recording
To streamline the survey experience and ensure participants cannot re-record their answers, you can program the survey to automatically move to the next question once a recording is completed. This removes the need for users to manually click the “NEXT” button and eliminates the possibility of re-recording their response.
Here’s how to implement this functionality:
- In the JavaScript code of the question where the recorder is embedded, locate the event handler for when a recording is successfully saved:
recorderObject.onSaveOk
- Add the following line of code before the closing curly bracket of the function:
qobj.clickNextButton(); // Automatically moves to the next question
This ensures that as soon as a recording is saved successfully, the survey automatically proceeds to the next question.
Important Note
Make sure to place all the custom code shown above inside the Qualtrics.SurveyEngine.addOnReady function; otherwise, it will not work. Your JS code should have this structure:
Simple Layout - New Survey Taking Experience
In Qualtrics, the Simple Layout, referred to as the New Survey Taking Experience, is a streamlined design option aimed at enhancing usability, especially on mobile devices. It modifies how the survey is rendered and affects the compatibility of some JavaScript methods.
Key Features of the Simple Layout
- Overall usability: Modernized user interface of surveys to meet evolving web design standards, as well as the latest AI enhancements, powered by an updated web framework.
- Mobile-friendly: Surveys are optimized for mobile use, meeting respondents where they are and setting the foundation for the interaction models of the future.
- Accessibility: Surveys meet WCAG 2.1 AA accessibility standards for key features, the complete list of which can be found in Overview of Improvements.
- Additional question types: Access additional question types, such as the Solicit Reviews Question.
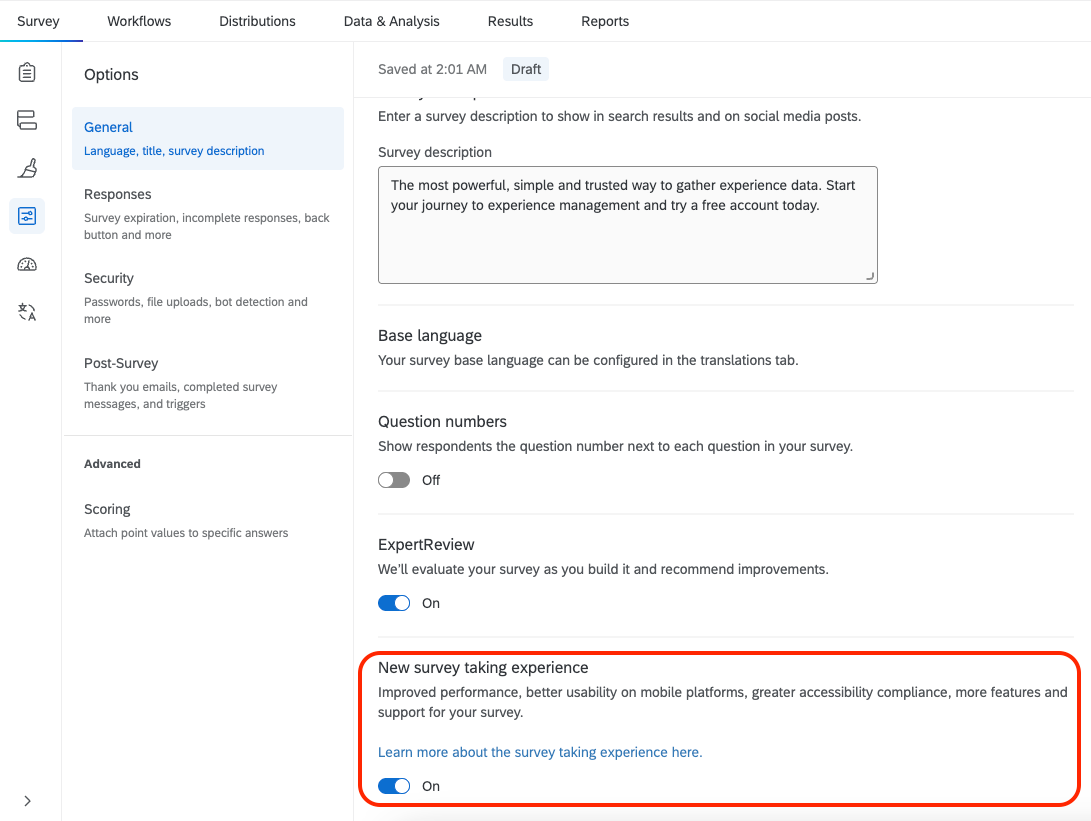
How to Determine if a Survey is Using the Simple Layout
- Access the Survey: Log in to your Qualtrics account and open the survey in question.
- Navigate to Look & Feel: Click on the Look & Feel tab in the survey editor.
- Check for Upgrade Prompt: If you see a prompt or option labeled “Upgrade to the new survey taking experience”, your survey is currently not using the Simple Layout.
- Survey Options: Alternatively, go to Survey Options, then the General tab. If there’s a toggle for the new experience, its status will indicate whether the Simple Layout is active:
Using Pipe’s payload option to send the ResponseID to Pipe
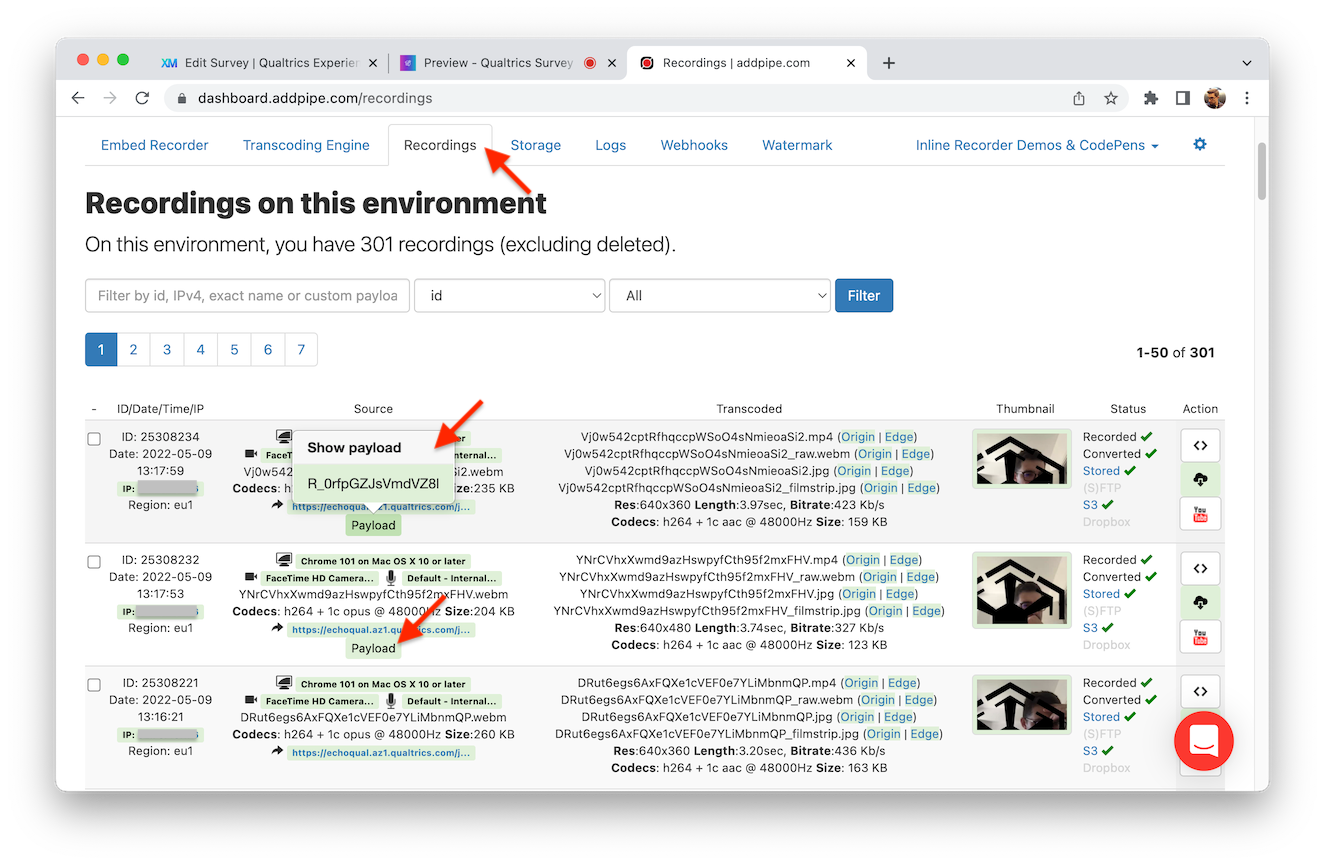
Now that we have the final recording URLs in the Qualtrics backend, there's still one thing we can do. Pipe offers an account dashboard where you can view all recordings. Pipe also offers webhook and REST APIs that make further integrations possible. We can attach some data - like the Qualtrics ResponseID - to each recording so that in the Pipe dashboard or through the Pipe APIs, we can distinguish between recordings coming from different survey questions.
To attach the ResponseID to each recording we’ll have to edit a bit the JS code we used before. Namely, you’ll have to edit the pipeParams object:
var pipeParams = {
  size: {
    width: 640,
    height: 390
  },
  qualityurl: "avq/360p.xml",
  accountHash: "ACCOUNT_HASH",
  eid: "ENVIRONMENT_ID",
  mrt: 120
};
And add the payload property and give it the value of ${e://Field/ResponseID}. Here’s my code after adding it:
var pipeParams = {
  size: {
    width: 640,
    height: 390
  },
  qualityurl: "avq/360p.xml",
  accountHash: "ACCOUNT_HASH",
  eid: "ENVIRONMENT_ID",
  mrt: 120,
  payload: "${e://Field/ResponseID}"
};
Here’s the ResponseID shown in the Pipe account area’s list of recordings:
Playing Back a Saved Recording Later in the Survey
After capturing a recording with Pipe and saving the URL using setJSEmbeddedData, you can play it back in a future question.
Here’s how to embed it into your question’s HTML editor:
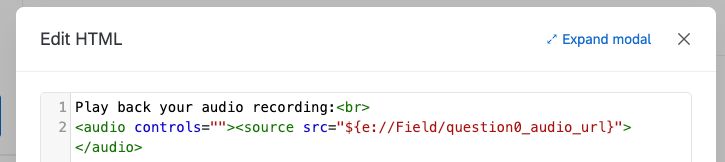
And here is how it will look like:
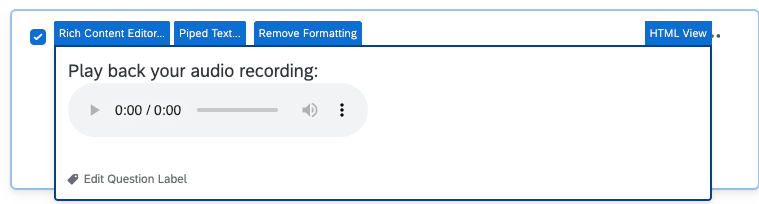
Example code for audio playback:
<audio controls>
  <source src="${e://Field/__js_question0_audio_url}">
</audio>
Example code for video playback:
<video width="640" controls>
  <source src="${e://Field/__js_question0_video_url}" type="video/mp4">
</video>
💡 Tip: Remember that the embedded data field will have the __js_ prefix automatically added if you didn't assign the value to another embedded data variable before.
BONUS: Capture Audio Only Recordings in your Qualtrics Survey
We have covered how to use the Pipe Recording Client to capture video in a Qualtrics survey, but did you know that you can also capture audio-only recordings with Pipe? Audio recordings are an excellent addition to your survey toolbox, especially if you are concerned about the privacy of your interviewees or if video is not an option/not needed and you want to get only audio recordings.
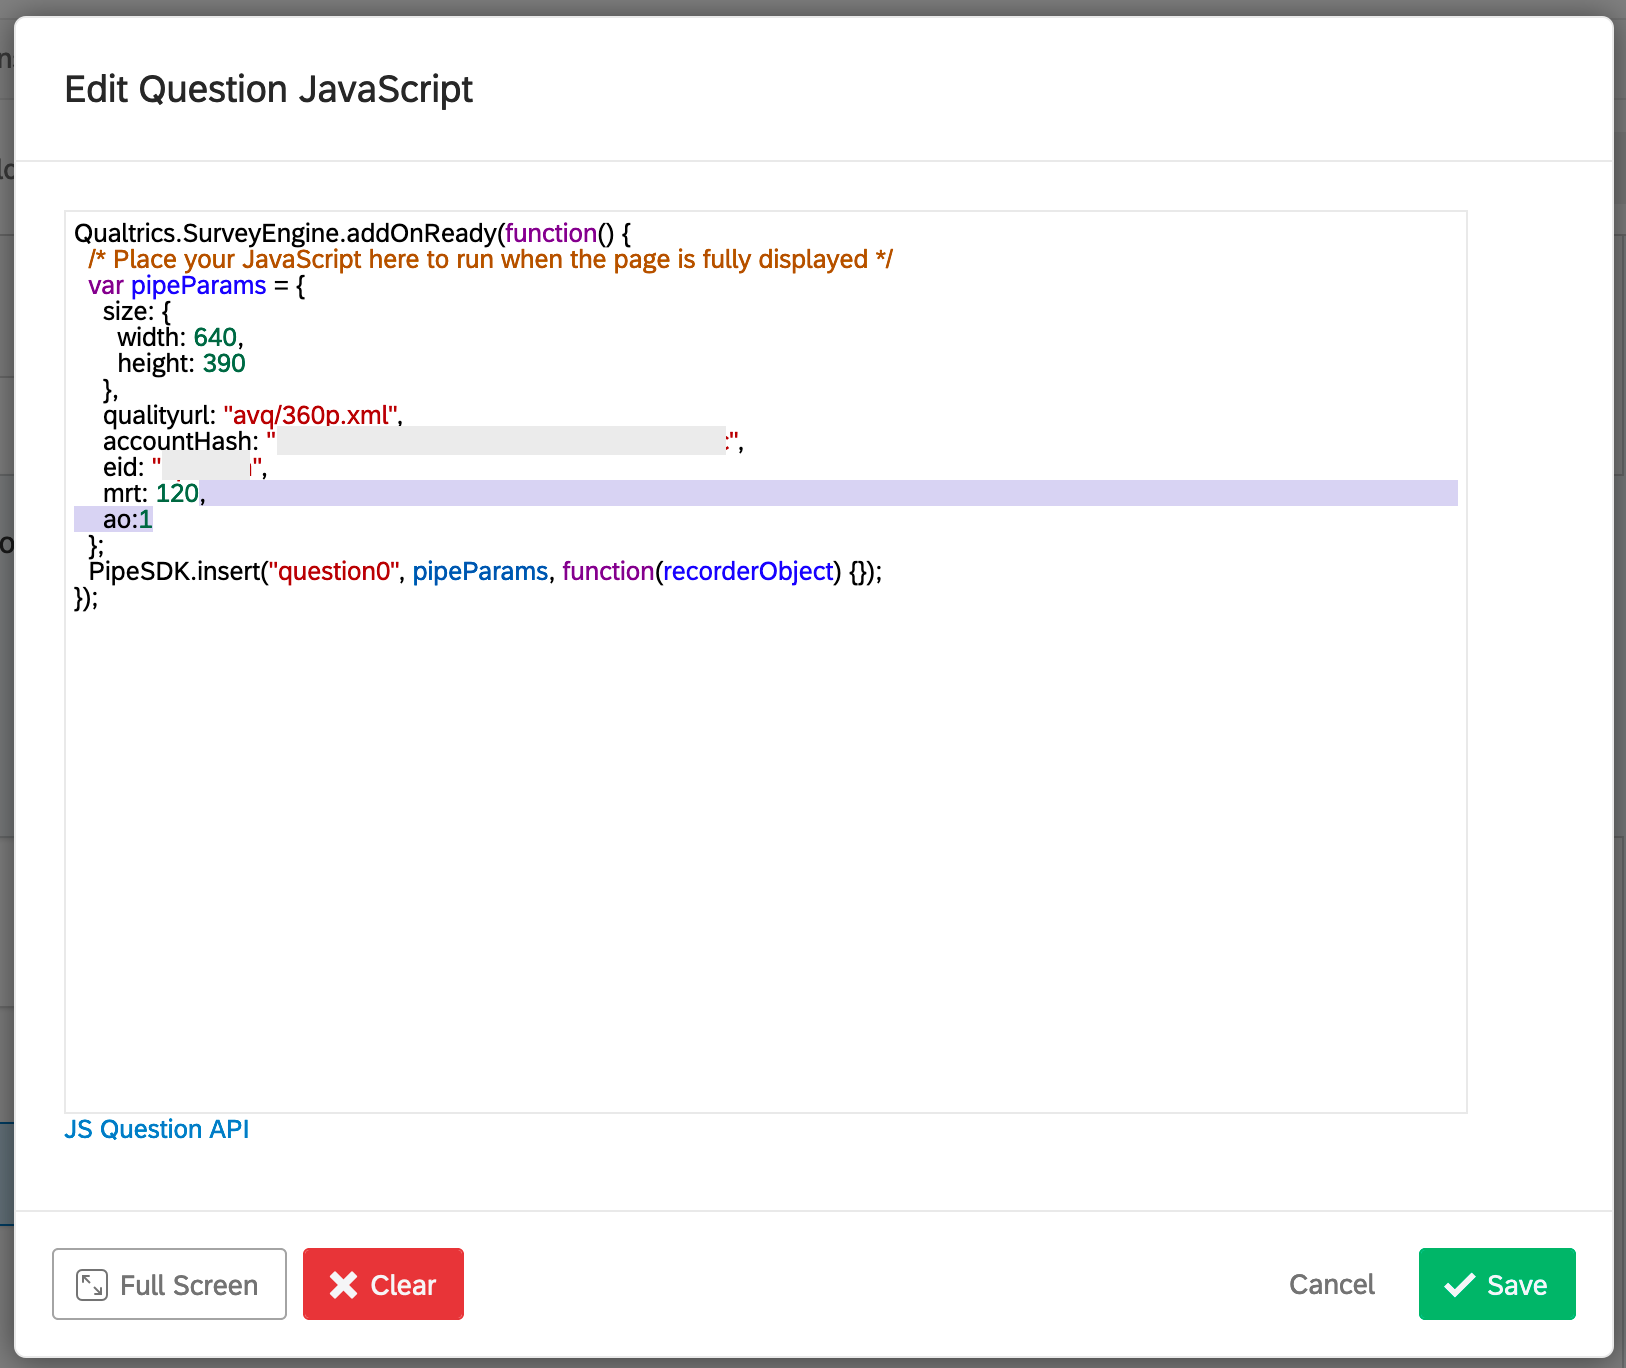
To add an audio recorder to your Qualtrics survey, you have to follow the same process as described in the "Build your 1st Qualtrics survey that includes a video answer" but with an extra line for the pipeParams object. When editing the JS code, add a comma and an ao key with a value of 1 to the pipeParams object (as shown in the image below), and you will turn the video recorder into an audio only recorder.
We are done!
Please let us know what you think about the Pipe x Qualtrics integration and if you have any questions, don’t hesitate to reach out to us or contact us through the messenger option available in the Pipe account dashboard. We’ll be happy to help you!