
How to build a no-code video testimonials page in 30 minutes using Webflow and Pipe Video Recorder
Learn how to use Pipe Video Recorder and Webflow to create a video testimonials page.
If you are thinking about starting an online business, one of the most difficult tasks is going to be making your visitors trust you so that they will be willing to buy from you. This becomes especially hard when you are just starting out and maybe you have only a few customers.
What can you do then to make your website more trustworthy? The list is actually quite long, but one of the most popular yet very effective tricks is to add testimonials to your website.
But here’s the caveat: everybody today has text-based reviews or even pictures that are so easy to fake. If you don’t believe me, just go to This Person Does Not Exist where you can find endless pictures of people created by an artificial intelligence who don’t actually exist.

So, even if you have an established business, your testimonials may not have the same effect they had in the past and making sure your trustworthiness is not destroyed over time should always be on top of your list of priorities.
In this article, we will go through why video testimonials may be a good solution to the issues mentioned above and how to quickly implement them even if you don’t have any coding skills
Table of Contents
- The case for video testimonials: social proof 2.0
- No code toolbox: Pipe Video Recorder and Webflow
- Creating a new Webflow project
- Integrating Pipe Video Recorder in your Webflow website
- Add your video testimonials to your Webflow website
- Making the video testimonials page mobile-friendly
- We are done!
The case for video testimonials: social proof 2.0
“A picture is worth 1000 words” it’s such a clichè but still so true when it comes to effectively delivering a message. That’s because, according to studies, it seems that people tend to remember visual information better than oral information and even more visual and oral information together. Translated: videos win over pictures and audios when it comes to making sure that people remember whatever message you are delivering to them.

When you add testimonials to your website you are leveraging a psychological and social phenomenon defined as Social Proof by Robert Cialdini in his book Influence: The Psychology of Persuasion (which by the way is a must-read). Social Proof basically consists of “people copying the actions of others in an attempt to undertake behaviour in a given situation” where the others can be experts or celebrities recommending a product or service, other peers or certified third parties (read this great article from Buffer to learn more). Social Proof 2.0 with video testimonials adds a layer of authenticity on top of all that which has a positive effect on your overall trustworthiness.
Ok, the theory is over, let’s put all that into practice!
No code toolbox: Pipe Video Recorder and Webflow
To get started you will need to create an account with:
Although Webflow offers a free account, we will need to be able to add some snippets of code into our page through their Embed feature and for that, a paid Webflow plan is required. So if you don’t have one already, you can find the best plan to fit for your needs on their pricing page. We went with the Site Plan because it was the cheapest way to have access to the Embed feature but your needs might differ.
Pipe offers a 14 days free trial, signing up takes just 1 minute and no credit card is required, so this part should be pretty straightforward.
Creating a new Webflow project
Now that you have access to your Webflow account, go to Dashboard and click on the blue button on the top right corner of the screen called + New Project. You will need to choose a template or a Blank Site where you can build your page from scratch. I have chosen the latter. After selecting the Blank Site option you will be prompted to add your Project Name and by clicking the Create Project button you will be redirected to the Webflow Editor.

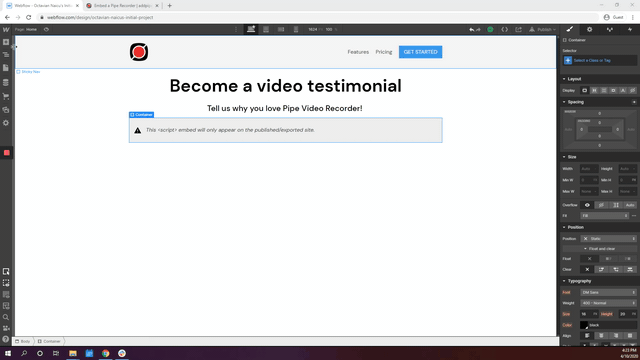
To prepare my new video testimonials page I have added the following elements to it:
- A Navbar
- An H1 Heading (Become a video testimonial)
- An H5 Heading (Tell us why you love Pipe Video Recorder)
If you don’t know how to do that the Webflow 101 crash course is what you need to take first in order to get the basics.
Integrating Pipe Video Recorder in your Webflow page
Now, in order to integrate the Pipe Video Recorder, we will need to add a Container element below our last H5 Heading and after that, we will need to drag an Embed element and drop it within the Container we just added. To do that, click on the + button on the top left part of the Webflow editor and pick the elements from the panel that will pop up.
After placing the Embed element, a new window will be opened where you will need to paste the video recorder embed code

To get the recorder embed code, go to the Embed Recorder section in your Pipe Account Area, select the Options that best fit your needs, click on the Generate Embed Codes button and copy the 2.0 HTML embed code from the bottom-right section of the page and paste it in the HTML Embed Code Editor window in Webflow.

Now you should have the Pipe recorder embed code placed correctly in the Embed element within the Webflow editor, but before moving to the next part we need to make a small change to the code we just pasted in order to make the width of the recorder relative rather than absolute so that it will adapt to different screen sizes. To do that we just need to change the pipe-width attribute to the value “100%”.

Let’s see if everything is working as expected. To do that, we will need to:
- Publish the video testimonials page.
- Check if the Pipe Video Recorder is present on the page.
- Record a video to test if it is saved in the Recordings section of the Pipe Account Area.
To start, go to the top right corner of the Webflow editor and hit the Publish button, select the domain where you want to push the changes (you can use the default subdomain Webflow generates for you) and click the Publish to Selected Domains blue button.
Great, your new page is now live!
To see the page click on the little icon (the square with the little arrow) next to the domain you chose before and you will be redirected to your new video testimonials page. On this page, for now, we only have our Pipe Video Recorder. Now it’s time to record our first video. Just click Record Video on the recorder, allow the browser to access your camera and microphone and start recording by clicking the red button on the bottom left corner of the recorder. After a few seconds stop the recorder and you will see a “Saved” message on the screen. That means our video has been saved for processing by the Pipe platform and now it can be accessed privately from the Recordings section in the Pipe Account Area.

Add your video testimonials to your Webflow page
Let’s now jump to the core of this tutorial: adding our video testimonials to our page.
Let’s start by creating a new section on the page where we will display all the video testimonials we will get through the video recorder we placed on the page.
For that, we need a new H1 Heading element below the Embed element where we placed the Pipe Video Recorder. I called this section “They already love us” but you can type whatever you want.
Let’s now add a new Container element below the H1 Heading, and let’s drop a Grid Element inside the Container element. When you drop the Grid element in the Webflow editor you will be able to set it up with the number of rows and columns that best fit your needs. I decided to keep the default 2x2 grid settings.
If you want to learn more about Grids you can take this Grid 2.0 layouts in Webflow course where everything is explained in detail.
Once you are happy with the Grid settings, click the “Done” button at the bottom of the page and the Grid will change colour. This means that now we can place other elements within it.
This is exactly what we are going to do next. Let’s pick another Embed element from the left panel and let’s drop it within the Grid Element. In the window that will appear after you drop the Embed element, we will need to place the embed code of the video we recorded before which we can find in the Recordings section in the Pipe Account Area.
Let’s move to the Recordings section of the Pipe Account Area. In the page, you will see the list of all the video recordings you gathered through the video recorder in the video testimonials page (you should have only one for now). Go to the first recording and in the last column called “Action” you will find three buttons. Click on the < > button and in the next window copy the code you will find below the video.
The video player embed code for your recorded video should look like something like this:
<video poster="https://eu1-addpipe.s3.eu-central-1.amazonaws.com/e46b2e13d3f9901a691b00c/W3rU1.jpg" width="640" height="360" controls>
<source src="https://eu1-addpipe.s3.eu-central-1.amazonaws.com/e46b2e13d3f990d82W3S1jvhWDckj1.mp4" type="video/mp4">
Your browser does not support the video tag.
</video>
Now go back to the Webflow editor where you should still have the HTML Embed Code Editor window open and paste the code you just copied. The last thing is to adjust the values of the width and height attributes to make them relative rather than absolute so that the video will fill all the available space on the grid and it will adapt to the screen size (in the next section we will cover some other adjustments to make the page mobile friendly). In the code you just pasted, find the width and height attributes and change their values to 100%.
This is how the final code will look like.
<video poster="https://eu1-addpipe.s3.eu-central-1.amazonaws.com/e46b2e13d3f9901a691b00c/W3rU1.jpg" width="100%" height="100%" controls>
<source src="https://eu1-addpipe.s3.eu-central-1.amazonaws.com/e46b2e13d3f990d82W3S1jvhWDckj1.mp4" type="video/mp4">
Your browser does not support the video tag.
</video>
That was it!
Click Save & Close and you will see the video you had in the Recordings section in your Pipe Account Area appear in the video testimonials page as well. Now you just have to repeat this process to keep adding new video testimonials when you will receive them in your Pipe Account Area. Just add a new Embed element to the Grid and inside it place the embed code of the new video.
Making the video testimonials page mobile-friendly
Now we have a page that looks nice on large screens but we want to make sure that also people that will access it from mobile will have a nice experience.
To check how the page looks like for different screen sizes, you can use the buttons on the top section of the Webflow editor.
I didn’t really like how the video testimonials were displayed in a 2x2 grid for mobile users, so I changed it to a 1 column grid where all the video testimonials will be displayed as a list. To do that click on the mobile view in portrait mode on the top section of the Webflow editor and click on the Grid element on the page. Now on the top right corner of the grid should appear a red button, which will enable the grid editing. When you click on it the grid will become red and it will be highlighted. That means that now we can change the grid settings.
For that, we will have to use the right panel and find the Columns section. When you hover with your mouse on the first element in the Columns section it will appear a Bin Icon. Click on it to remove the column from the grid layout. Now you have a different grid layout to display your video testimonials for mobile devices in portrait mode only, so when your users will visit the page from their laptop they will still see the 2x2 column layout but when they visit the page from their phones they will see the video testimonials as a list of videos on the page.

We are done!
Now we just have to test our page to make sure that is behaving the way we want. To do that let’s publish again the page as we did before by clicking on the Publish button and selecting the domain where to push the changes.
On the page we need to test that:
- We can record new videos with the Pipe Video Recorder
- The video testimonials are displayed correctly on the page
- The video testimonials change the layout on the mobile view in portrait mode

Please let us know what you think about this tutorial, and if you have any questions, don’t hesitate to contact us. We’ll be happy to help you!