How To Add One or More Video Recorders to Gravity Forms Using the 2.0 Embed Code
In this tutorial, we will show you how to add one or multiple video recorders to your Gravity Forms form.
We have an older article showing you how to integrate between Pipe and Gravity Forms, but it uses the 1.0 embed code (which we'll deprecate soon). We'll use the newer and better 2.0 embed code in this tutorial. The 2.0 embed code comes with many improvements, including the ability to add multiple recorders to the same web page and the ability to use the Desktop Recording Client inline on mobile browsers (iOS and Android).
There's also an official Gravity Forms Pipe add-on, but it also relies on the 1.0 embed code, and it does not expose all the configuration options that we've built into our 1.0 embed code. It's also only available with the PRO, Elite, and Nonprofit GF licenses, while this tutorial can be used with the cheaper Basic license.
Requirements
To follow this tutorial you will need an account with:
Pipe offers a 14-day free trial account after which you'll have to subscribe to one of the two paid monthly subscriptions.
To use Gravity Forms, you need to purchase a license. The cheapest one is the Basic one at $59/year.
Adding a Single Video Recorder
We will begin by adding a single video recorder to a Gravity Forms powered contact form.
Create a new Gravity Form
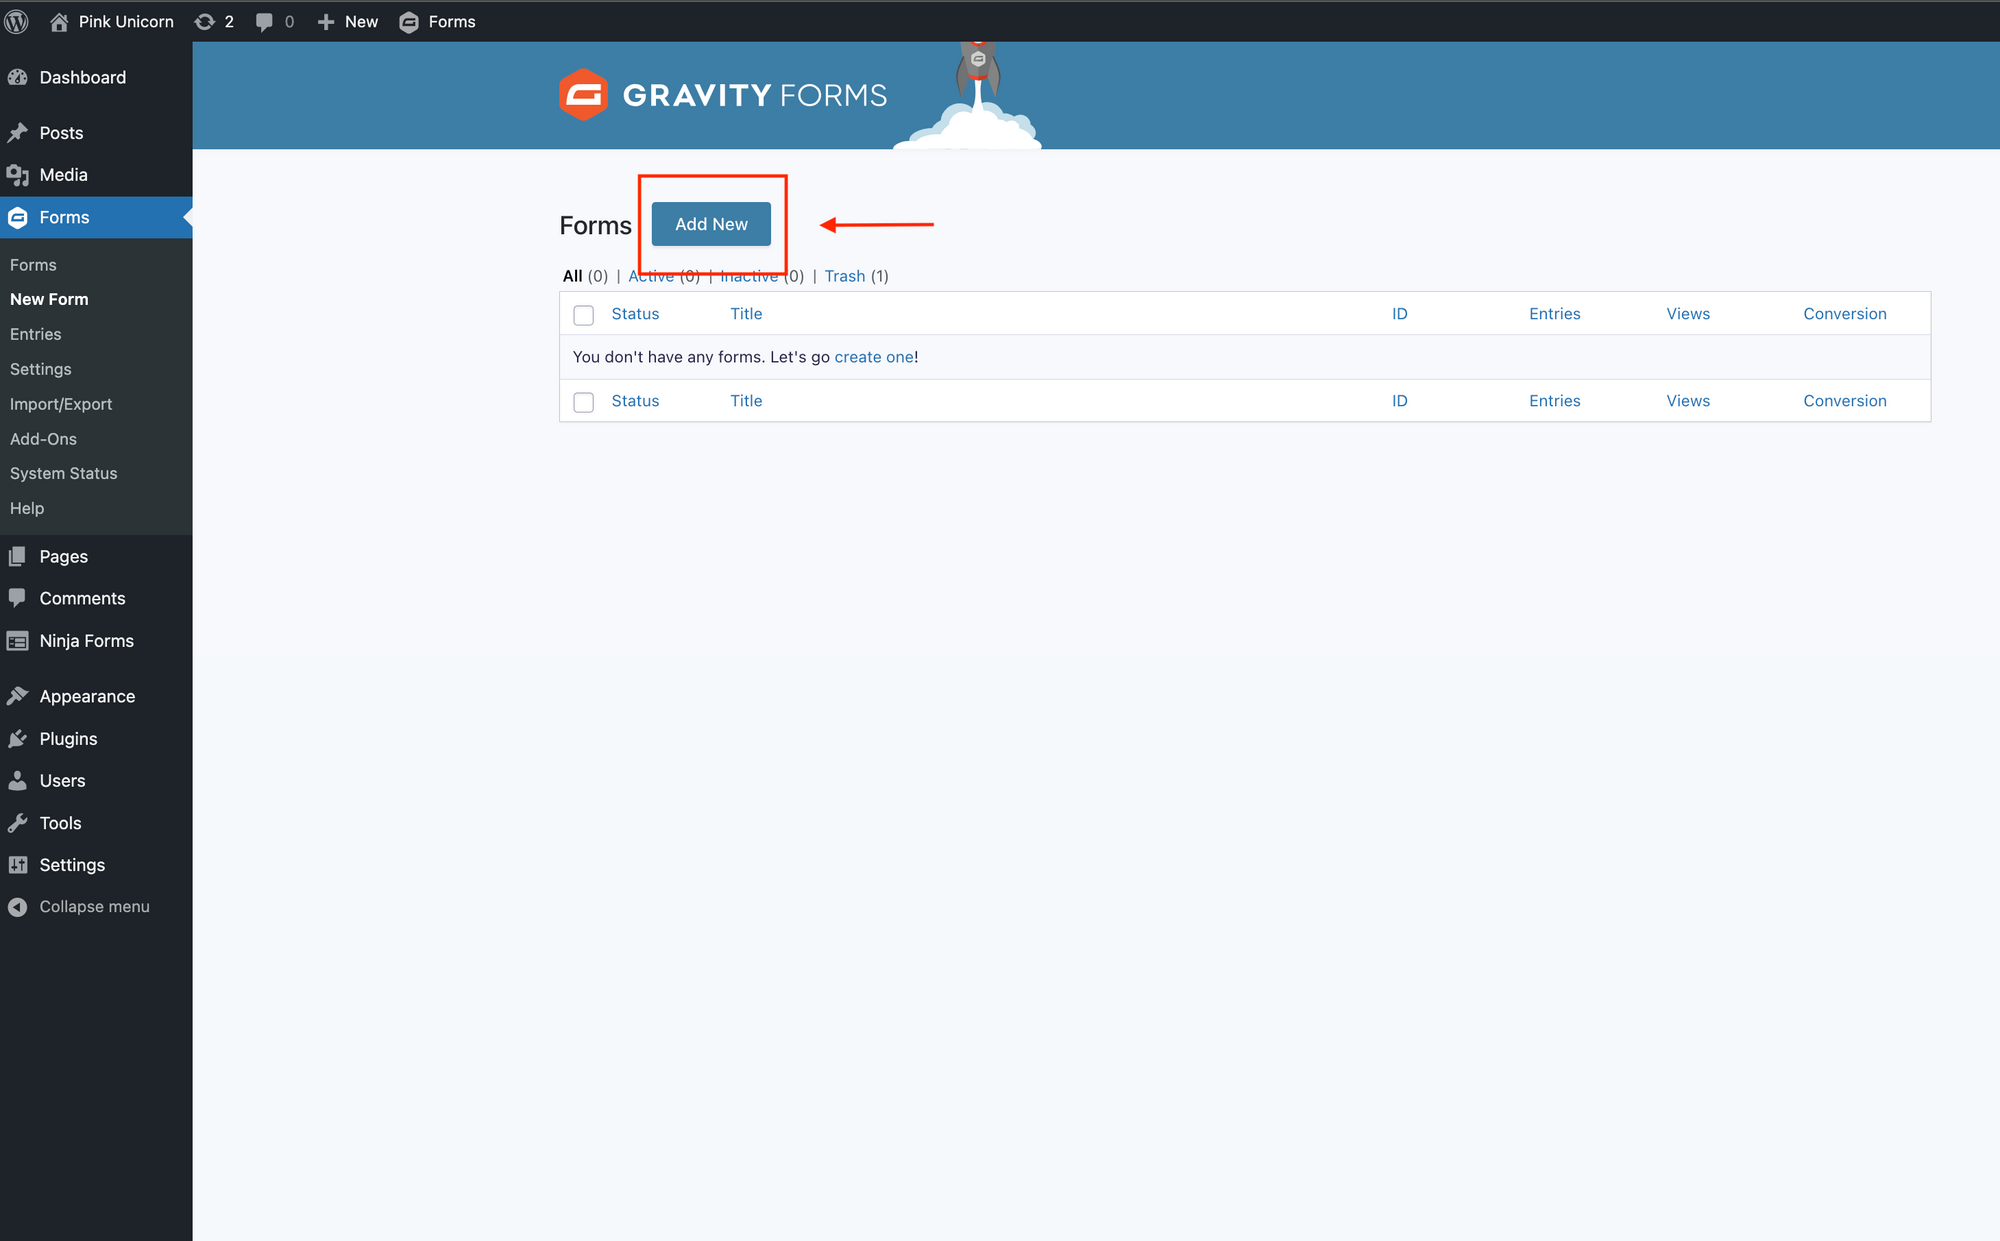
The first step is to create a Gravity Form. You can do so by clicking on the [Add New] button under the Forms section as seen below:
Now select the Blank Form template:

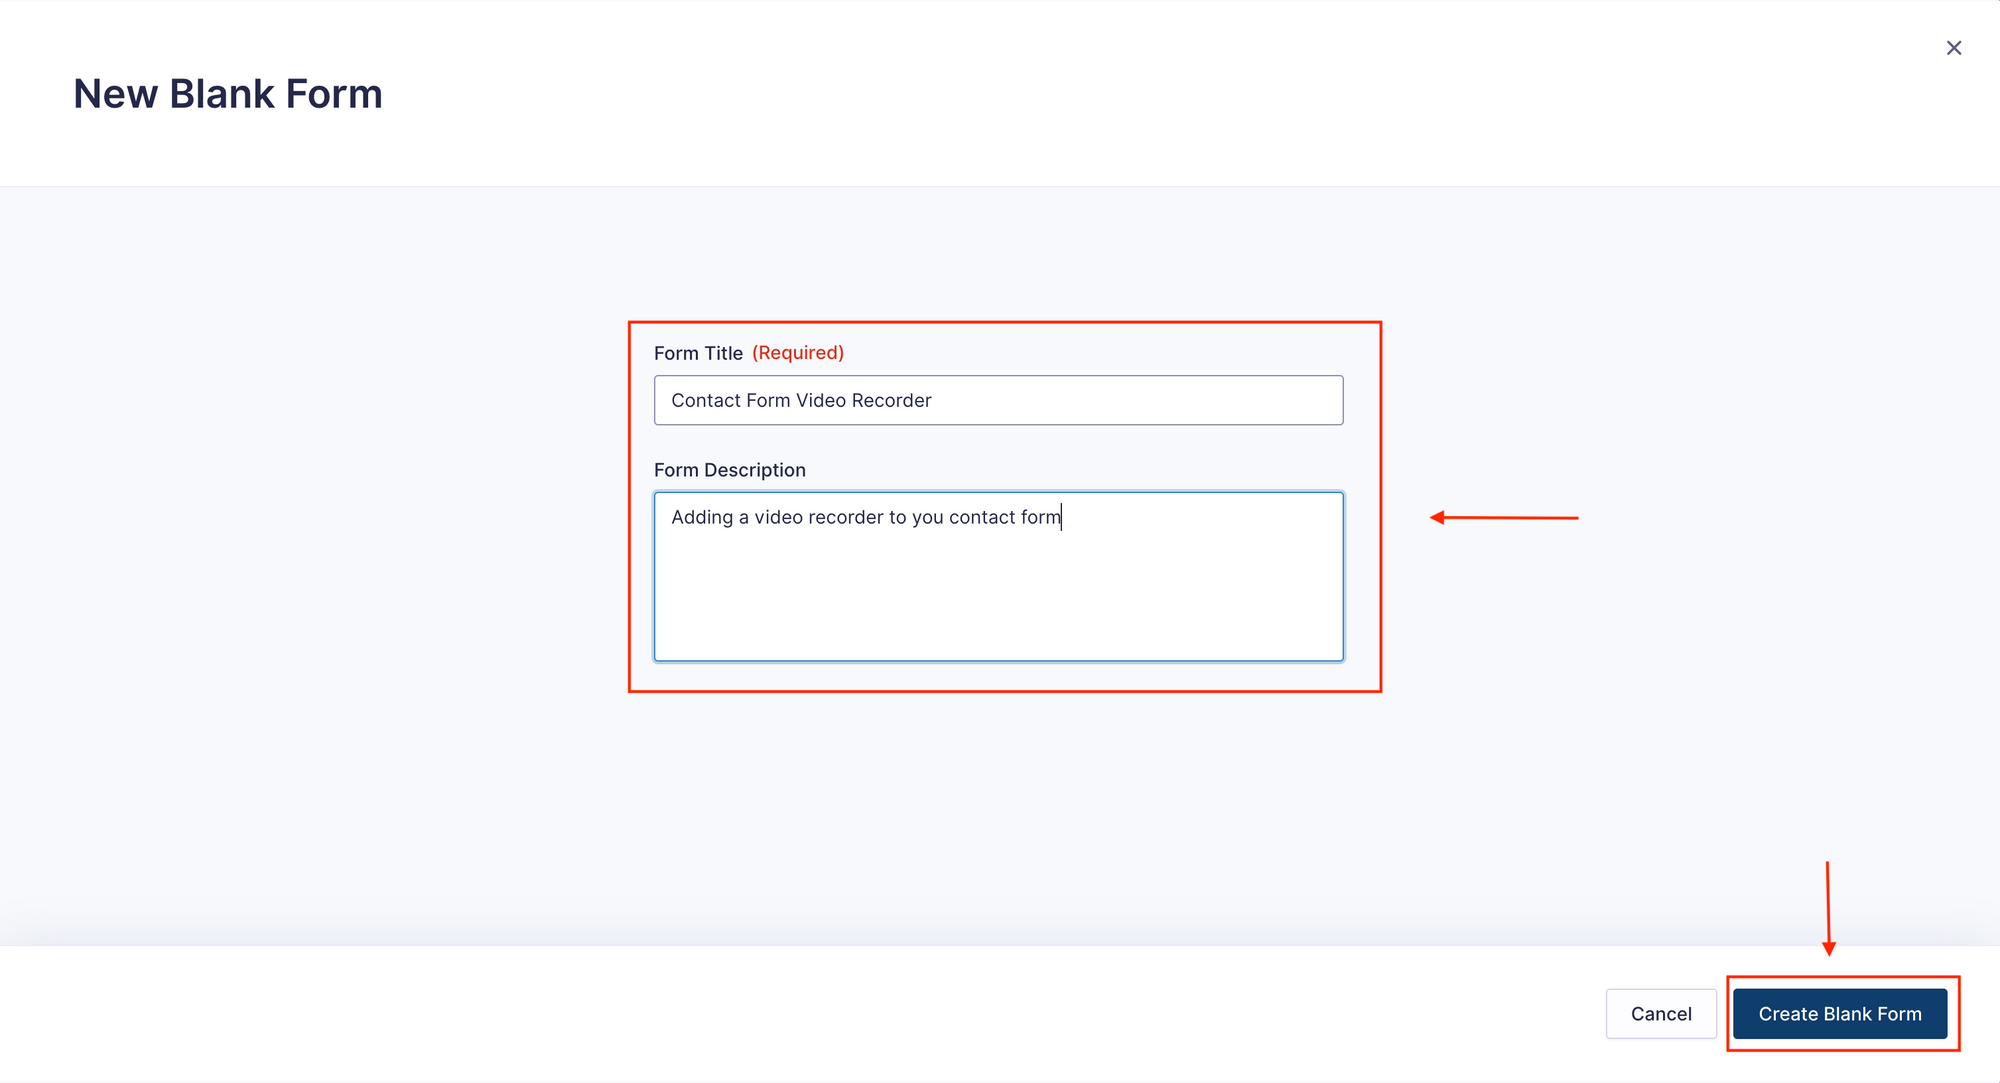
You will be prompted to give the new form a title and a short description. I have opted to name mine "Contact Form Video Recorder" and gave it a brief description. After populating the two fields, press the [Create Blank Form] button in the bottom right section of the page.
Adding Name and Email fields
We'll want to collect the name and e-mail in our contact form together with a video message so we'll begin by adding two new fields to the contact form:
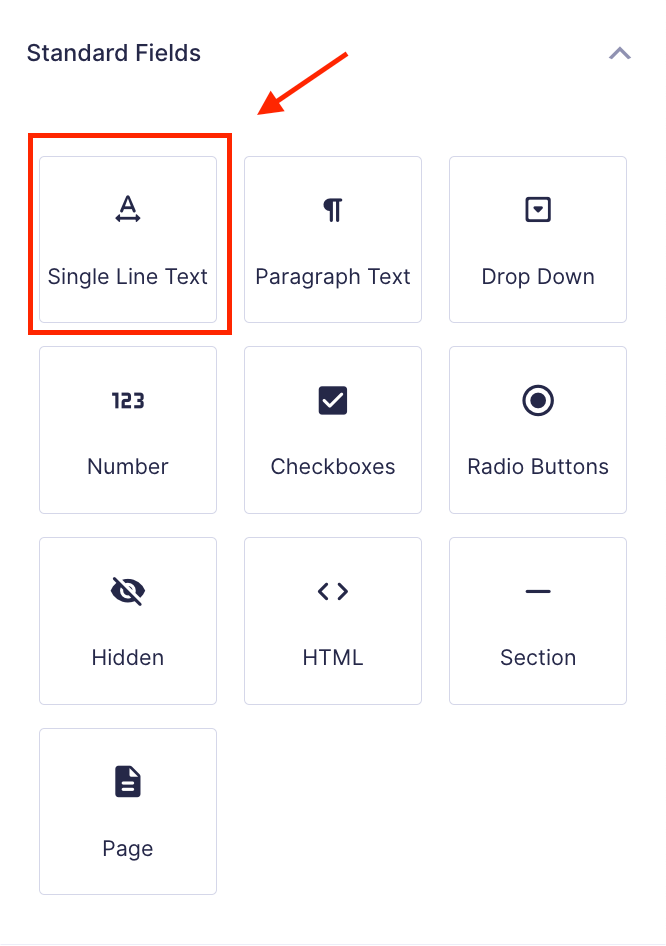
- Name: Add a Single Line Text field from Standard Fields
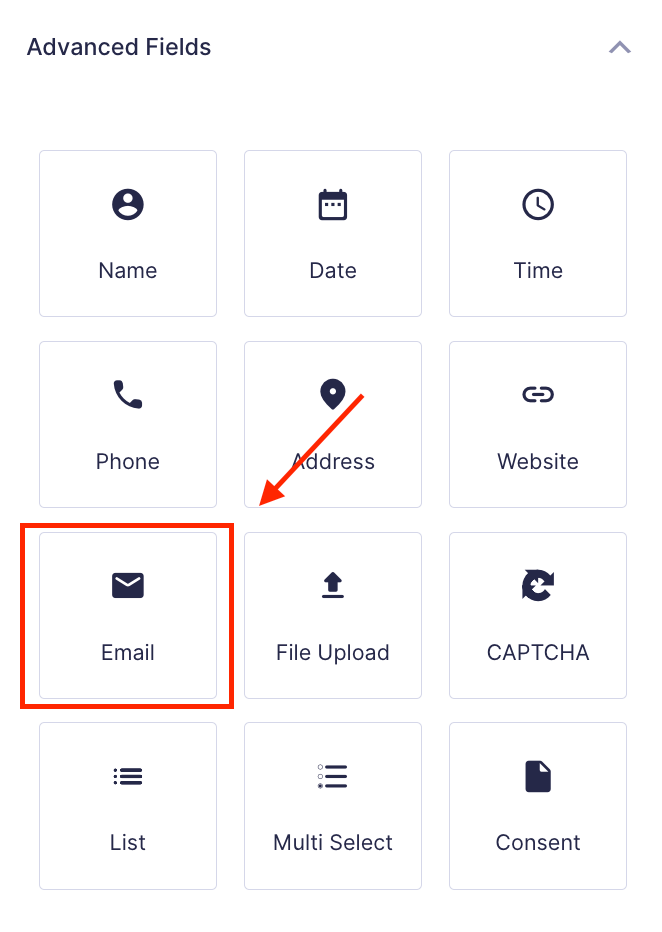
- Email: Add an Email field from Advanced Fields
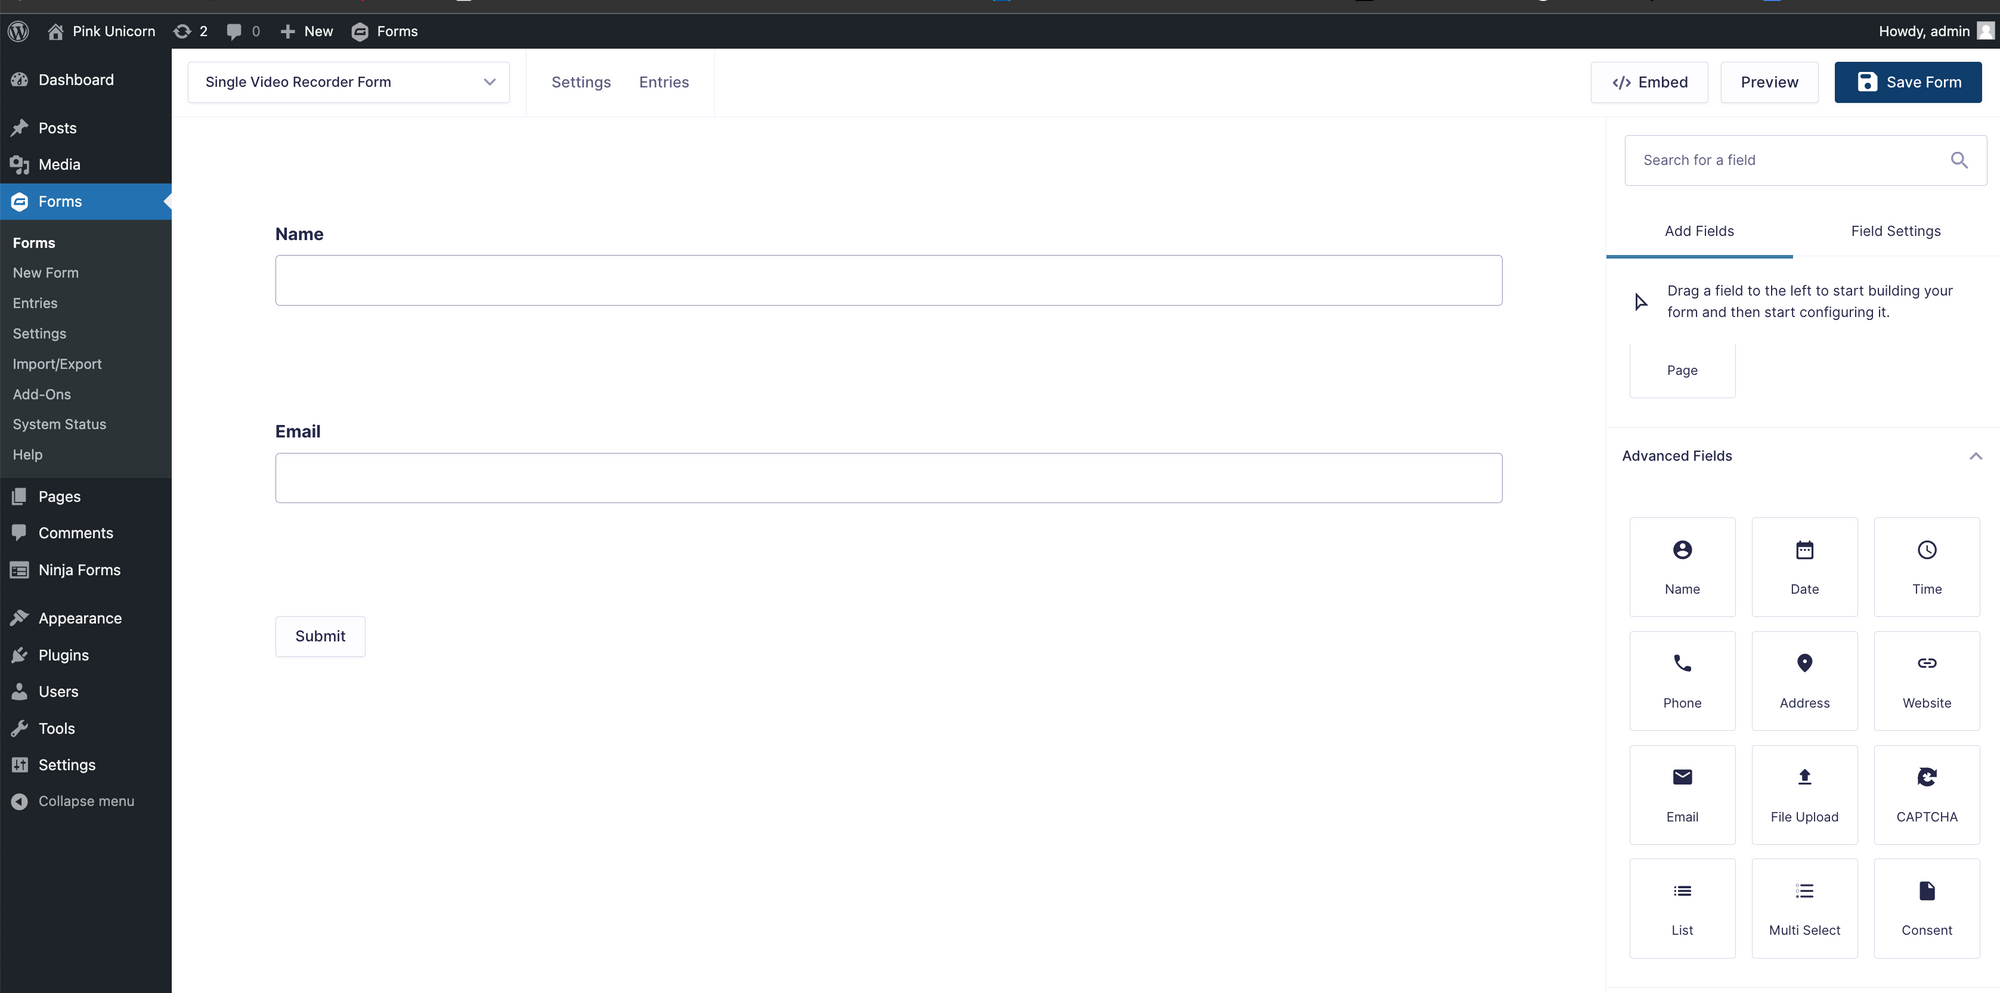
After adding the above-mentioned fields, you should end up with something similar to this:
Adding the Pipe Recording Client
We’re now going to add the video recorder to the contact form. For that, we need an HTML block from Gravity Forms in which to paste the Pipe Recording Client embed code.
- Add a new HTML block to your contact form after the fields for Name and Email;
- Log in to your Pipe account at https://dashboard.addpipe.com/signin (If you don’t have an account click this link and create one );
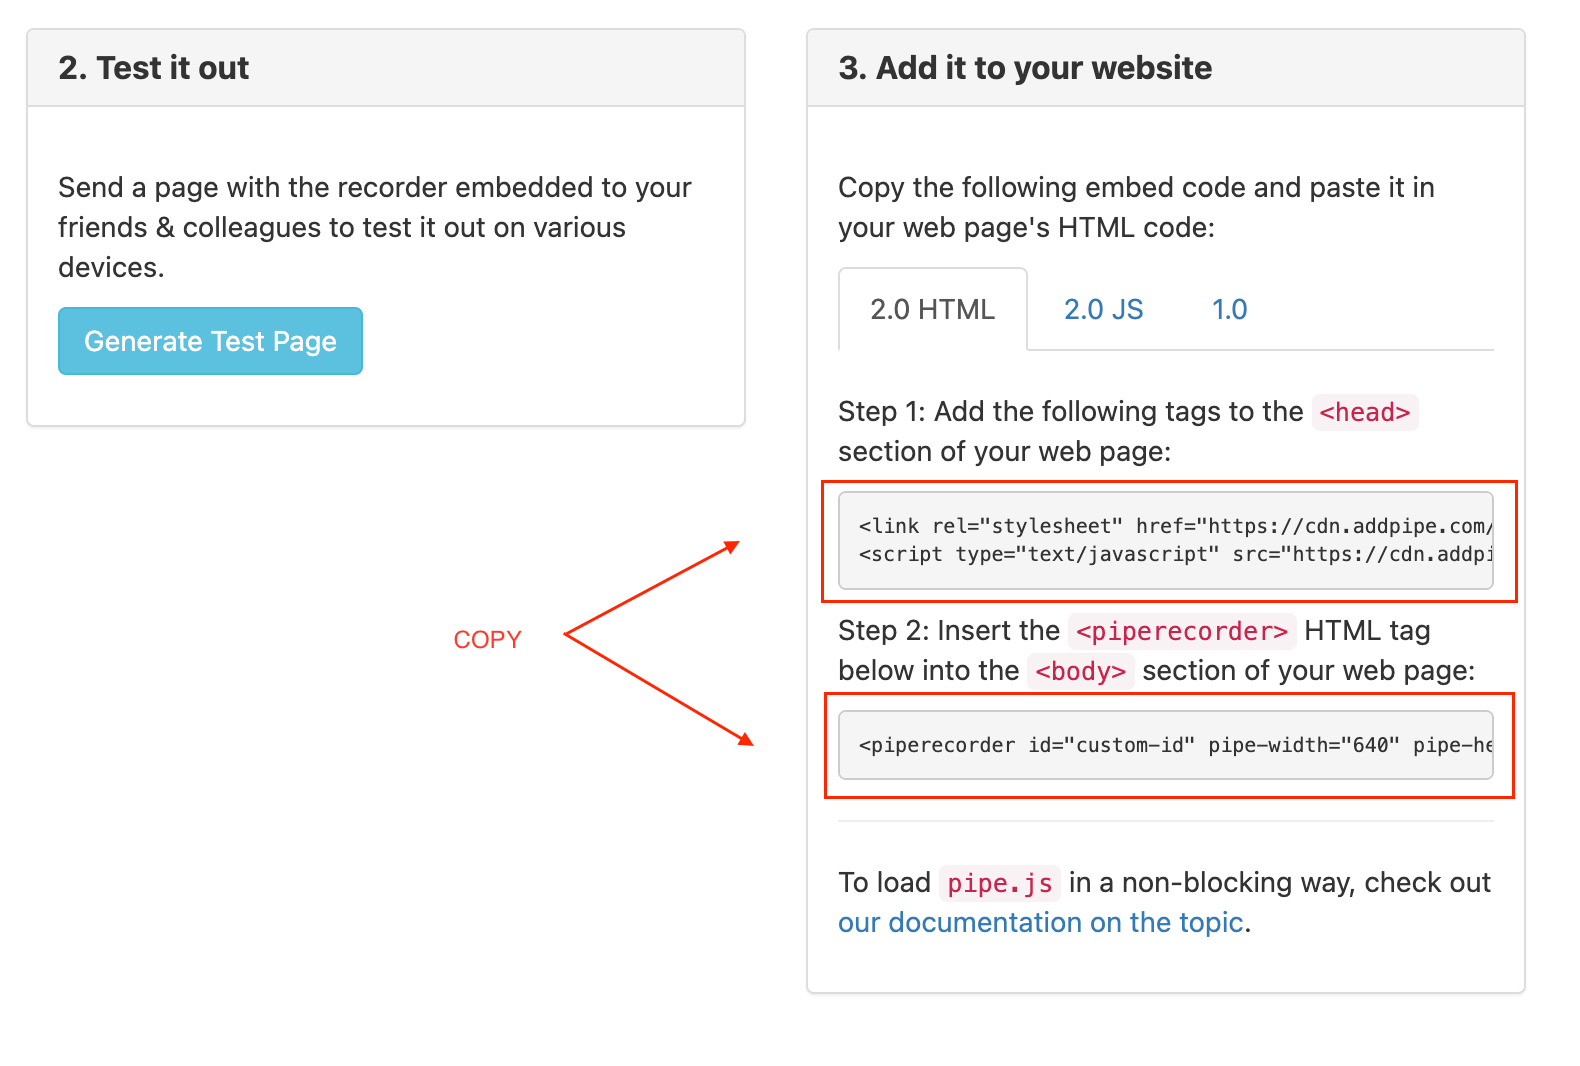
- Once logged in to your account, go to the Embed Video Recorder tab, and copy the two parts of the 2.0 HTML embed code from the lower right part of the page;
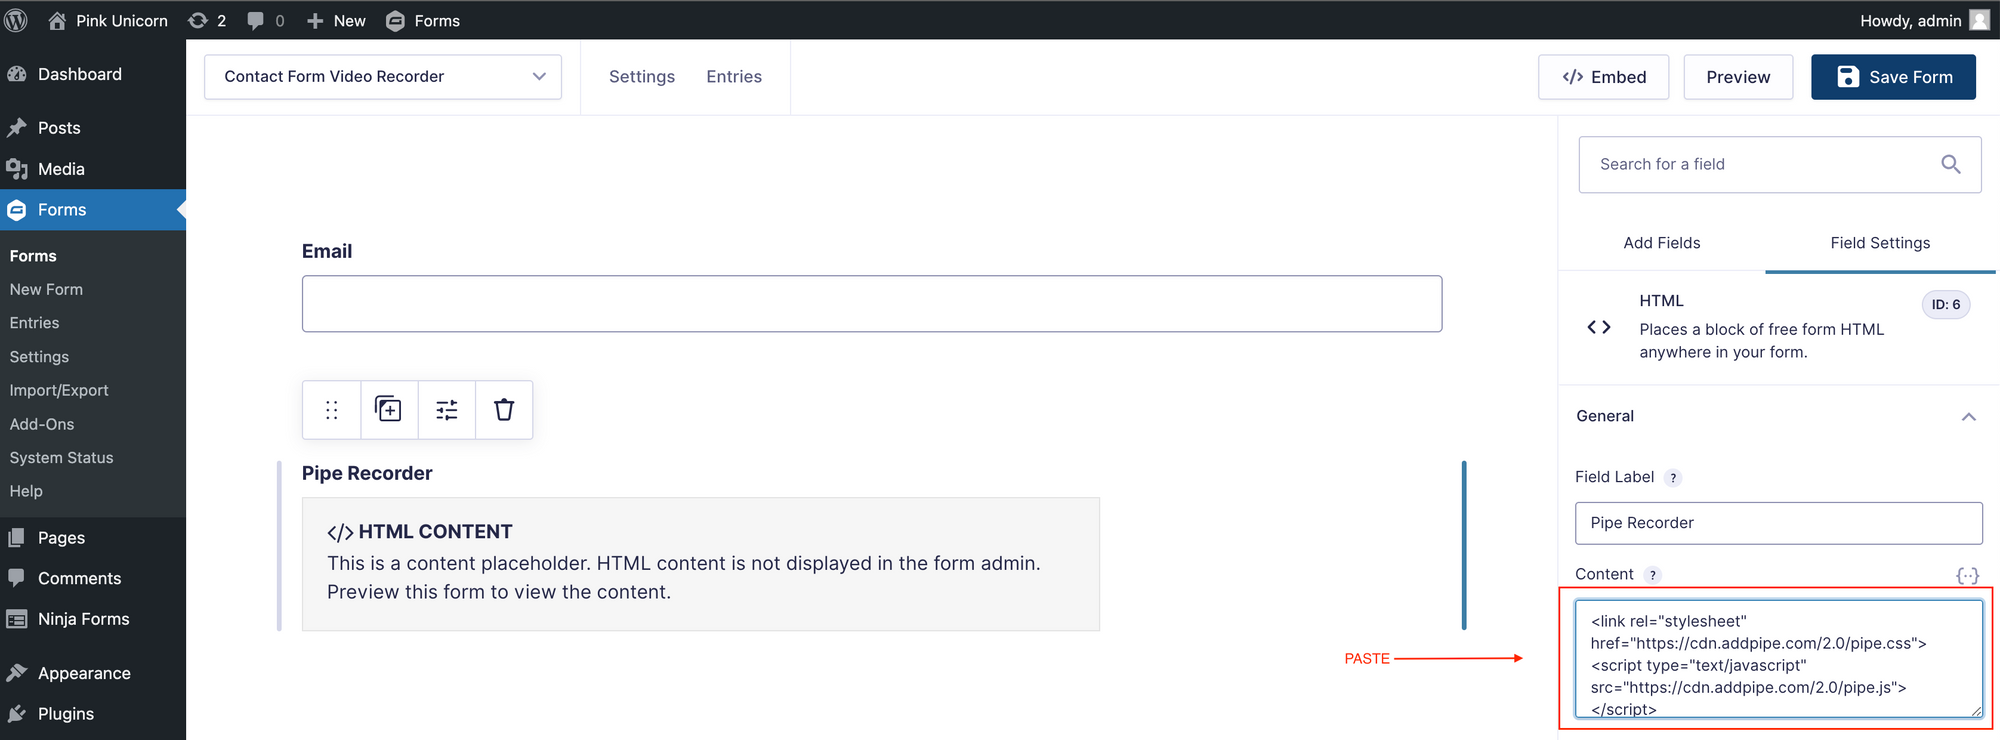
4. Now paste both parts of the embed code in your new Gravity Form’s HTML block field:
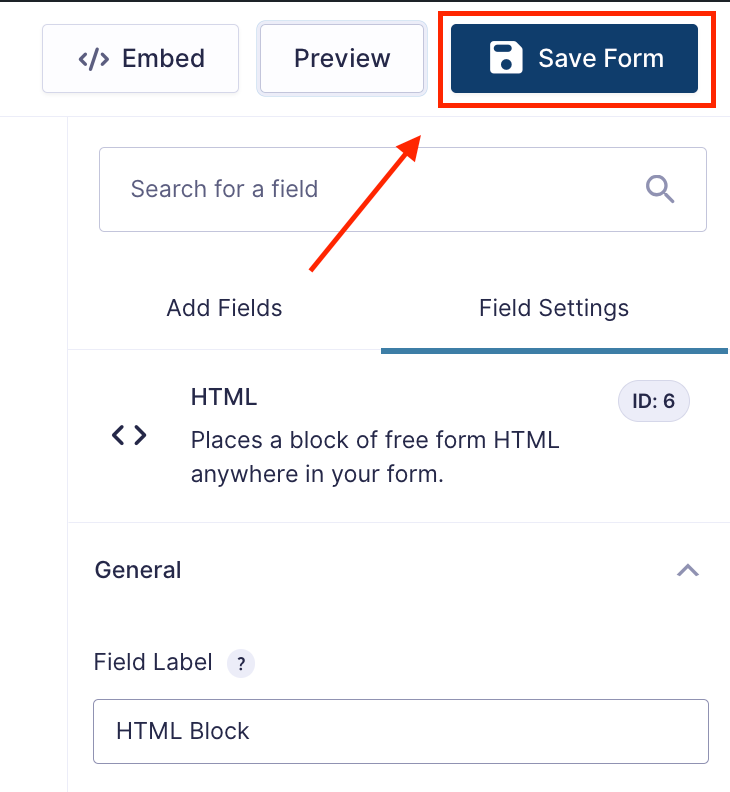
5. And click [Save Form] on the top right side of the screen;
Your contact form now contains the Pipe Recording Client embedded using the Pipe 2.0 Embed Code.
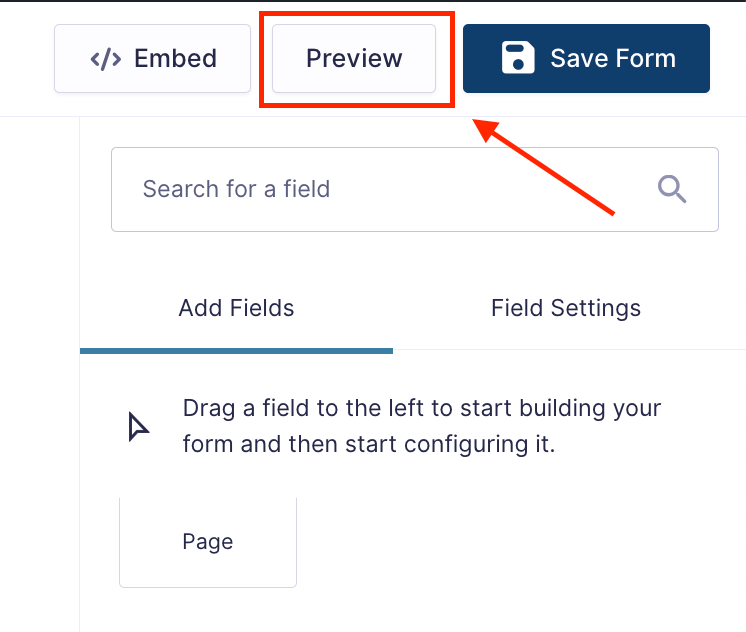
To check what we have done so far, use the [Preview] button at the top right side of the form editor.
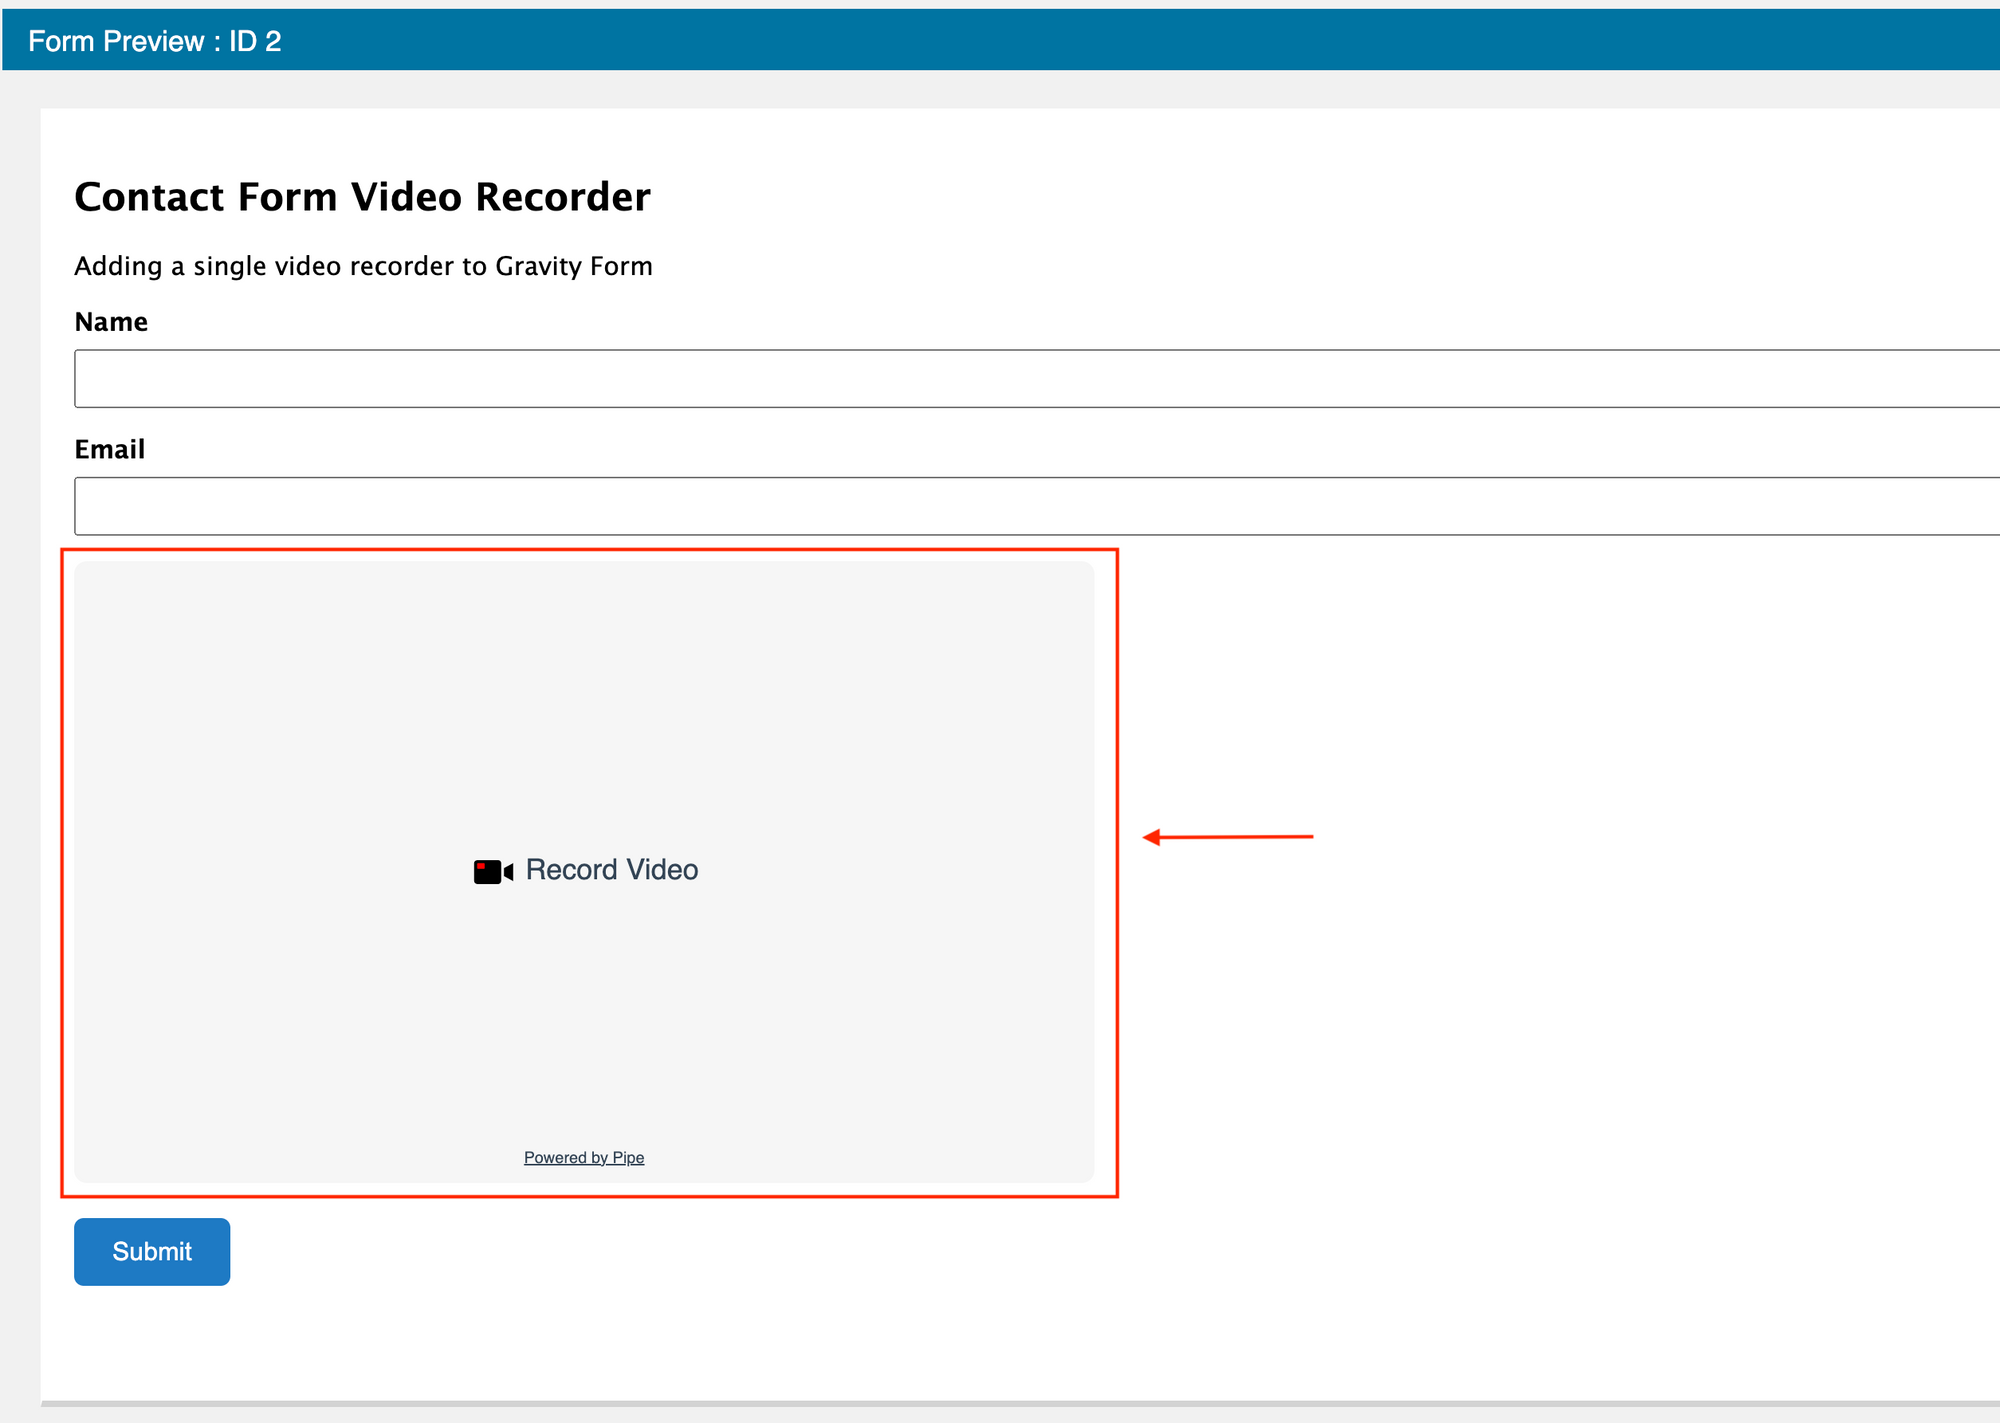
The contact form will open in a new tab. At the bottom of the contact form, you should now see the Pipe Recording Client ready to capture audio and/or video.
Add a (Hidden) Recording URL Field
At this moment, we still need to link each form submission with the recording made in that form. We'll use a 4th input to keep hold of the actual recording URL as hosted by us on our complimentary storage.
The value of this field will be saved with our contact form submission, allowing us to view the recording later from the WP admin area. The process works even if you're using your storage, but the code needs to be adapted to your storage URLs.
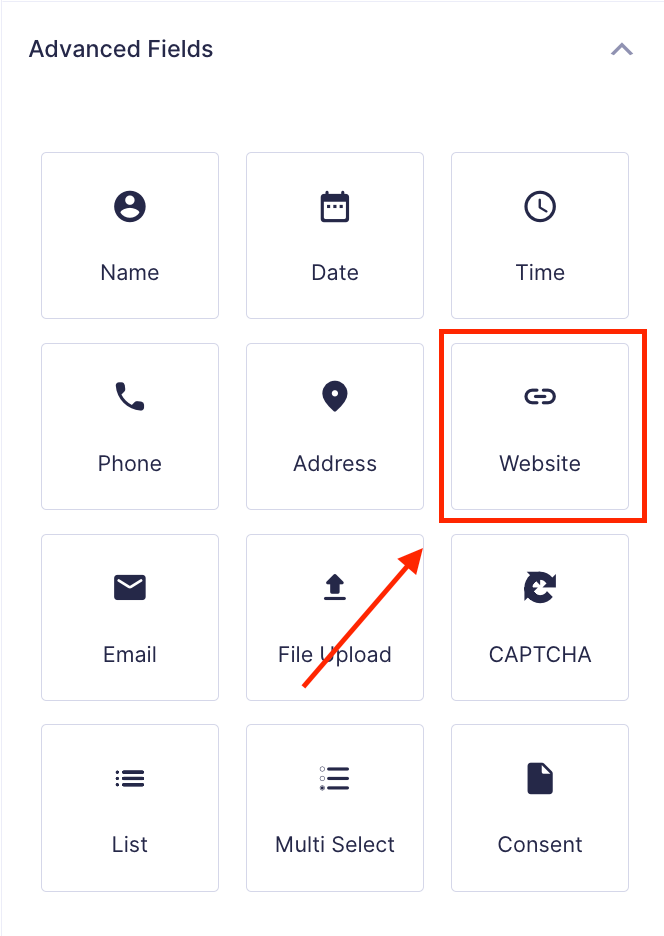
To hold the recording URL we'll add a new Website field from Advanced Fields to our contact form. We’re using the Website input because it will hold a URL.
When you publish the contact form on your website, you can convert this field from type Website to type Hidden, but for now, we’ll want a visible one to make sure the code below works.
So now our contact form should look something like this:
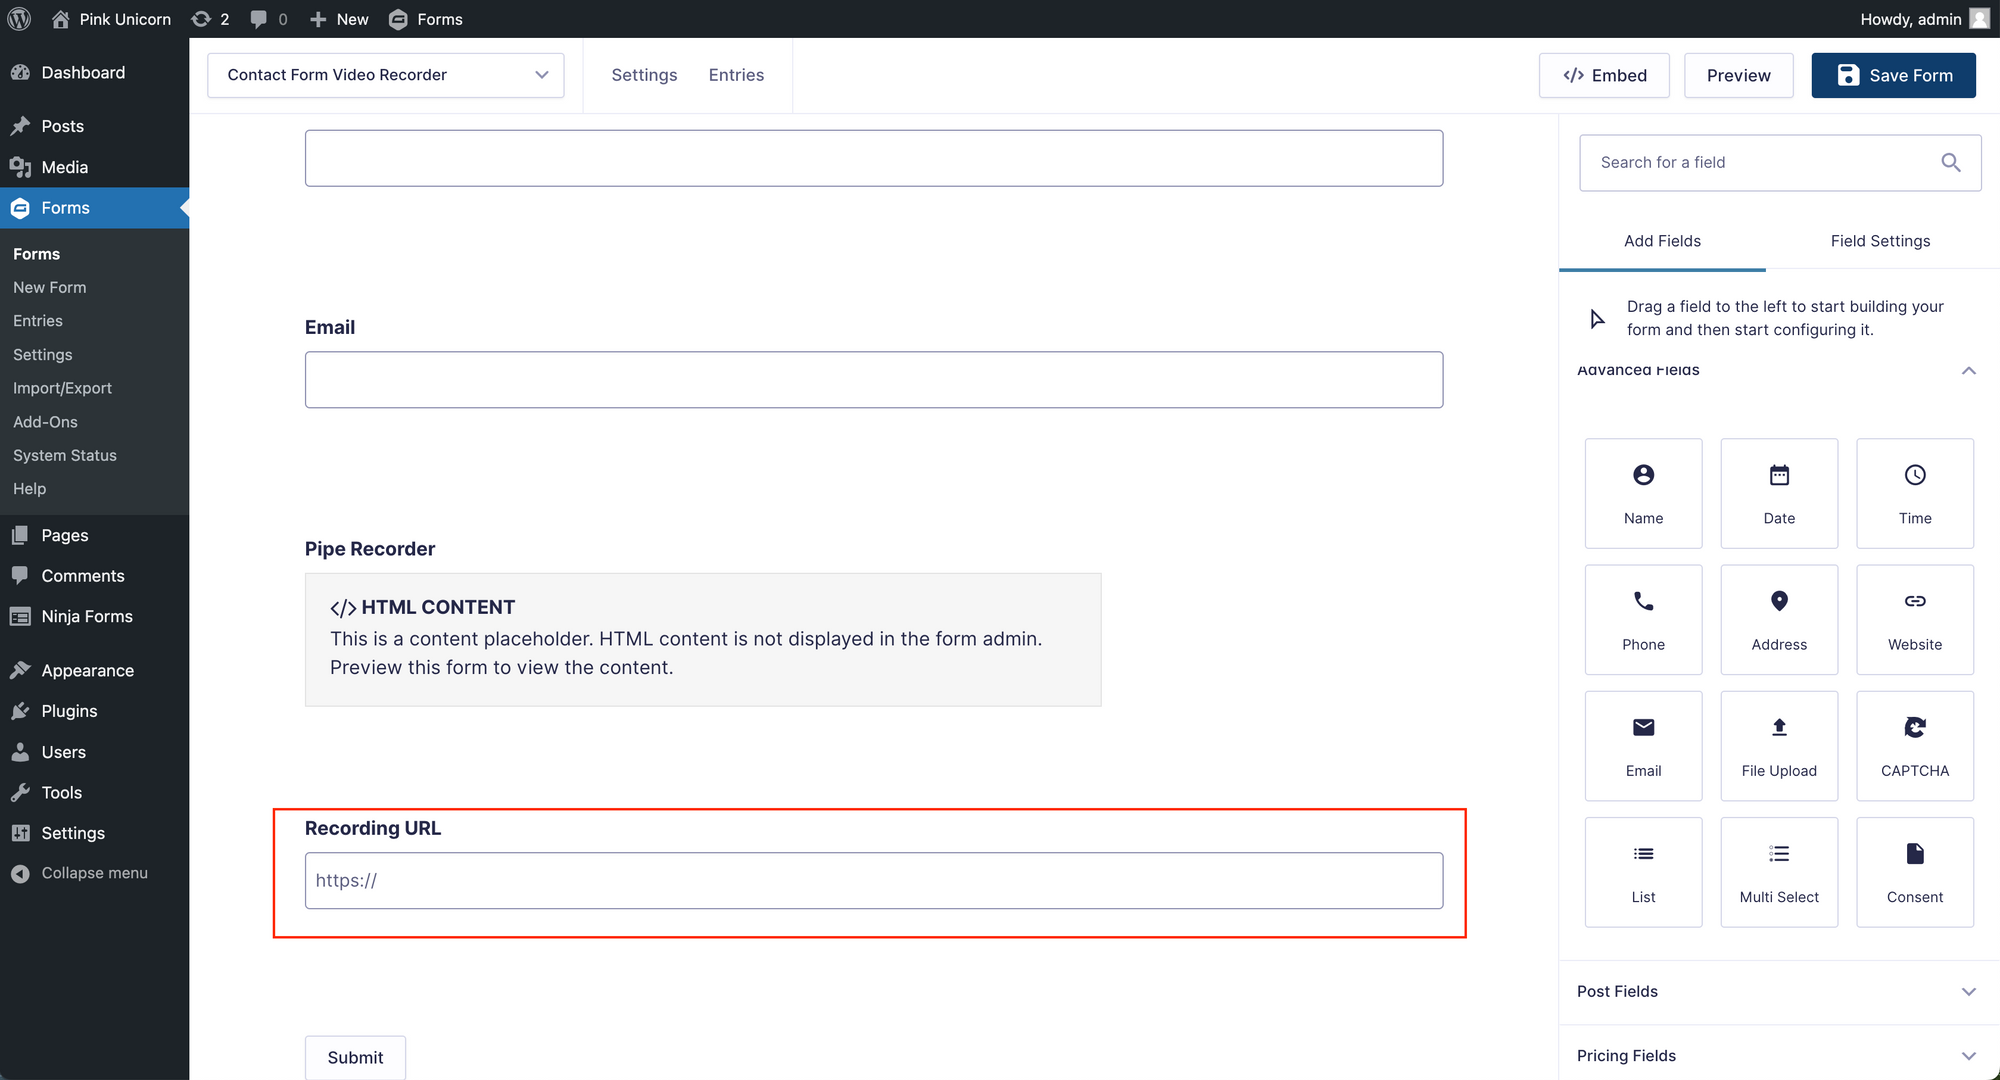
Note that I have opted to change the default name of the "Website" field to "Recording URL" and the default name of the "HTML" block to "Pipe Recorder".
Fill the new Recording URL field with the actual recording URL
When you use our complimentary storage (ON by default), the final processed .mp4 file is pushed to our storage, and a (private) URL is generated and made available to you.
The Pipe Recording Client now needs to populate the Gravity Forms field with that URL once a recording is saved. For that, we’ll be using Pipe’s onSaveOk function (part of Pipe’s JavaScript Desktop Events API), which gives us the name of the recording and the storage location for the final .mp4 file (and associated files, including the .jpg snapshot). Using this info, we’ll generate the full/absolute URL.
Since the Pipe Recording Client allows the user to make several recordings, the Recording URL field will hold the URL to the last recording saved.
The onSaveOk function is called by the Pipe Recording Client after a recording is made and saved with the desktop recording client and gives us a lot of information about the new recording, including:
- recording name (without extension);
- duration;
- device names (camera, microphones) if this information is available;
- audio and video codecs;
- the location/host where the final recording files will be stored by us.
We’ll be using the recording name and location in our example, but you can include any other information with the form submission.
We'll be expanding the onSaveOk function to:
- generate the absolute URL, including the extension, using the recording name and storage location;
- populate the Recording URL field with the actual URL.
To make it work with the desktop upload function of the Pipe Desktop Recording Client, we'll also be using Pipe's onDesktopVideoUploadSuccess function (part of Pipe's JavaScript Desktop Events API).
To make it work with the Native Mobile Recording Client (which does not stream the recordings but uploads them), we’ll also be using Pipe’s onVideoUploadSuccess function (part of Pipe’s JavaScript Mobile Events API).
All three functions are in the JavaScript code below. You'll have to slightly modify the code below and paste the modified code at the end of our HTML block, where you already have the Pipe 2.0 HTML embed code.
<script>
PipeSDK.onRecordersInserted = function () {

  const accountHash = "YOUR_ACCOUNT_HASH";
  const formFieldId = "input_1_4";

  myRecorder = PipeSDK.getRecorderById('custom-id');
  myRecorder.onSaveOk = function (recorderId, streamName, streamDuration, cameraName, micName, audioCodec, videoCodec, fileType, videoId, audioOnly, location) {
    console.log('onSaveOk('+arguments+')');
    // onSaveOK is part of the desktop recorder's JS events API (recording from camera or screen)
    document.getElementById(formFieldId).value = "https://" + location + "/" + accountHash + "/" + streamName + ".mp4";
  };

  myRecorder.onDesktopVideoUploadSuccess = function(recorderId, filename, filetype, videoId, audioOnly, location){
      console.log('onDesktopVideoUploadSuccess('+arguments+')')
      //onDesktopVideoUploadSuccess is part of the JS desktop events API
      document.getElementById(formFieldId).value = "https://" + location + "/" + accountHash + "/" + filename + ".mp4";
  };

  myRecorder.onVideoUploadSuccess = function(recorderId, filename, filetype, videoId, audioOnly, location) {
      console.log('onVideoUploadSuccess('+arguments+')')
      //onVideoUploadSuccess is part of the JS mobile events API
      document.getElementById(formFieldId).value = "https://" + location + "/" + accountHash + "/" + filename + ".mp4";
  };
};
</script>
Copy the above code in a text editor and make the following changes.
Changes:
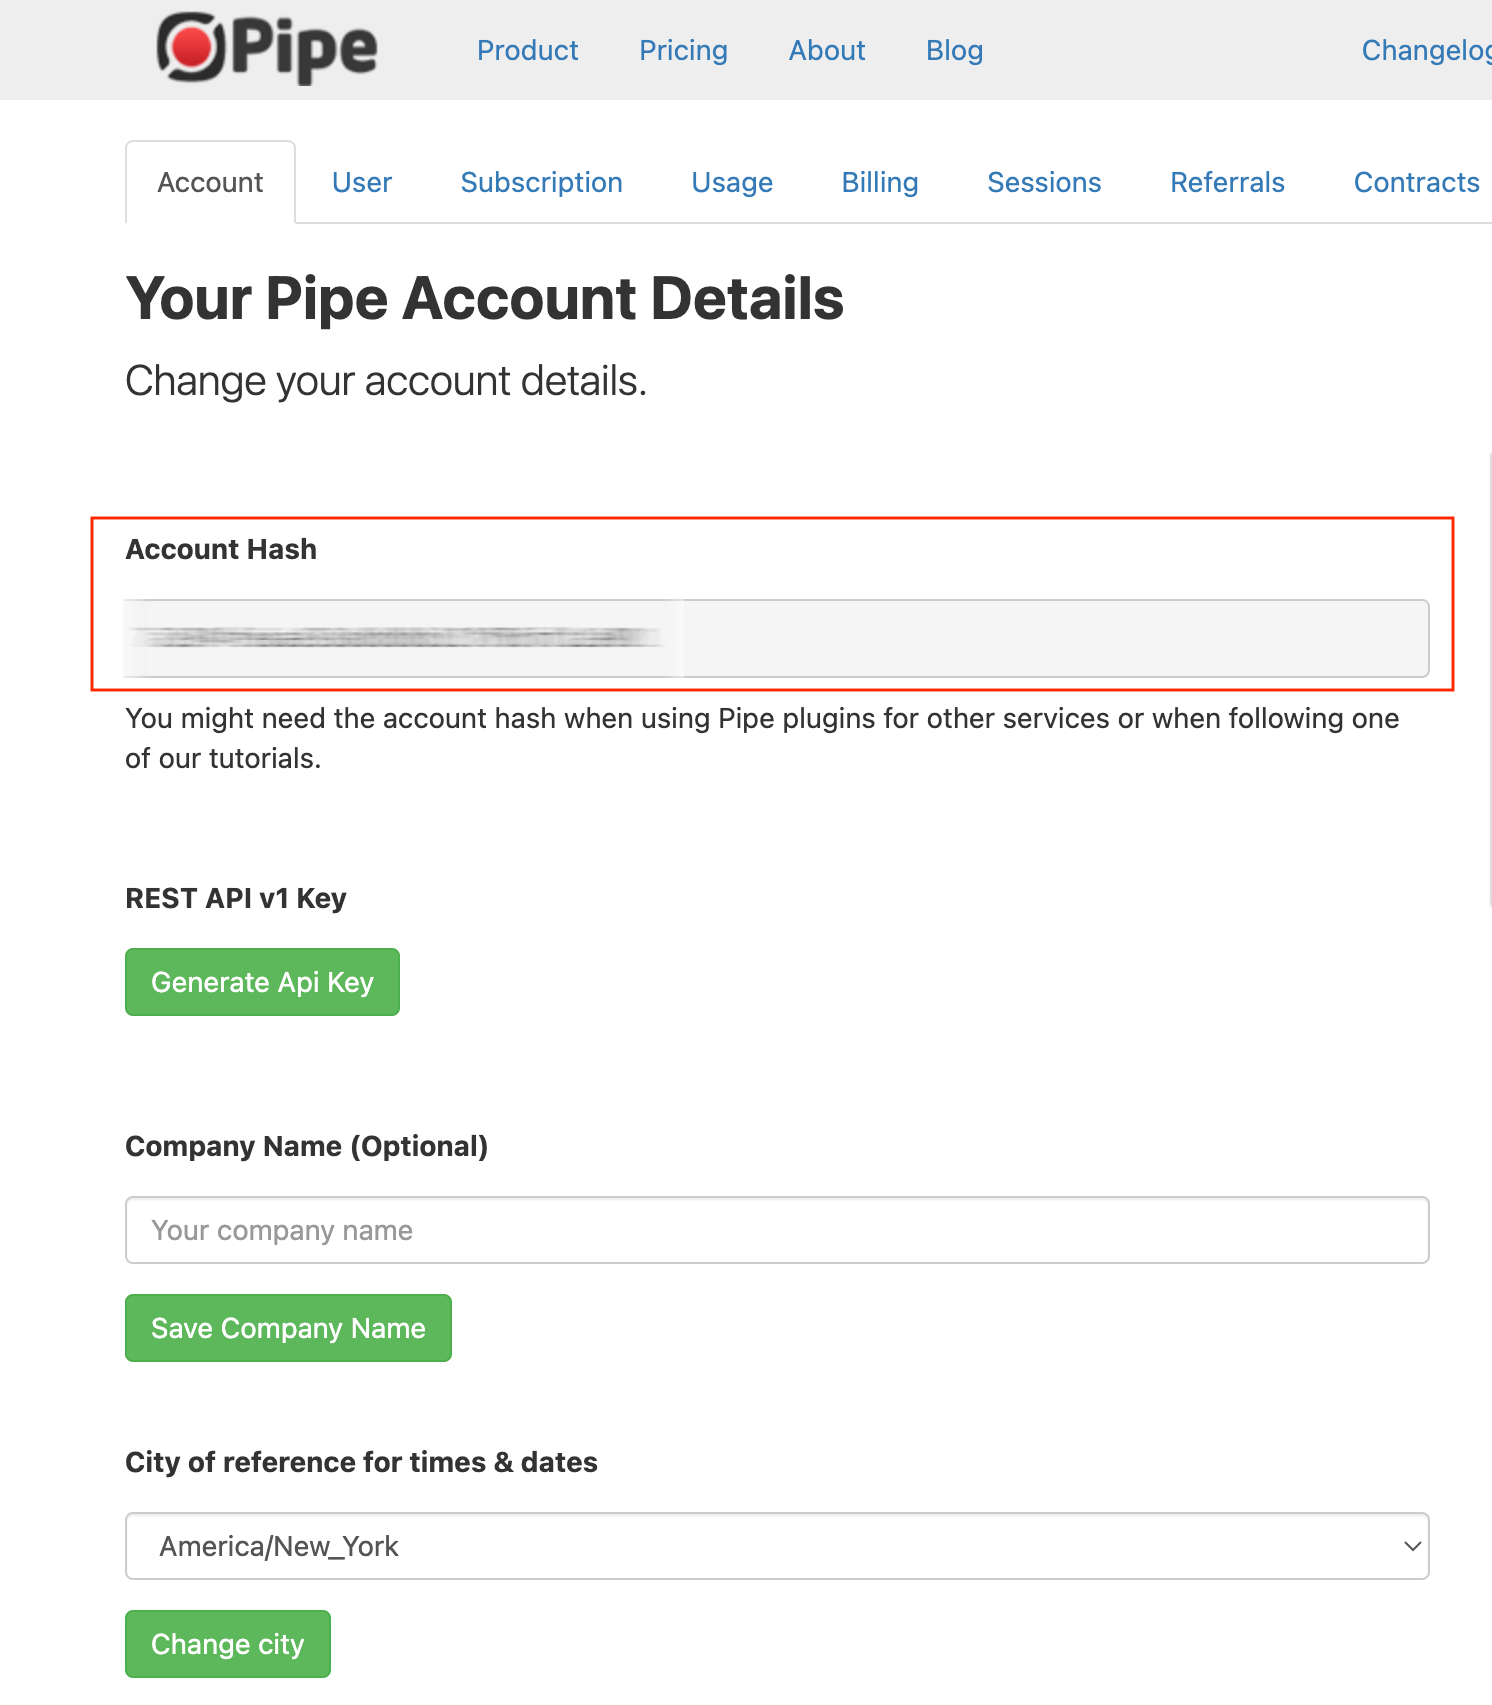
- Replace the string "YOUR_ACCOUNT_HASH" in the code above with your own Pipe account hash (it’s in your Pipe Account > Account)
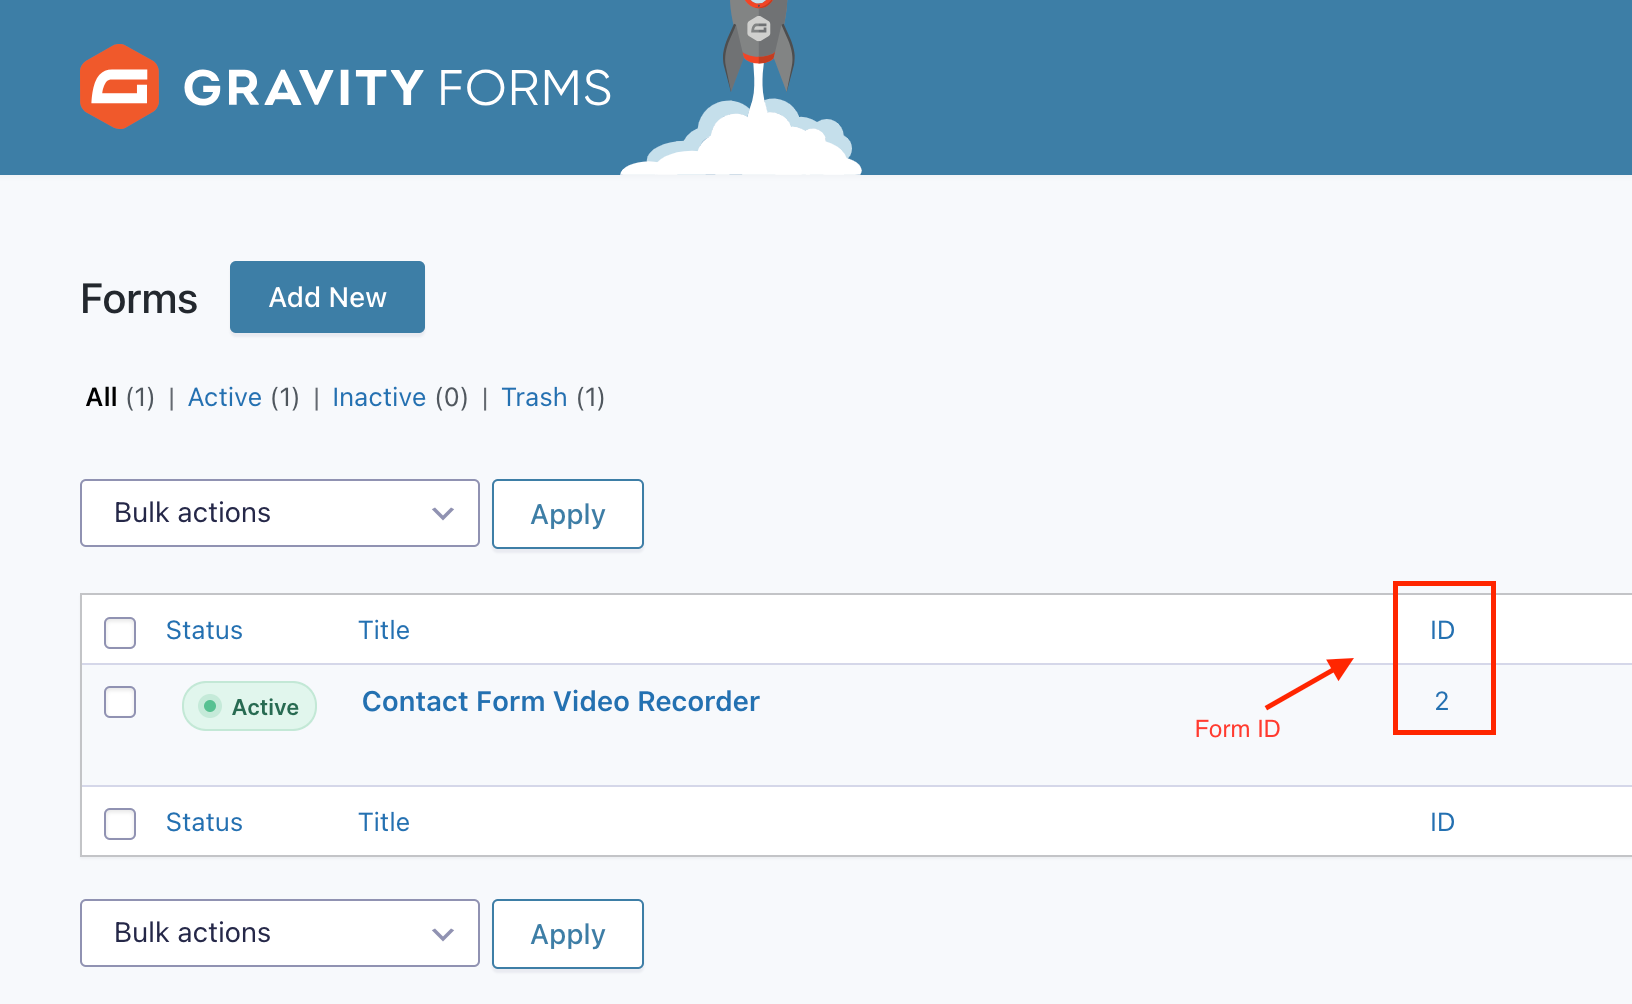
2. Replace the 1 and 4 in input_1_4 with your form ID and your Recording URL field ID respectively:
- Below you can see the form ID generated by Gravity Forms, in this case, it's the second form, hence the number 2;
- Here we can see the field ID of our Recording URL, in this case, it is the number 11.
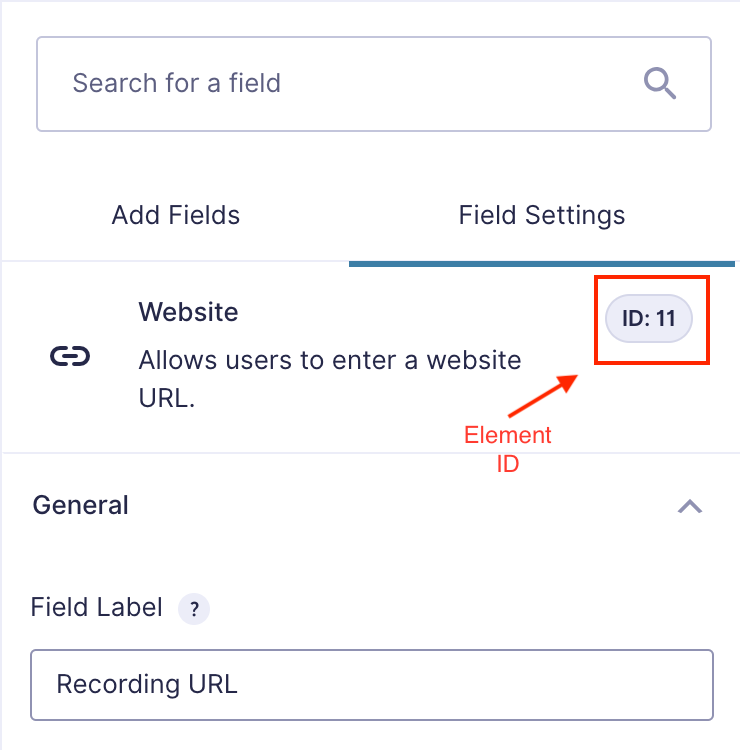
So if this is your 2nd form and the Recording URL field is your 11th field the string should be input_2_11.
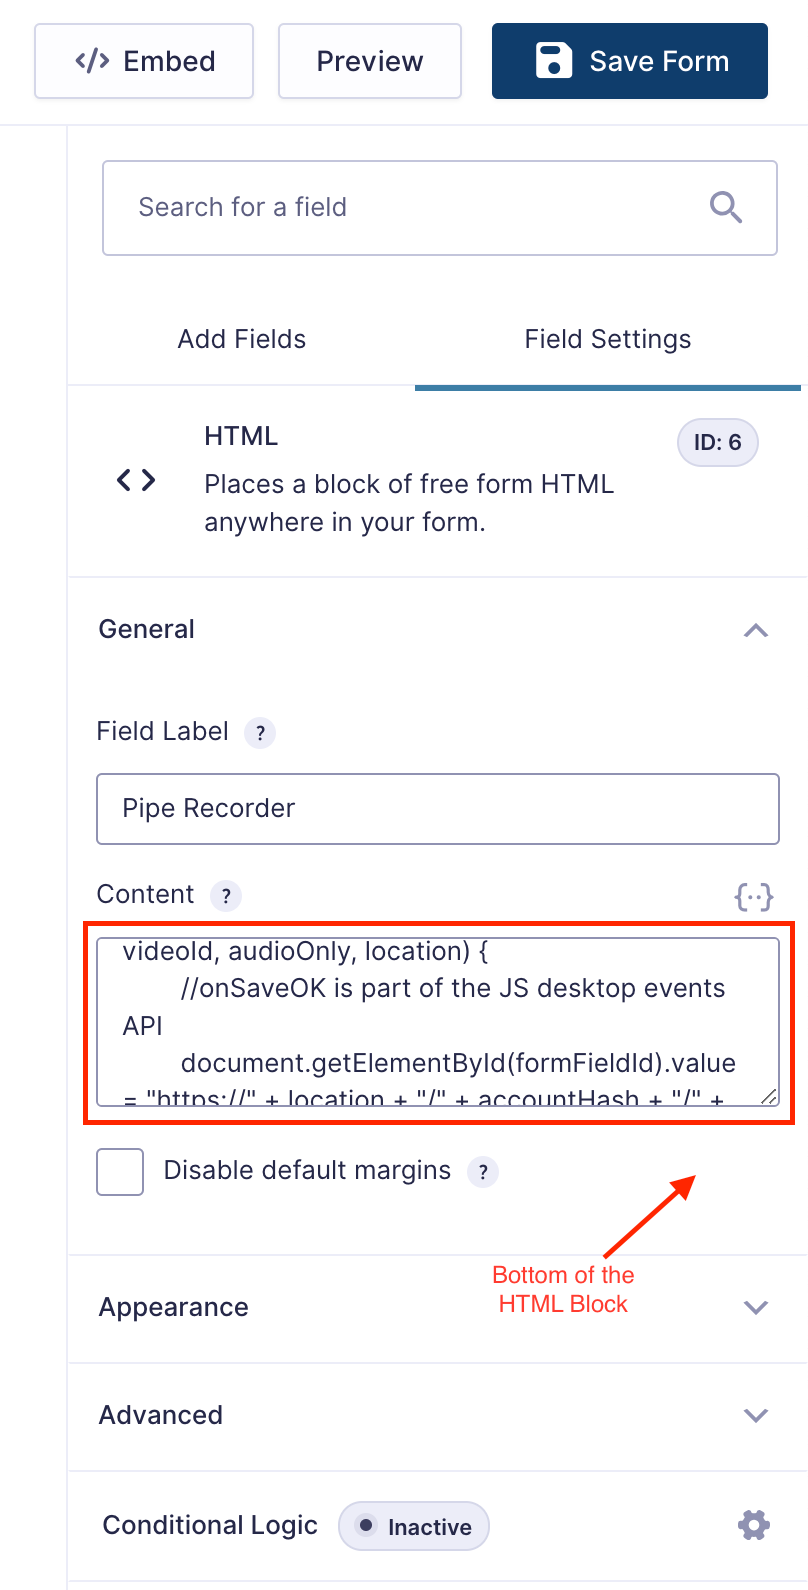
Now paste the (modified) code at the bottom of your HTML block after the existing video recorder code:
And that's it! Congratulations!
So now, if you preview the contact form and record a video, after clicking STOP you should immediately see the actual recording URL, as stored by us, in the last field:
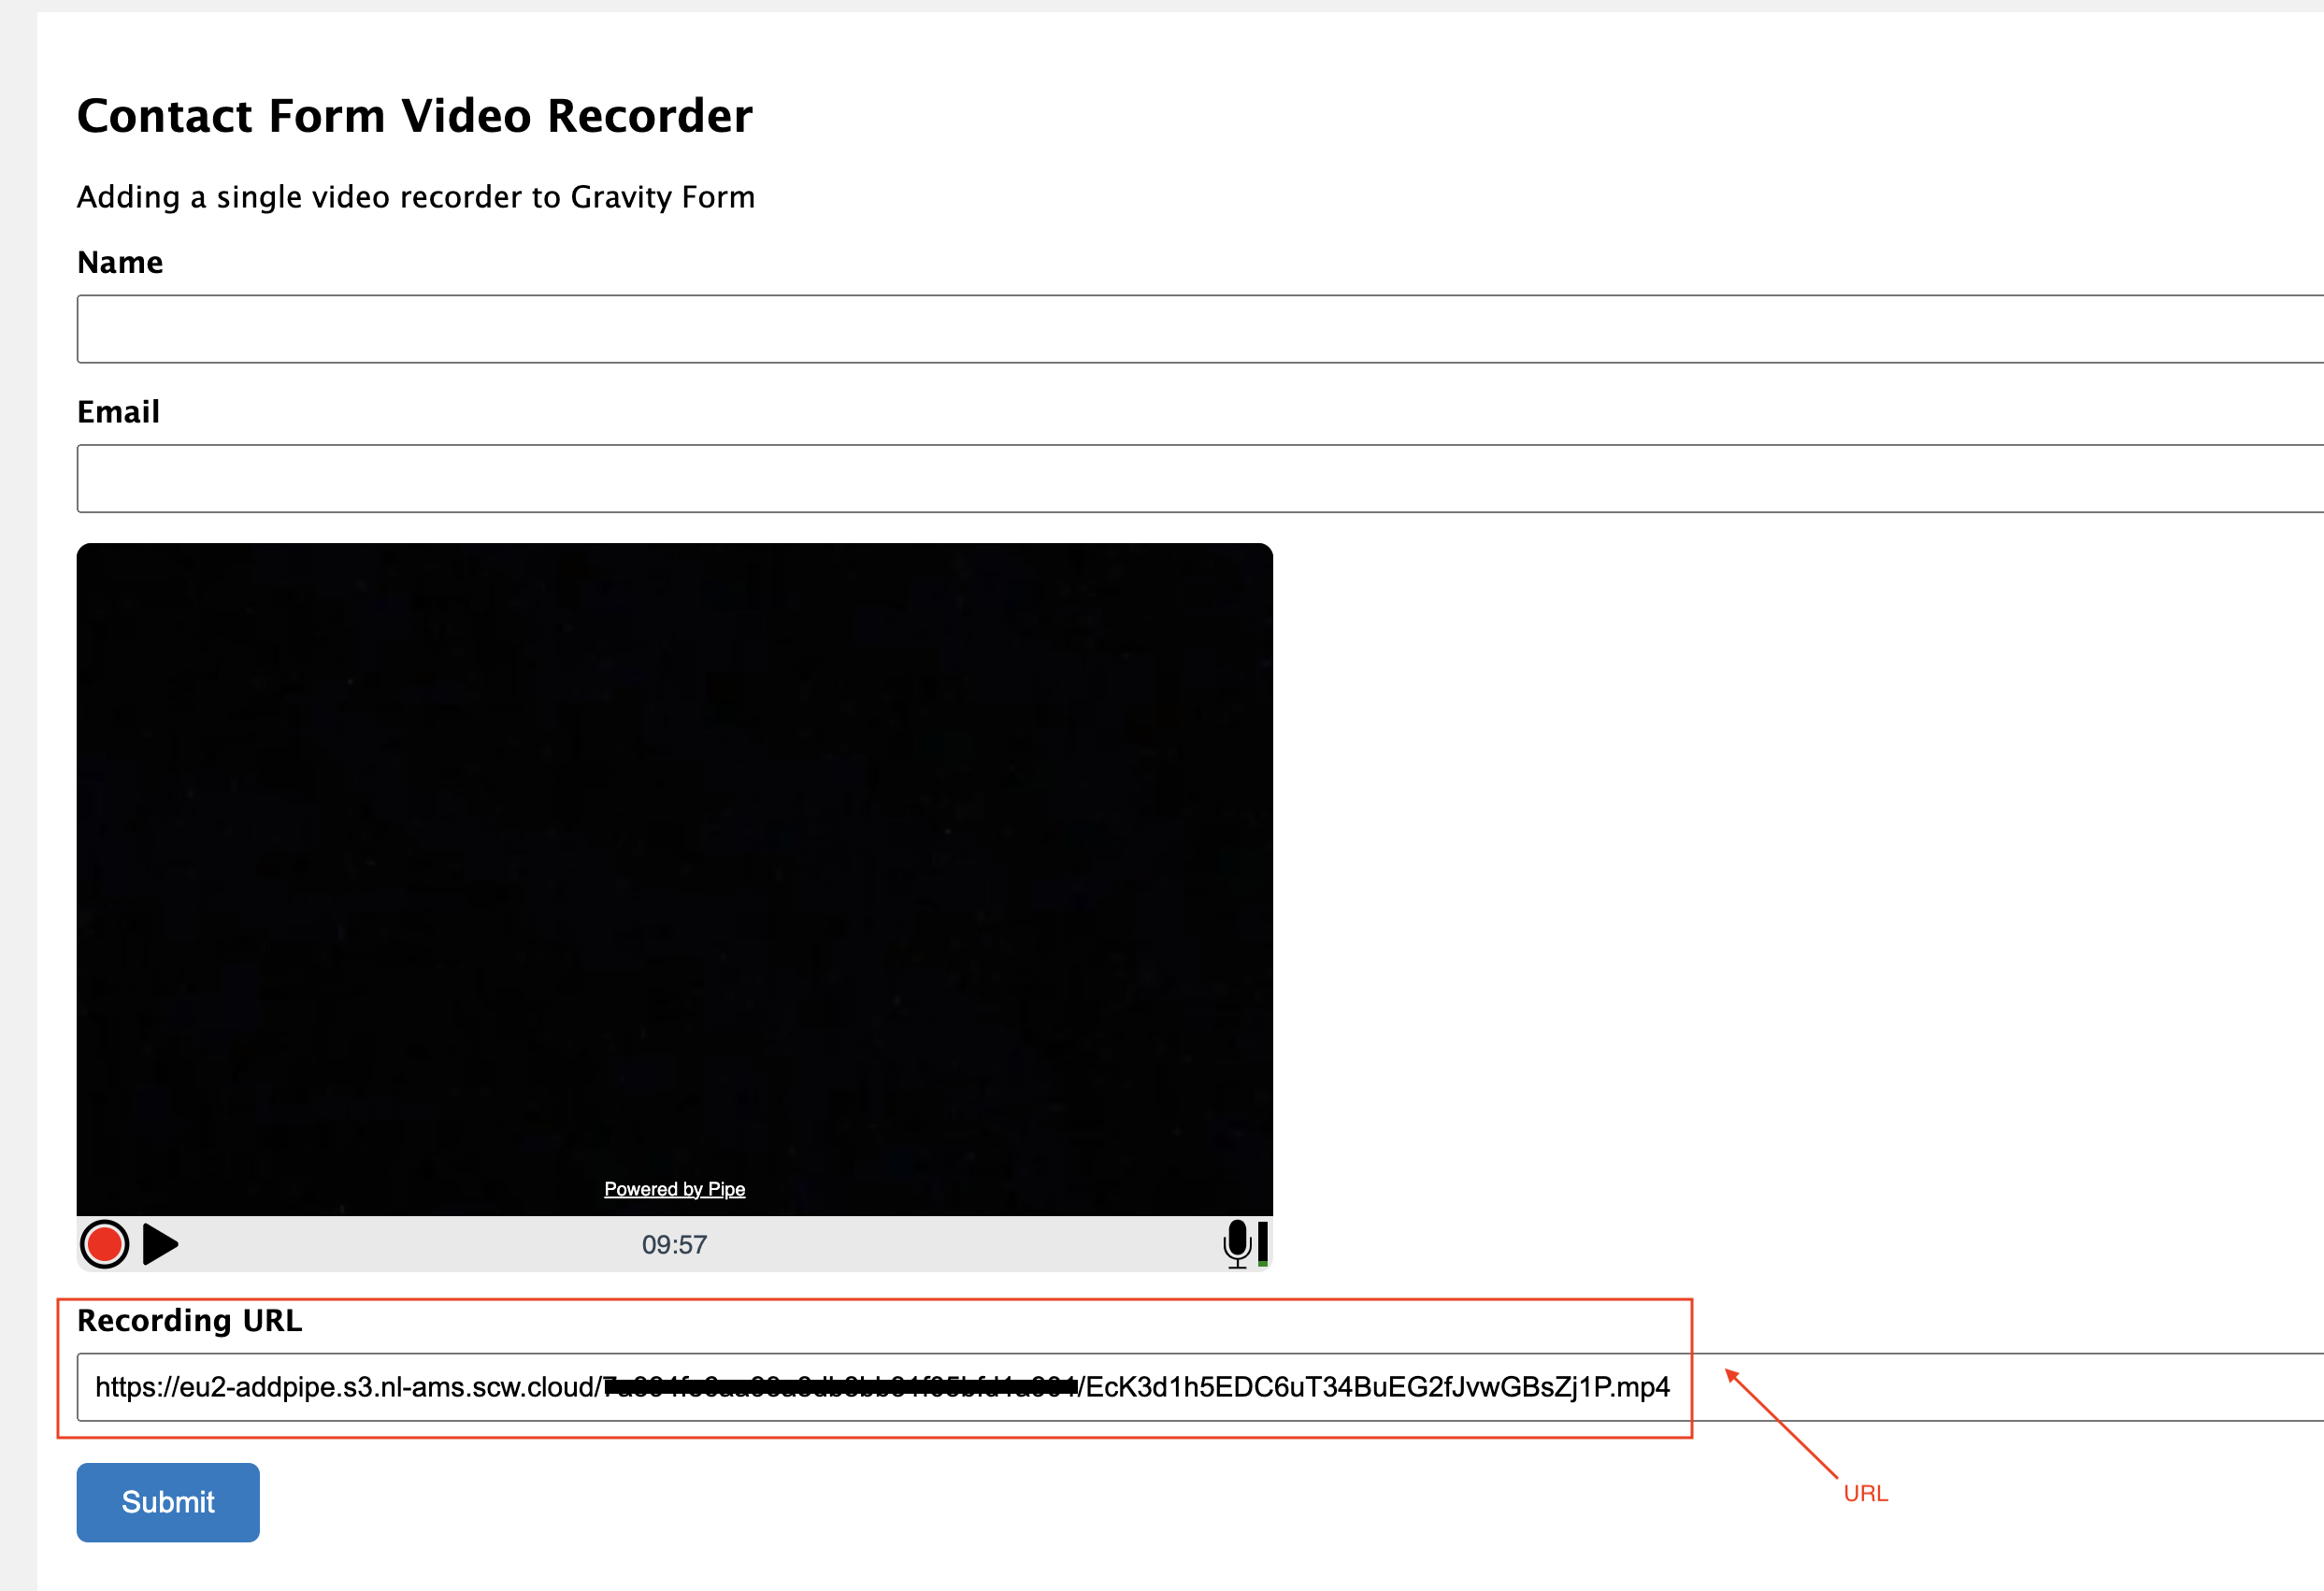
The visible Recording URL field that we previously added now allows us to check if our code:
- generates a proper-looking URL;
- populates the Gravity Forms input field with the URL value.
Testing and Submitting the First Video Contact Form
You can now embed the contact form in any page or post on your WP website by clicking the [Add Form] button when editing the post/page content.
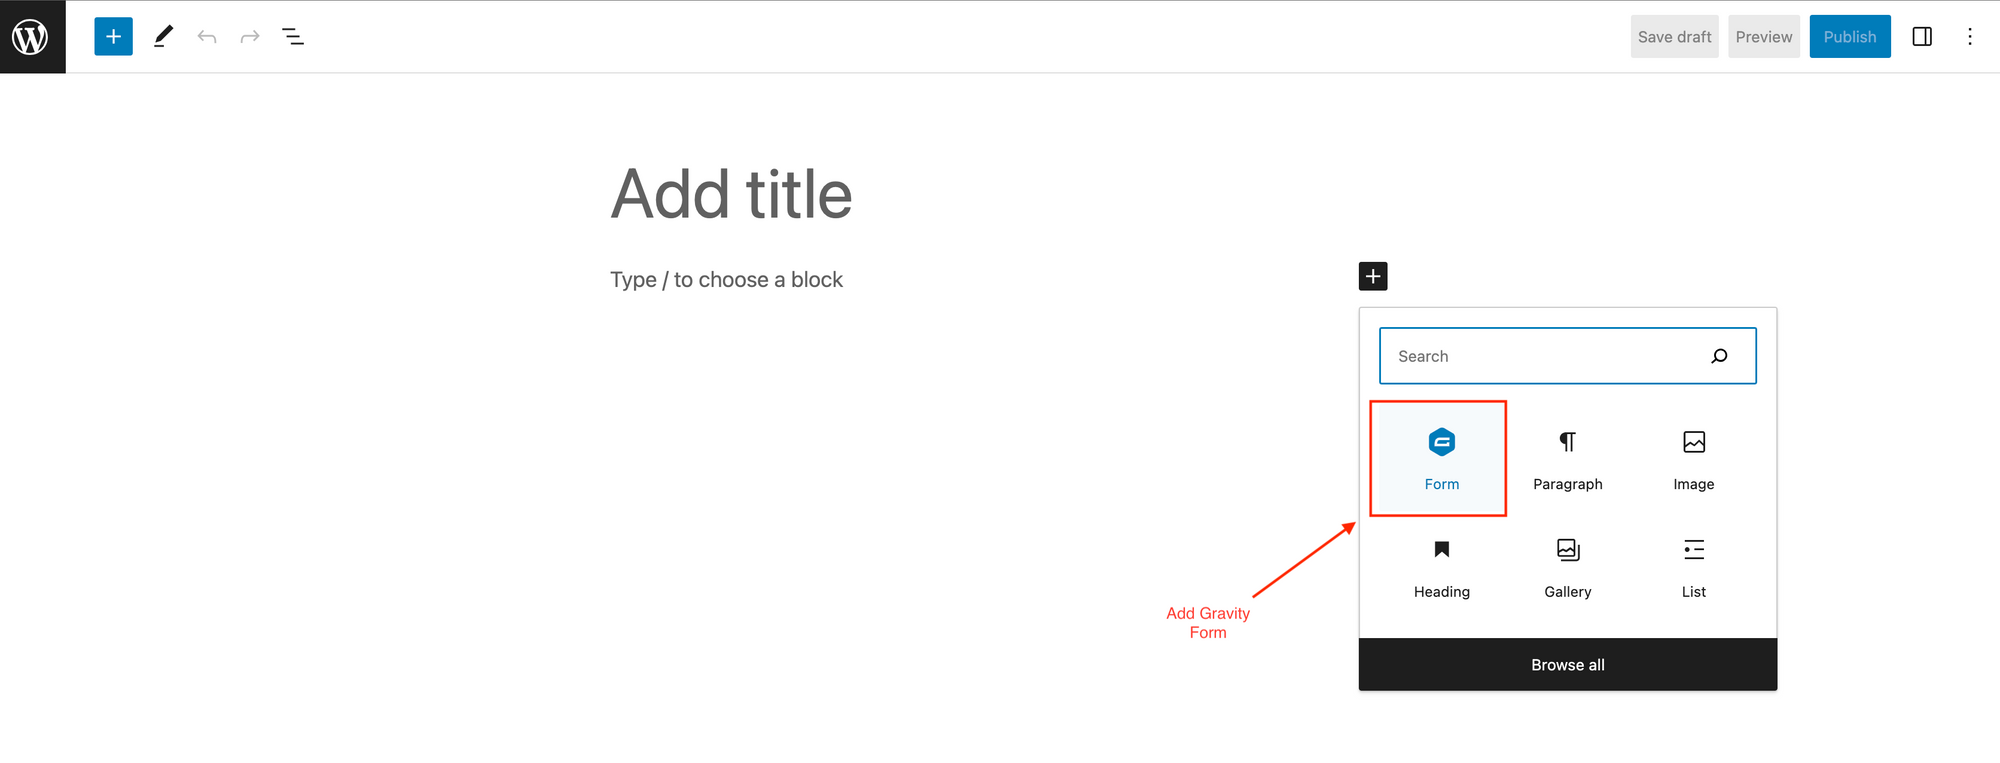
When presented with this contact form, your website visitors will be able to type their name and email, record a video using their webcam, and submit the contact form.
Viewing Form Submissions and Videos
All form submissions will be shown in your WP admin area under Forms > Entries:
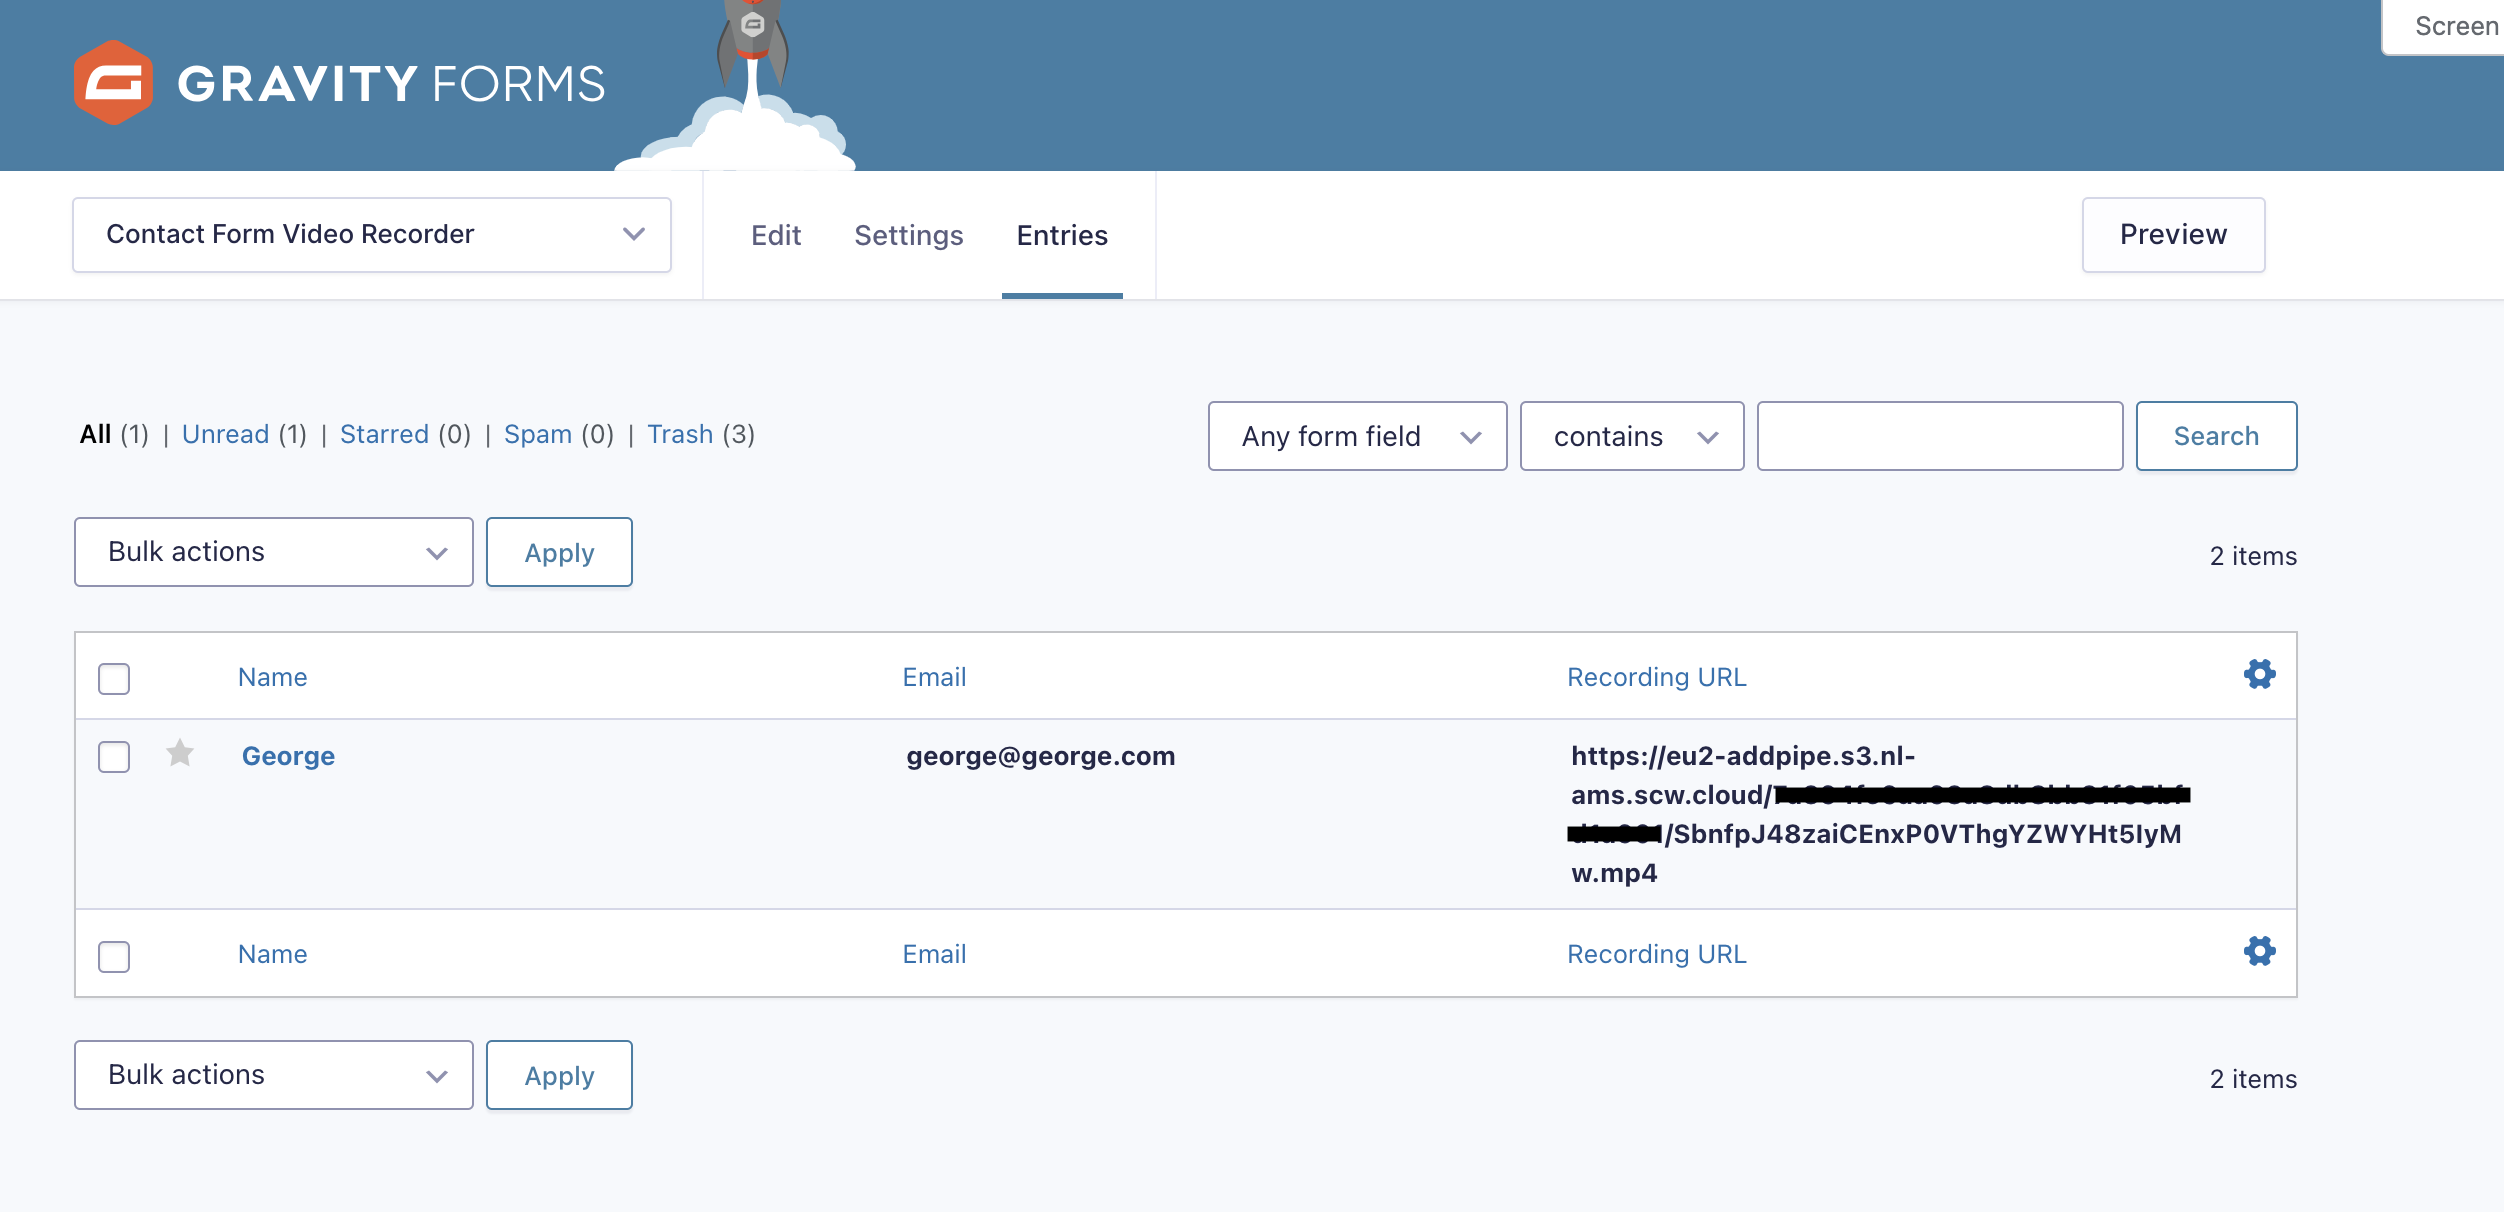
You can see the Recording URL in the rightmost column. Clicking the Name value or the [View] button will bring up the detail page where the full Recording URL is shown and can be clicked:

That’s it!
Adding More Than One Video Recorder to Your Custom Form
To add a second recorder to the page you will need to
- add a new HTML block field to the form
- add the 2nd part of the Pipe 2.0 HTML Embed Code to it (just the
<piperecorder ...>tag,pipe.jsandpipe.csswere already included in the form) - Change the id of the new
<piperecorder id="custom-id"...>element. I have used the id "second" in my code instead of "custom-id". This will ensure the recorders can be identified individually in the JavaScript code. - Add another "Website" field to the form so that it will store the URL for the recordings made with our second recorder
- Modify the JS code that was added to the initial HTML block field and, extend the
onRecordersInsertedfunction with the changes below.
Changes to be done inside the initial onRecordersInserted function (see below for example):
- add the code necessary to get the JS object associated with the 2nd recorder
- for that object, add the 3 functions (
onSaveOk,onVideoUploadSuccessandonDesktopVideoUploadSuccess) - make sure the new functions update the value of the new Website field (update the value of
secondFormFieldId)
Once you have done all of that, your JavaScript code should look something like this:
<script>
PipeSDK.onRecordersInserted = function () {

  const accountHash = "6edfef4c4934d69b7129ec3xxa534112";
  const formFieldId = "input_2_4";

  myRecorder = PipeSDK.getRecorderById('custom-id');
  myRecorder.onSaveOk = function (recorderId, streamName, streamDuration, cameraName, micName, audioCodec, videoCodec, fileType, videoId, audioOnly, location) {
    console.log('onSaveOk('+arguments+')');
    // onSaveOK is part of the desktop recorder's JS events API (recording from camera or screen)
    document.getElementById(formFieldId).value = "https://" + location + "/" + accountHash + "/" + streamName + ".mp4";
  };

  myRecorder.onDesktopVideoUploadSuccess = function(recorderId, filename, filetype, videoId, audioOnly, location){
      console.log('onDesktopVideoUploadSuccess('+arguments+')')
      //onDesktopVideoUploadSuccess is part of the JS desktop events API
      document.getElementById(formFieldId).value = "https://" + location + "/" + accountHash + "/" + filename + ".mp4";
  };

  myRecorder.onVideoUploadSuccess = function(recorderId, filename, filetype, videoId, audioOnly, location) {
      console.log('onVideoUploadSuccess('+arguments+')')
      //onVideoUploadSuccess is part of the JS mobile events API
      document.getElementById(formFieldId).value = "https://" + location + "/" + accountHash + "/" + filename + ".mp4";
  };

  const secondFormFieldId = "input_2_15";
  mySecondRecorder = PipeSDK.getRecorderById('second');
  mySecondRecorder.onSaveOk = function (recorderId, streamName, streamDuration, cameraName, micName, audioCodec, videoCodec, fileType, videoId, audioOnly, location) {
    console.log('onSaveOk('+arguments+')');
    // onSaveOK is part of the desktop recorder's JS events API (recording from camera or screen)
    document.getElementById(secondFormFieldId).value = "https://" + location + "/" + accountHash + "/" + streamName + ".mp4";
  };

  mySecondRecorder.onDesktopVideoUploadSuccess = function(recorderId, filename, filetype, videoId, audioOnly, location){
      console.log('onDesktopVideoUploadSuccess('+arguments+')')
      //onDesktopVideoUploadSuccess is part of the JS desktop events API
      document.getElementById(secondFormFieldId).value = "https://" + location + "/" + accountHash + "/" + filename + ".mp4";
  };

  mySecondRecorder.onVideoUploadSuccess = function(recorderId, filename, filetype, videoId, audioOnly, location) {
      console.log('onVideoUploadSuccess('+arguments+')')
      //onVideoUploadSuccess is part of the JS mobile events API
      document.getElementById(secondFormFieldId).value = "https://" + location + "/" + accountHash + "/" + filename + ".mp4";
  };
};
</script>
Click on the [Save Form] button, to save the changes made so far, and to check that everything is in order click on the [Preview] button.
If everything goes well we should have a page that looks like this:
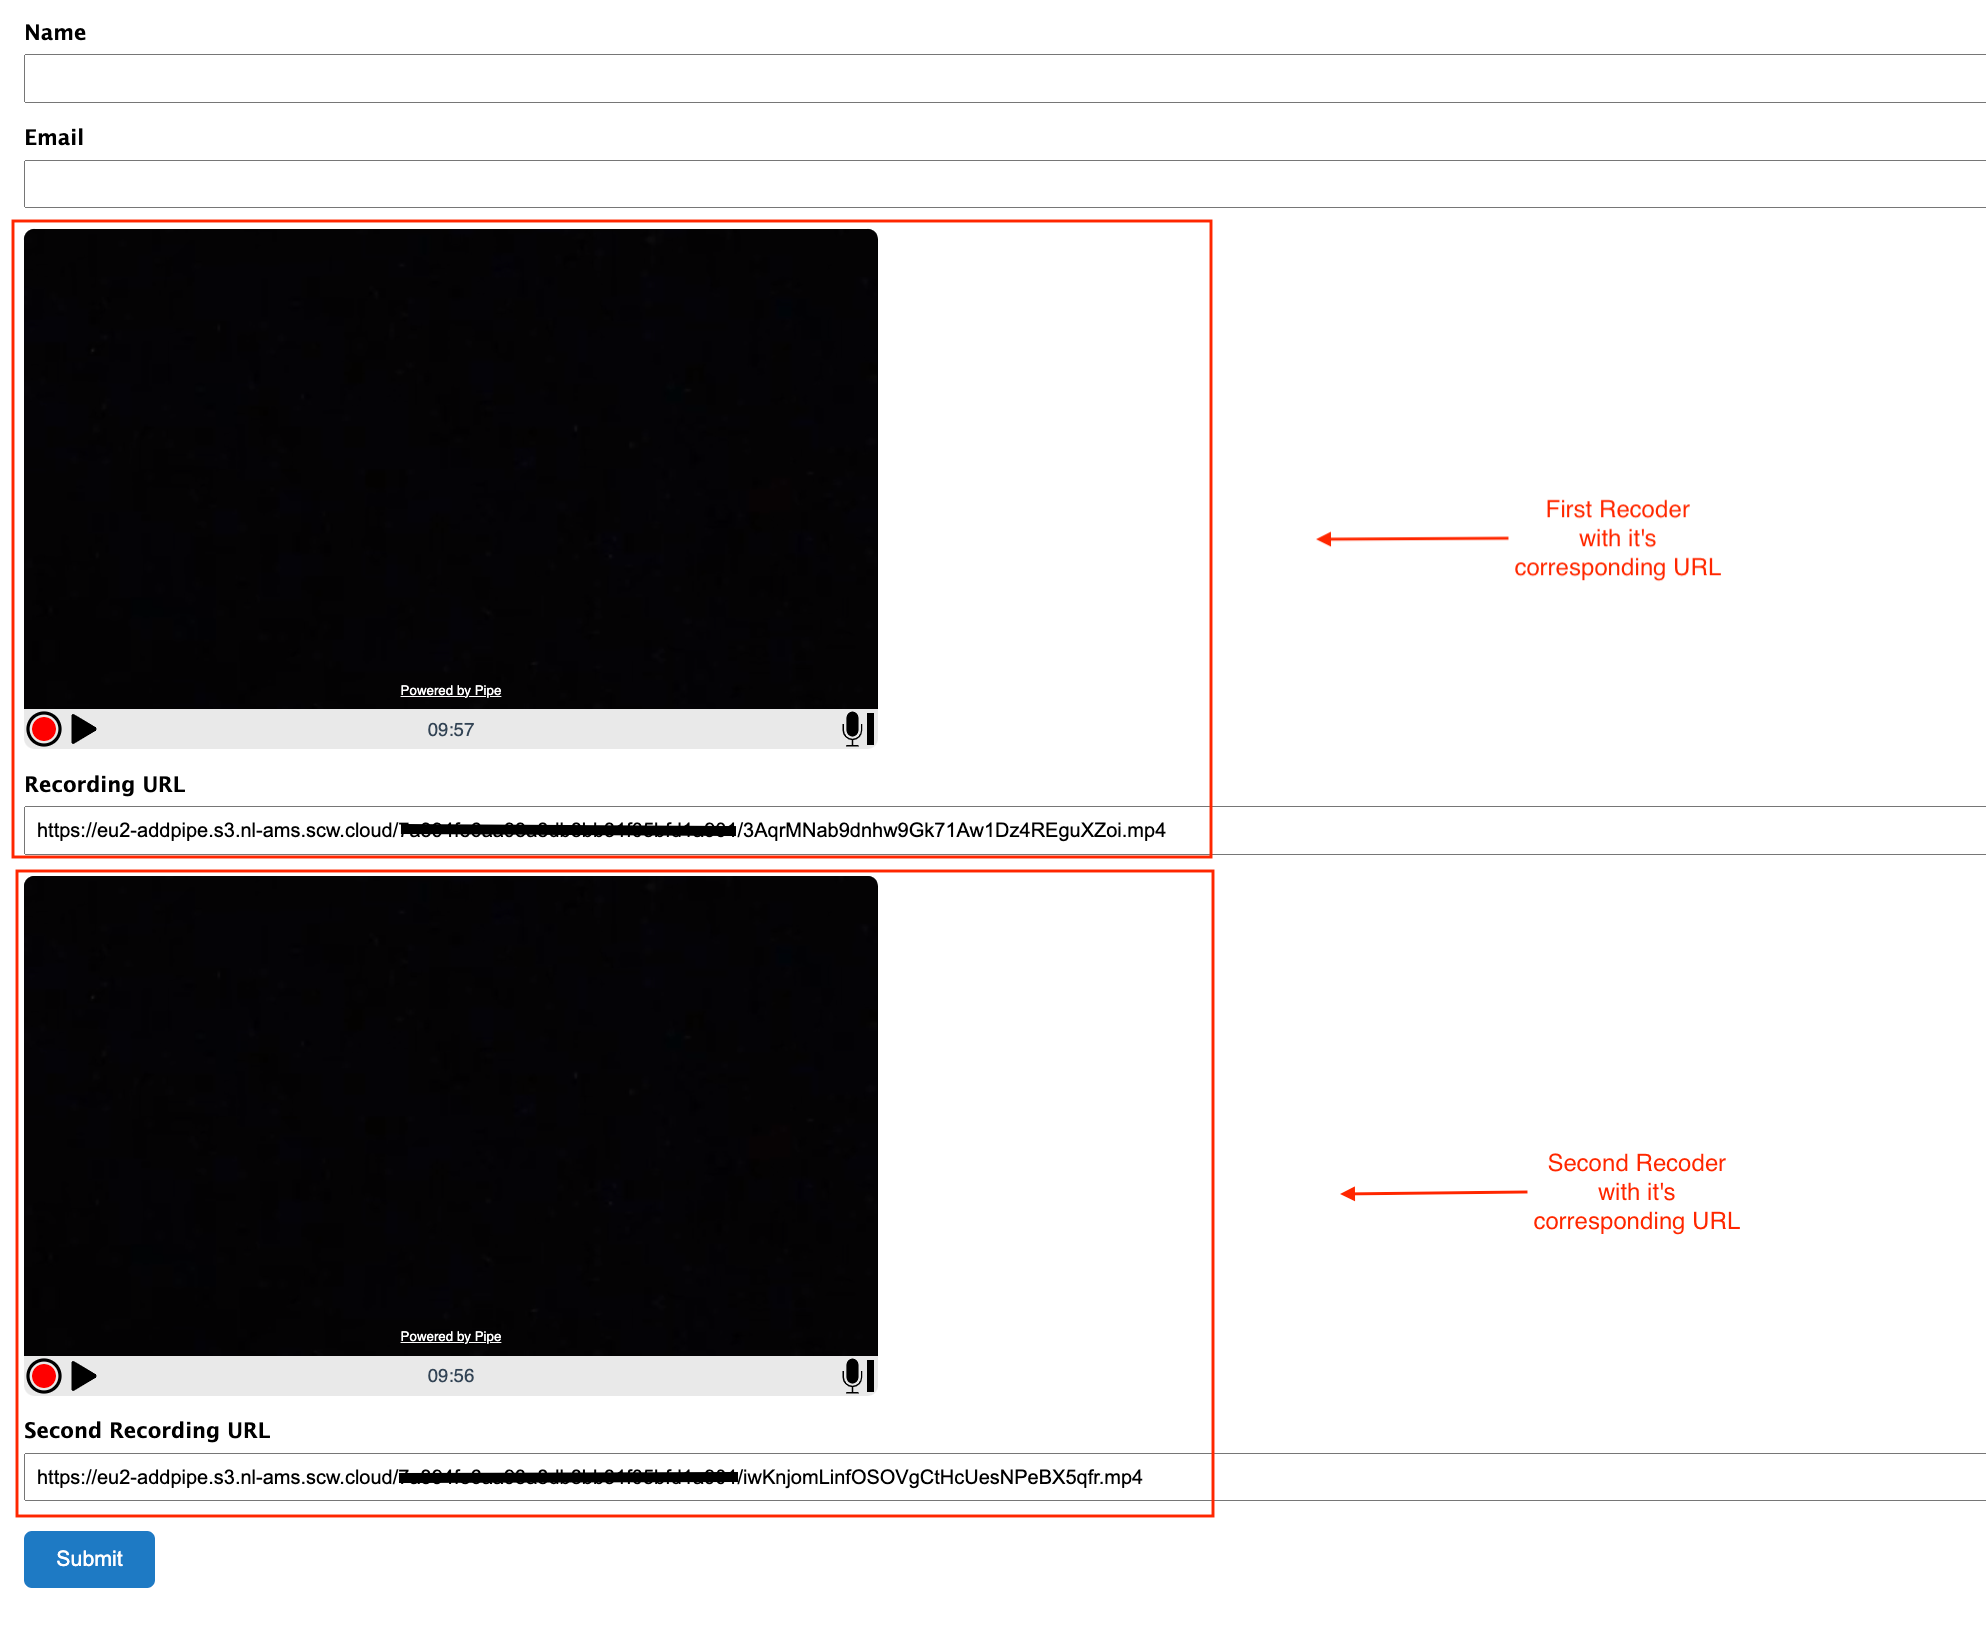
Excellent Work! Now you can add as many recorders as you like to Gravity Forms.
You’re now recording high-quality video from your website, visitors, through a simple contact form created with Gravity Forms and Pipe Video Recorder.
Not using Pipe yet? Get started today to capture relevant, emotion-rich video content from your website visitors.