Integrating Pipe With Amazon Transcribe
This step-by-step tutorial will teach you how to integrate Pipe with Amazon Transcribe.
Amazon Transcribe is an automatic speech recognition (ASR) service that allows developers to add speech-to-text capability to their applications. Using the Amazon Transcribe API, you can analyze audio files stored in Amazon Simple Storage Service (S3) and have the service return a text file of the transcribed speech.
We'll set up an Amazon S3 bucket where the Pipe Platform will push the mp4 recording files. Separately, we'll use a Python function in AWS Lambda function OR a self-hosted PHP script to push transcription jobs to Amazon Transcribe through the AWS PHP SDK. Either of these scripts will be triggered through Pipe's pipe_copied_s3 webhook. The output (.json, srt, and vtt transcription files) will be available in the same S3 bucket and through the Amazon Transcribe Jobs List.
Amazon Transcribe API (including streaming transcription) is billed monthly at $0.0004 per second. Usage is billed in one-second increments, with a minimum per-request charge of 15 seconds. See more pricing details here.
This means that Amazon’s service is a lot cheaper than other services like TranscribeMe or HappyScribe.
At the time of writing, Amazon Transcribe supports over 100 languages.
A few things to keep in mind before getting started:
- You need to have an AWS account (sign up here).
- A Pipe account (sign up here) with an active trial or PRO subscription is needed in order to have access to the push to Amazon S3 storage functionality.
- We will be using recordings in MP4 format, so make sure that the MP4 output is enabled in your Pipe dashboard under https://dashboard.addpipe.com/transcoding.
Step 1. Create an Amazon S3 bucket
You first need to create an Amazon S3 bucket in one of the regions with Amazon Transcribe Batch support. You can reference the AWS Global Infrastructure Region Table for an up-to-date view of the supported regions. The pricing table for Amazon Transcribe also contains the supported regions for each Transcribe feature you're looking for Batch processing.
We will not cover the process of creating the S3 bucket as this is very well documented in the Pipe documentation in the S3 Storage section or in the more detailed official Amazon S3 documentation.
In this bucket, Pipe will push the recordings as usual and from here the files will be further pushed to be transcribed.
For this tutorial, I’ve chosen the supported region Frankfurt (eu-central-1) and created a bucket named pipe-transcribe-tutorial. Pipe will push the recordings and all associated files, as normal, to this bucket.
Step 2. Create a new IAM user
The bucket we created in the previous step must be accessible by the Transcribe service through an IAM user with read and write permissions to this bucket (GetObject, PutObject and PutObjectAcl).
You can create this new IAM user or attach the correct policies to an already existing one.
For the purposes of this tutorial, we will create a new one:
- While logged in to your AWS console, go to https://console.aws.amazon.com/iam/home#/home
- From the left menu, select Users
- In the newly opened screen, click Create user at the top
- Enter the username. I’ll name mine pipe-transcribe-example
- Check Provide user access to the AWS Management Console - optional, and I want to create an IAM user (for Programmatic access) (we will be using the access key ID and secret access key generated for this user later on). Click Next.
- We will attach the required permissions in the permission screen. This can be done in multiple ways, but for clarity, we will be attaching the permissions directly to the user. Select at the top Attach policies directly
- Check the AWS managed policy AmazonTranscribeFullAccess, AmazonS3FullAccess and AWSLambdaBasicExecutionRole. Click Next
- You can add tags on this screen. We don’t need them for the purposes of this tutorial, but you can add them if you wish. Click Next.
- Review your settings and click Create user.
- Save the credentials that are automatically generated and keep them safe. We will use them later.
OK, we’ve created our IAM user, but we are not done with it just yet. We still need to attach to it a policy that grants access to the S3 bucket we created earlier:
Go to the Users section in the IAM dashboard:
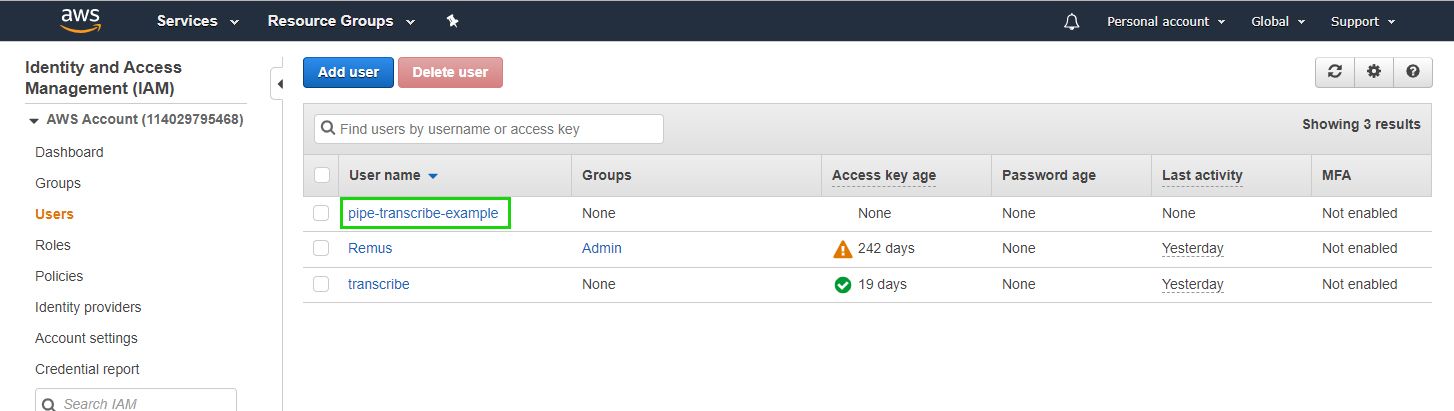
- Click on the newly created user
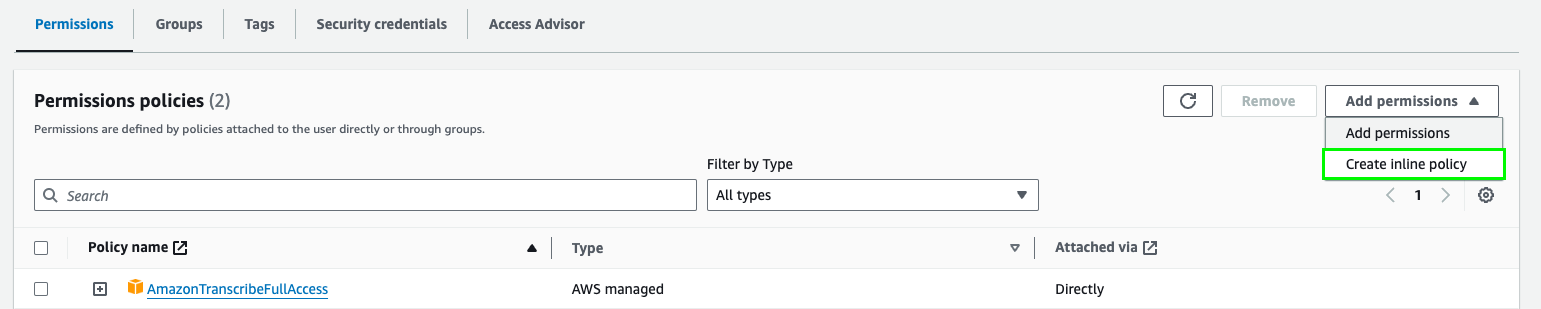
- Click Add permissions and Create Inline Policy
3. Click the JSON tab at the top and copy-paste the following
{
    "Version": "2012-10-17",
    "Statement": [
        {
            "Sid": "VisualEditor0",
            "Effect": "Allow",
            "Action": [
                "transcribe:StartTranscriptionJob",
                "transcribe:GetTranscriptionJob",
                "transcribe:ListTranscriptionJobs",
                "s3:PutObject",
                "s3:PutObjectAcl",
                "s3:GetObject"
            ],
            "Resource": "arn:aws:s3:::YOUR-BUCKET-NAME/*"
        }
    ]
}
4. Click Next, give it an easily identifiable name, and click Create Policy.
Once the user is created, the next step is to configure the Pipe Platform's Push to S3 feature. To do this, navigate to the S3 page in the Pipe account dashboard. Fill in all the required details here.
Make sure you use the correct key and secret generated for the IAM user, the correct bucket name, and the correct bucket region.
For the next step, we can set up an AWS Lambda function to act as a webhook directly within the AWS console (step 3), OR we can create a custom PHP webhook script (steps 4 & 5) that needs to be hosted on a live server.
Step 3. Using an AWS Lambda Function as a Webhook
In this step we will use an AWS Lambda function as a webhook to automatically start new transcription jobs. We will also set up an AWS API Gateway that will provide access to the Lambda function through POST requests.
In order to create an AWS Lambda function, follow these steps signed into your AWS console:
- Go to the AWS Lambda service in the AWS Management Console by searching for Lambda.
- Click on Create function.
- Choose Author from scratch.
- Set the function name (e.g., transcribeWebhookFunction).
- Choose the Python runtime (e.g., Python 3.12 or higher).
- Click on Create function.
Now that the function is created, we need to add the Python script to handle the POST requests. Here is the full webhook handler code, written in Python, that adds a transcription job:
import json
import urllib.parse
import boto3
from botocore.exceptions import NoCredentialsError, ClientError

def lambda_handler(event, context):
    # Extracting the body from the event
    try:
        body = event["body"]
        # Parsing the form-urlencoded payload
        parsed_body = urllib.parse.parse_qs(body)
        payload = parsed_body.get('payload', [None])[0]

        if not payload:
            raise ValueError("Payload not found")

        jsonData = json.loads(payload)
    except (KeyError, ValueError) as e:
        return {
            'statusCode': 400,
            'body': json.dumps(f'Error: {str(e)}')
        }
    except json.JSONDecodeError:
        return {
            'statusCode': 400,
            'body': json.dumps('Invalid JSON')
        }

    # Get the recording name, recording URL, and bucket name
    try:
        streamName = jsonData["data"]["videoName"]
        url = jsonData["data"]["url"]
        bucketname = jsonData["data"]["bucket"]
    except KeyError as e:
        return {
            'statusCode': 400,
            'body': json.dumps(f'Missing key in payload: {str(e)}')
        }

    # Initialize the transcribe client
    client = boto3.client('transcribe', region_name='eu-central-1')

    # Start the transcription job
    try:
        response = client.start_transcription_job(
            TranscriptionJobName=streamName,
            LanguageCode='en-US',
            Media={'MediaFileUri': url},
            OutputBucketName=bucketname
        )
        return {
            'statusCode': 200,
            'body': json.dumps('Transcription job started successfully')
        }
    except (NoCredentialsError, ClientError) as e:
        return {
            'statusCode': 500,
            'body': json.dumps(f'Error starting transcription job: {str(e)}')
        }
After pasting the above code, click on Deploy.
Things to note here:
- I’m specifying the
en-USlanguage code. If you're unsure of the language spoken in your recording, consider usingIdentifyLanguageorIdentifyMultipleLanguagesto enable automatic language identification. - The input file is an MP4 that can also contain video. AWS Transcribe automatically extracts the audio from the video. The input can be in FLAC, MP3, MP4, or WAV file format. The input must be less than 4 hours or less than 2 GB of audio data.
- I’m specifying the S3 bucket where the transcription output should be uploaded. This parameter is optional. If you decide not to pass this parameter, AWS Transcribe will automatically upload the transcription to a default Amazon S3 bucket. If you opt for a default Amazon S3 bucket, just beware that the transcription jobs will be automatically deleted after 90 days.
Now that the AWS Lambda function is deployed, we must set up an AWS API Gateway:
- Go to the API Gateway service in the AWS Management Console by searching for API.
- Create a new REST API.
- Create a new POST method under this resource.
- Integrate this method with your Lambda function by selecting Lambda function as the Integration type and selecting the previously created Lambda function.
- Make sure to check the Lambda proxy integration checkbox for the function to correctly handle the
application/x-www-form-urlencodedcontent-type sent by the Pipe webhook. - Click on Create method.
- Click on Deploy API and select a New Stage (e.g., prod) to generate a valid URL.
- Copy and store the generated Invoke URL after deployment since it will be used in step 6.
If you completed this step, you can skip directly to step 6 since you already have a working webhook hosted by AWS Lambda.
Step 4. Setting up the AWS SDK
In steps 4 and 5 we will use our own PHP webhook to receive notifications from Pipe and push transcription jobs to Amazon Transcribe through the AWS SDK.
The Amazon Transcribe API is accessible only through the v3 version of the AWS APIs.
We will be using the Amazon Transcribe Batch service - where you can send pre-recorded files for transcribing.
For our case, we will be using the AWS PHP SDK, which requires PHP v5.5 at minimum. For an up-to-date list of all the SDKs available, see the Amazon Transcribe resources.
First, let’s install the AWS PHP SDK in the directory where your webhook handler script is located for ease of use. You can install it anywhere you want; just make sure you fill out the correct path when you load the SDK into your script.
You can install the AWS SDK for PHP Version 3:
- As a dependency via Composer
- As a prepackaged part of the SDK
- As a ZIP file of the SDK
In this tutorial, we will be using Composer on a Linux machine.
On Linux systems, you need to have access to the command line to install via Composer:
- Install Composer if you don’t already have it installed.
- Go to the directory where your webhook PHP script will be located and run
composer require aws/aws-sdk-php. Composer will install all the necessary dependencies. - Once installed, create a new webhook PHP script in a text editor and include the autoloader in your script at the top, as follows:
require '/path/to/webhook-handler-directory/vendor/autoload.php';
If you need to install AWS PHP SDK in other ways, check the installation page.
Step 5. Starting a transcription job
Now that we got the AWS PHP SDK installed we can make calls to the AWS Transcribe API.
For a broader view of the methods that you have at your disposal, you can view the official docs.
Transcriptions are made in the form of jobs. You add a transcription job by specifying, at a minimum, the following:
- A unique job name
- The language code the input audio is in
- The S3 bucket storage link for the input file (the file needs to be accessible by the IAM user created earlier).
For the unique job name, we will be using the video name provided by the Pipe webhook that we are going to set up in the next step. We will also be getting the link to the file and the bucket name where the file is stored from the webhook payload.
Here is the full webhook handler code, written in PHP, that adds a transcription job (webhook-handler.php):
<?php

//this most probably particular for my use case that I have to increase the memory available for the PHP process.
ini_set('memory_limit', '256M');

//load the AWS SDK
require_once('vendor/autoload.php');

//load the libraries that we will be using
use Aws\TranscribeService\TranscribeServiceClient;
use Aws\Exception\AwsException;
use Aws\TranscribeService\Exception\TranscribeServiceException;

//get the webhook payload
$payload = $_POST["payload"];
$jsonData = json_decode($payload, true);

//get the recording name, recording URL and bucket name
$streamName = $jsonData["data"]["videoName"];
$url = $jsonData ["data"]["url"];
$bucketname = $jsonData ["data"]["bucket"];

//initialize the transcribe client
$client = new TranscribeServiceClient([
	//this the region of the S3 bucket as well as the region of the Transcribe service
	'region'  => 'eu-central-1',
	'version' => 'latest',
	'credentials' => [
		'key'    => YOUR_IAM_USER_KEY,
		'secret' => 'YOUR_IAM_USER_SECRET',
	]
]);

//start the transcription job
try{
	$result = $client->startTranscriptionJob([
		'LanguageCode' => 'en-US', // REQUIRED language code of the audio input
		'Media' => [
// REQUIRED link to the audio input. In our case we use the link from the webhook payload
			'MediaFileUri' => $url,
],
//the bucket where the transcription file will be put. In our case is the same S3 bucket we used to get the audio input from. We are using the bucket name returned in the webhook payload
		'OutputBucketName' => $bucketname,
// REQUIRED unique job name. We are using the video name provided by the Pipe webhook
		'TranscriptionJobName' => "$streamName"
]);
}catch (TranscribeServiceException $e) {
    echo "TranscribeServiceException=".$e->getMessage();
}

?>
Things to note here:
- I’m specifying the
en-USlanguage code. If you're unsure of the language spoken in your recording, consider usingIdentifyLanguageorIdentifyMultipleLanguagesto enable automatic language identification. - The input file is an MP4 that can also contain video. AWS Transcribe automatically extracts the audio from the video. The input can be in FLAC, MP3, MP4, or WAV file format. The input must be less than 4 hours or less than 2 GB of audio data.
- I’m specifying the S3 bucket where the transcription output should be uploaded. This parameter is optional. If you decide not to pass this parameter, AWS Transcribe will automatically upload the transcription to a default Amazon S3 bucket. If you opt for a default Amazon S3 bucket, just beware that the transcription jobs will be automatically deleted after 90 days.
Step 6. Setup the Pipe webhook
We now need to set up the Pipe Platform to execute your AWS Lambda function or local PHP webhook code whenever the Pipe Platform finishes uploading a new mp4 file to your S3 storage.
Go to https://dashboard.addpipe.com/webhooks and Click on Add New Webhook.
In the Webhook URL field, we will be using the URL for the webhook created in the previous steps:
- If you opted for the AWS Lambda webhook (step 3), you need to enter the URL generated by the AWS API Gateway service (e.g.,
https://aaaaaaaba.execute-api.eu-central-1.amazonaws.com/prod). - If you opted for hosting the PHP webhook file on your own server (steps 4 and 5), you need to enter the URL for where you hosted the webhook-handler.php file (e.g.,
https://your_domain.com/webhook/webhook-handler.php).
For event select the video_copied_s3 event. It triggers right after a recording is successfully pushed to your Amazon S3 bucket.
For the content type, it is important to select the application/x-www-form-urlencoded option (In order for the payload to be sent as a URL parameter).
You can check out the Pipe docs on how to setup a webhook and how to handle webhook data, if you need help doing this.
The code for starting up the transcribing process is implemented inside your AWS Lambda function or inside your webhook handler script (webhook-handler.php).
Okay, great. Now, you can go ahead and record a video using Pipe to see if everything is working as expected. Once the recording is saved, the Pipe webhook that we've setup earlier will trigger and add a transcription job for the recording you just made.
Step 7. Getting the transcription
We will be using the AWS console to see the resulting transcriptions, but you can also use the AWS SDKs to access them programmatically.
While signed into your AWS console, go to the services drop-down, search for transcribe, and click on the Amazon Transcribe result:
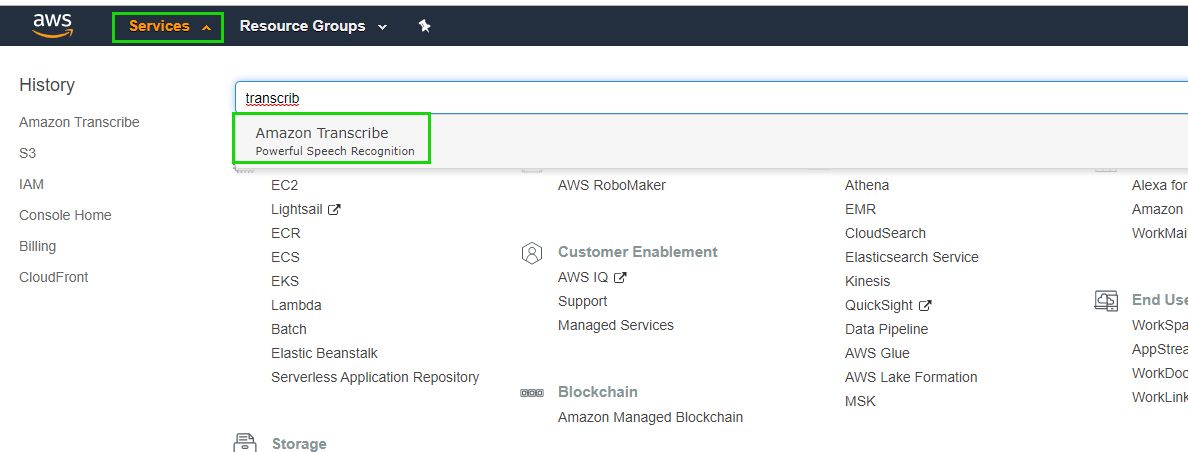
You will be redirected to the Amazon Transcribe dashboard, where you can access your transcription jobs.
Make sure you have the correct region selected in the top right corner (the same region of your S3 bucket)
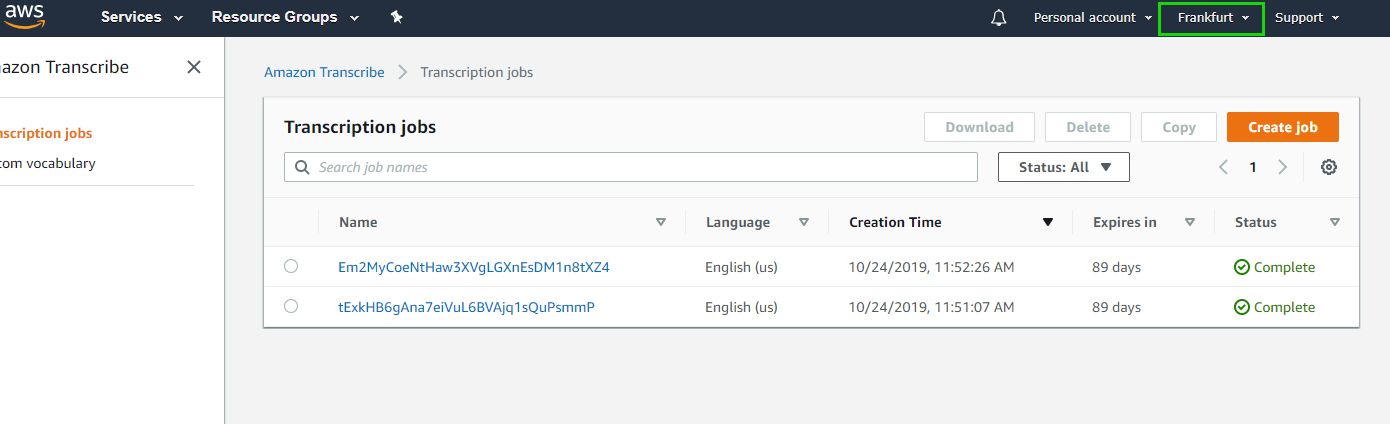
In my case, the region is Frankfurt.
As you can see, the transcription jobs are listed together with information about:
- Job name (recording name)
- Language
- Creation time
- Expiration date
- Status
You can click on each individually to get more information, including the actual link to the transcription JSON, srt, and vtt files.
If you have followed the steps in the tutorial, you can access the transcription JSON, srt, and vtt files directly from your S3 bucket as you would with any other file.
The following is an example JSON transcription file generated by Amazon Transcribe:
{
    "jobName": "my-first-transcription-job",
    "accountId": "111122223333",
    "results": {
        "transcripts": [
            {
                "transcript": "Welcome to Amazon Transcribe."
            }
        ],
        "items": [
            {
                "start_time": "0.64",
                "end_time": "1.09",
                "alternatives": [
                    {
                        "confidence": "1.0",
                        "content": "Welcome"
                    }
                ],
                "type": "pronunciation"
            },
            {
                "start_time": "1.09",
                "end_time": "1.21",
                "alternatives": [
                    {
                        "confidence": "1.0",
                        "content": "to"
                    }
                ],
                "type": "pronunciation"
            },
            {
                "start_time": "1.21",
                "end_time": "1.74",
                "alternatives": [
                    {
                        "confidence": "1.0",
                        "content": "Amazon"
                    }
                ],
                "type": "pronunciation"
            },
            {
                "start_time": "1.74",
                "end_time": "2.56",
                "alternatives": [
                    {
                        "confidence": "1.0",
                        "content": "Transcribe"
                    }
                ],
                "type": "pronunciation"
            },
            {
                "alternatives": [
                    {
                        "confidence": "0.0",
                        "content": "."
                    }
                ],
                "type": "punctuation"
            }
        ]
    },
    "status": "COMPLETED"
}
The Amazon Transcribe dashboard can be used for an eagle-eye view over the status of the transcriptions, but as I’ve mentioned before, the same information presented in the dashboard can be obtained through the AWS SDK using the method listTranscriptionJobs() to get a list of transcription jobs combined with the getTranscriptionJob() method to get more details about each transcription.
Transcription jobs remain on the job list for 90 days after the job is complete. After 90 days, the job is removed from the list of transcription jobs. If the output of the job is stored in the default Amazon S3 bucket the output from the job is removed as well. If you specified your S3 bucket, the output is not removed when the job expires.
For further reference about a transcription job, including ways a job can fail, you can read the documentation.
And that’s it! You’ve successfully integrated Pipe with Amazon Transcribe.