The WebM Project has been slowly getting more support from the browser community with Edge 14 adding support in the Anniversary edition of Windows 10. At the same time more .webm files are created by new HTML5 APIs like WebRTC when recording WebRTC sessions and the the MediaStream Recorder API.
In this post I’ll cover how to convert a large library of .webm files to MP4 with FFmpeg – the free and open source Swiss army knife of video conversion.
WebM Overview
WebM is an open, royalty-free, media container designed for the web. It is based on the Matroska container (but less complex) and it can now contain:
- video streams compressed with the VP8, VP9 and even H.264 video codecs
- audio streams compressed with the Vorbis or Opus audio codecs.
A key benefit with webm is that it is open for anyone to implement and improve.
Webm is also optimized for the web with a simple container and low computational footprint to enable playback on any device, including low-power mobile devices.
Then why convert to MP4? you may ask. The answer is for compatibility:
- WebM videos play natively only in Firefox, Chrome & Opera
- Edge 14 supports (only) webm videos containing VP9 video and Opus audio
- IE & Safari on both macOS and iOS offer no builtin support
- Playing .webm videos natively on other devices is also a challenge
So WebM is having quite a hard time against MP4 files with H.264 video and AAC audio which play across a very wide net of devices and browsers.
Your WebM Library
There are several situations where you’ll have to deal with lots of .webm files:
- recording WebRTC video calls will result in .webm video recordings
- recording videos using the MediaRecorder API in Chrome, Firefox and Opera will produce .webm files
- you’re sitting on a large library of .webm video files like Wikimedia Commons and YouTube are
- you’re feverishly downloading cartoons from YouTube
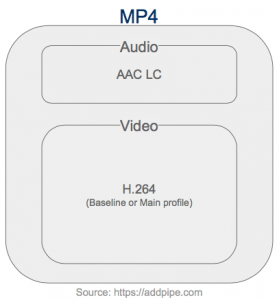
The MP4 File We’re Targeting
MP4 files have the ability to work natively on all devices and browsers but for that to happen we need to ensure the MP4 file contains H.264 video and AAC-LC for sound. On top of that, to ensure our video can be played on older devices like the iPhone 5S, we will be using H.264’s High Profile and Level 4.2 .
FFmpeg Setup
This article assumes you’ve downloaded and installed (or compiled) FFmpeg and you can access it from the command line. To check just type ffmpeg in the command line or Terminal, you should get something similar: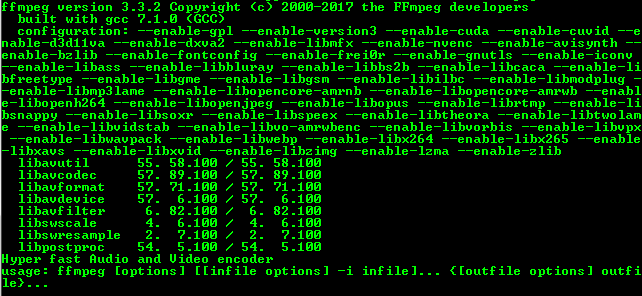
FFmpeg can natively
decode:
- VP8, VP9 and H.264 video
- Vorbis and Opus audio
Encoding however is mostly supported through external libraries and we will be needing them to encode H.264 video and AAC audio.
| Codec | FFmpeg Decoding | FFmpeg Encoding |
|---|---|---|
| VP8 | native | libvpx library |
| VP9 | native | libvpx library |
| H.264 | native | libx264 and OpenH264 |
| Opus | native | libopus library |
| Vorbis | native | native (but very primitive) |
| AAC-LC | native | native and libfdk_aac external. |
Video LAN’s libx264 is the default H.264 video encoding library and a very good one too. I haven’t seen a FFmpeg build that doesn’t include it so you should have no problems using it.
FFmpeg currently supports two AAC-LC encoders:
- native FFmpeg AAC encoder (
aac) - Fraunhofer FDK AAC library (
libfdk_aac)
Our examples will be using the native AAC-LC library. For details on how to use the 2nd one (it’s better) check out the FFmpeg’s AAC Encoding Guide.
Inspecting WebM Content
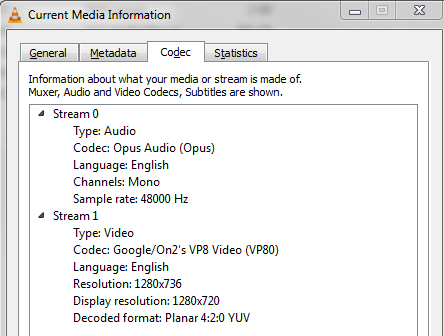
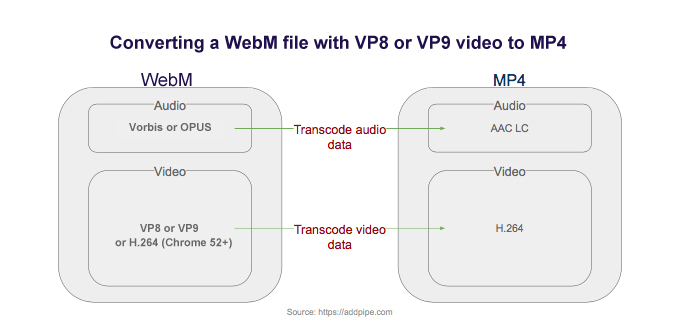
Video data: Most WebM files will contain VP8 or VP9 for video. For them we’ll transcode the video data to H.264. Some (rare) .webm files already contain H.264 video in which case we can simply copy the video data over and transcode just the audio.
Audio data: A WebM file might contain sound encoded with Opus at 8-48kHz or Vorbis at 8-192kHz
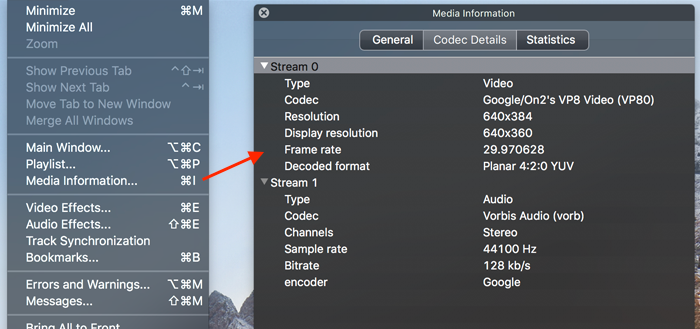
VLC‘s Media Information window is very good in providing you with quick information about the number and types of streams available in a video. Here is a .webm file with 720p video and 48kHz Opus audio:
Converting WebM to MP4
The simplest catch all command to convert WebM to MP4 using FFmpeg is:
ffmpeg -i video.webm video.mp4
When the WebM file contains VP8 or VP9 video, you have no choice but to transcode both the video and audio.
Video conversion can be a lengthy and CPU intensive process, depending on file size, video and audio quality, video resolution, etc. but FFmpeg provides a series of presets and controls to help you optimize for quality or faster conversions.
A note on video quality
When encoding video with H.264, the video quality can be controlled using a quantizer scale (crf value, crf stands for Constant Rate Factor) which can take values from 0 to 51: 0 being lossless, 23 the default and 51 the worst possible. So the lower the value the better the quality. You can leave the default value or, for a smaller bitrate, you can raise the value:
ffmpeg -i video.webm -crf 26 video.mp4
Video presets
FFmpeg also provides several quality presets which are calibrated for a certain encoding speed to compression ratio. A slower preset will provide a better compression. The following presets are available in descending order: ultrafast, superfast, veryfast, faster, fast, medium, slow, slower and veryslow. The default preset is medium but you can choose a faster preset:
ffmpeg -i video.webm -preset veryfast video.mp4
Placing the MOOV atom at the beginning
All MP4 files contain a moov atom. The moov atom contains information about the length of the video. If it’s at the beginning it immediately enables a streaming video player to play and scrub the MP4 file. By default FFmpeg places the moov atom at the end of the MP4 file but it can place the mov atom at the beginning with the -movflags faststart option like this:
ffmpeg -i video.webm -movflags faststart video.mp4
Using Levels and Profiles when encoding H.264 video with FFmpeg
To ensure the highest compatibility with older iOS or Android devices you will need to use certain encoding profiles and levels. For example a video encoded with the High Profile and Level 4.2 will work on iPhone 5S and newer but not on older iOS devices.
ffmpeg -i video.webm -movflags faststart -profile:v high -level 4.2 video.mp4
Converting WebM with H.264 video to MP4
In some rare cases the .webm file will contain H.264 video and Vorbis or Opus audio(for example .webm files created using the MediaRecorder API on Chrome 52+ ). In such cases you don’t have to re-encode the video data since it’s already in the desired H.264 format (re-encoding is also not recommended since you’ll be loosing some quality in the process while consuming CPU cycles) so we’re just going to copy over the data

To copy the video data and transcode the audio in FFmpeg you use the -c:v copy option:
ffmpeg -i video.webm -c:v copy video.mp4