How to notify your users via email when their Pipe recording is ready for playback using Zapier Webhooks
In this tutorial, we are going to cover how to easily send an email to your users when their recording is ready for playback using Zapier, a no-code automation tool which supports more than 2000 apps.
This is part 2 of our Zapier tutorials series. In the 1st part we’ve looked at how to automatically push Pipe’s recordings to Box.
In this tutorial, we are going to cover how to easily send an email to your users when their recording is ready for playback using Zapier, a no-code automation tool which supports more than 2000 apps.
Requirements
To follow along with this tutorial you will need an account with both Zapier and Pipe.
Zapier offers a free 14 days trial of their Profession plan which allows you to use Premium Apps. We’re going to use a premium app (Webhooks by Zapier) in this tutorial. So, if you want to keep your Pipe account integrated with Zapier, you will need to eventually upgrade to the Professional plan ($61.25/mo) or the Starter plan at $24.99/month.
Pipe offers 14 days free trial. Signing up takes 1 minute and no credit card is required.
Overview
The way Zapier enables different apps to interact with each other is through a Zap which consists of at least one trigger and one action.
In our case, the trigger will be an event happening on the Pipe platform, for example, a new recording is made on your account. When such an event happens, we’ll send the data from Pipe to Zapier using Pipe’s webhooks, and use the data to set up an action, like sending an outbound email.
We’ll also need the email of the user on the Zapier side. For that, we’ll pass the user email from the website where the recording is made to Zapier through Pipe recorder’s custom payload feature. We’ll start with this step.
Sending the user email from your website to Zapier
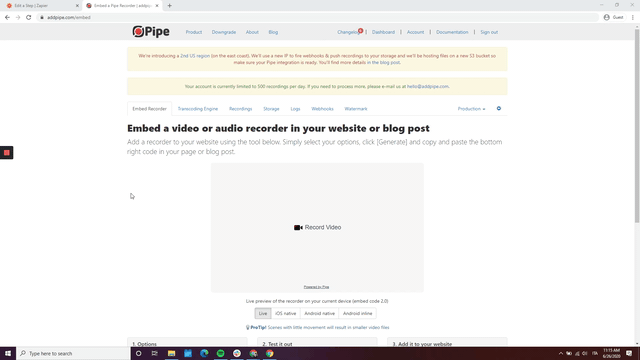
To be able to send the email, you will need to add a custom HTML attribute named `pipe-payload` in your Pipe embed code. The value of this HTML attribute will be sent along with the rest of the recording’s information to Zapier. We’ll use the email address of the user you want to notify as the value.
Normally when you integrate the Pipe client in your website you just need to copy and paste the embed code provided by us . The 2.0 HTML embed code looks like this:
Head (2.0 HTML embed code)
<link rel="stylesheet" href="//cdn.addpipe.com/2.0/pipe.css"><script type="text/javascript" src="//cdn.addpipe.com/2.0/pipe.js"></script>
Body (2.0 HTML embed code)
<piperecorder id="custom-id" pipe-width="640" pipe-height="390" pipe-qualityurl="avq/360p.xml" pipe-accounthash="e46b2e13d3f99a691b00c" pipe-eid="RmSasefdv" pipe-mrt="120"></piperecorder>
Now add the pipe-payload attribute in the second part of the code (Body) and assign to it as value the email address of the user we want to notify.
This is how the code will look like after adding the pipe-payload attribute and it’s value:
<piperecorder id="custom-id" pipe-width="640" pipe-height="390" pipe-qualityurl="avq/360p.xml" pipe-accounthash="e46b2e13d3f99a691b00c" pipe-eid="RmSasefdv" pipe-mrt="120" pipe-payload="name@email.com"></piperecorder>
Connecting Zapier to your Pipe Account
Obtaining the webhook URL from Zapier
To set up the trigger we will use the Webhooks by Zapier app (a premium app which is why a paid Zapier account is required). This app will give us an URL which we will use in our Pipe account as a webhook to notify Zapier of any events happening on the Pipe platform. When notified, Zapier can trigger the actions that we want like sending out an email.
To use the Webhooks by Zapier app:
- Go to your Zapier Dashboard
- Click on the MAKE A ZAP button on the top left corner of the page.
- Choose an App & Event. Use the search bar to type Webhooks by Zapier
- Click on the app that will appear in the search result section.
- In the Choose Trigger Event dropdown, select the Catch Hook option
- Click on the CONTINUE button.
You should now have access to the Custom Webhook URL generated by the app.
The Custom Webhook URL will look something like this:
https://hooks.zapier.com/hooks/catch/78445695/oqweooa/
Copy the URL generated by Zapier for you and click on the CONTINUE button. You will be taken to a section where you can (and eventually need to) to test the trigger. This step is needed to allow Zapier to map the data that’s sent by Pipe. Before that we need to set up the webhook in the Pipe account area using the new URL from Zapier.

Sending the data from Pipe to Zapier using webhooks
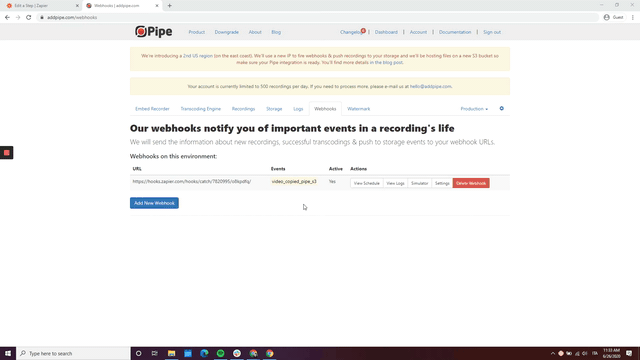
- Go to your Pipe account
- Click on the Webhooks tab
- In the webhooks section click on the Add New Webhook button
- Paste the URL you got from Zapier in the Webhook URL input field.
- Check the video_copied_pipe_s3 event
- Click on the Save Webhook button
We will use the video_copied_pipe_s3 event because this is the moment when the recording has been processed and stored by Pipe, thus a playback URL exists and it can be sent to the user.
Integrating the Pipe webhook data with Zapier triggers
We’re now ready to send some data to Zapier and test the trigger. For that, we will use the Simulator tool from the Pipe account area.
In the Webhooks section of your Pipe account area:
- Go to the Actions column of the Webhook that we just set up
- Click on the Simulator button.
- In the Simulator section, click on the Webhook Event dropdown
- Select the event called video_copied_pipe_s3 (with video specific data)
- Click on the Send Data button at the bottom of the page.
Now go back to the Zapier workflow editor and click on the Test Trigger button.
If everything works as expected you should be able to see all the data sent by Pipe through the Webhook Simulator in the Zapier workflow editor. The last step is to click on the CONTINUE button and the trigger will be successfully set up
Congrats! You now have a working trigger and have successfully established a real-time communication channel between your Pipe account and Zapier.
Now that the trigger is ready, Zapier is prompting us with a Do this … task. As you can see in the picture below, it’s now more clear how triggers and actions allow us to build a workflow.
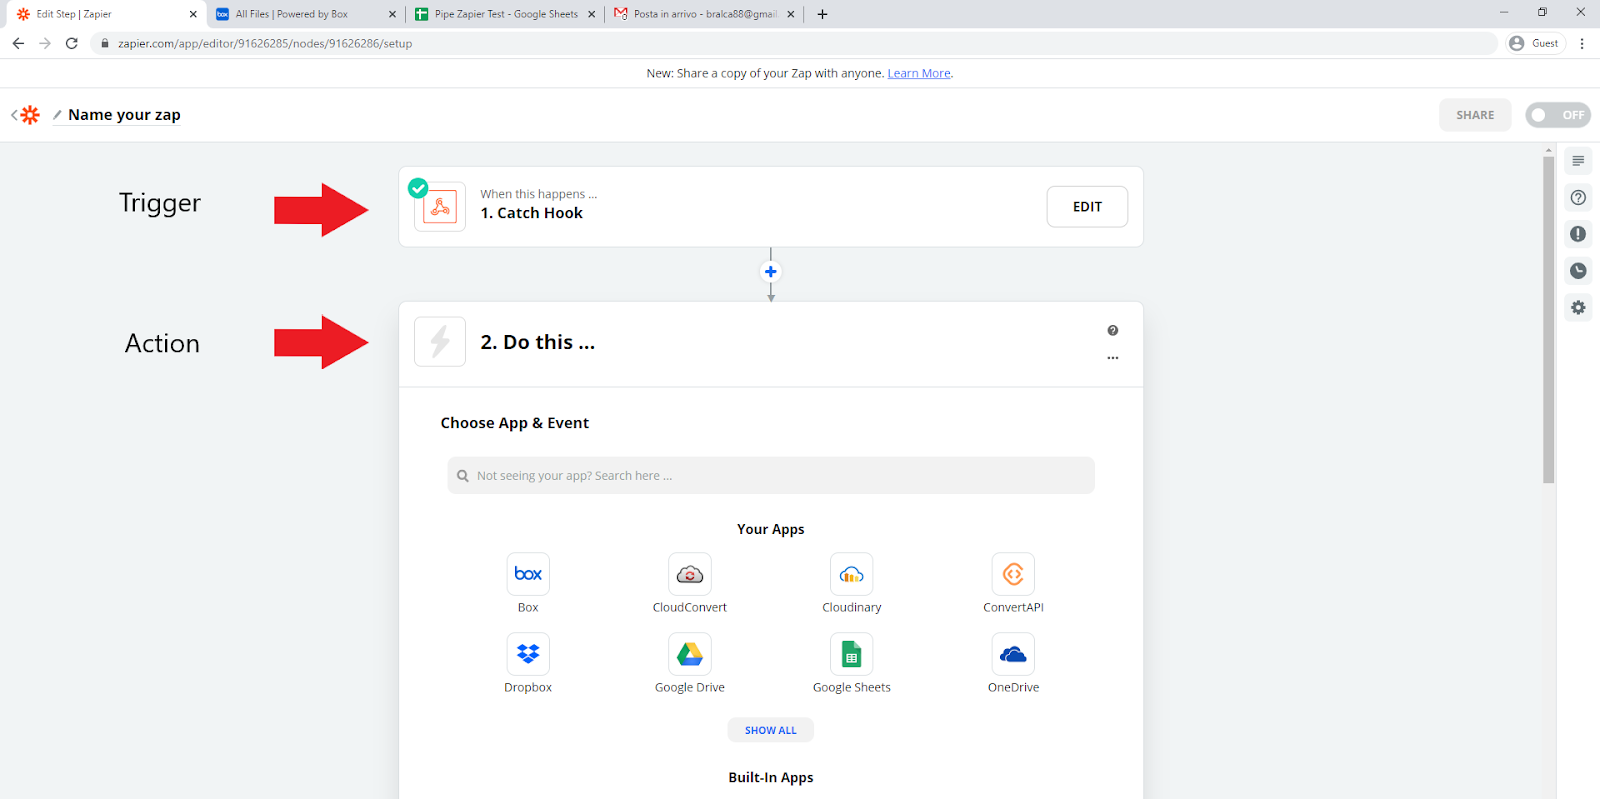
Send an email to your users
Click on the + button below the Catch Hook trigger to add an action to the workflow.
To send the email we will use a built-In free app called Email by Zapier, but you can choose any other app you like from the Zapier marketplace.
If you decide to use another app for sending the email you will need to go through the setup process of that app, which may be different from what I will do here.
After choosing the Email by Zapier app, leave the default Action Event (which in this case is the only one supported) Send Outbound Email and click on CONTINUE.
In the next section, you can set up the email that you will be sending. The most important fields to fill-up are:
- To: this is the recipient of the email. This is where you have to insert the email of your user which was sent through the custom payload we set up at the beginning of the tutorial. Click on the input field and search for the Payload Data Payload variable, which is where the user’s email is stored.
- Subject: you can type whatever you want here. It would be a good idea to put an identifier of the video like the video id, which you can find in the Payload Data ID variable
- Body: this is what your users will receive in their inbox. Make sure to include the video URL (which is in the Payload Data URL variable) along with whatever else you want to communicate.
- From Name: Make sure to identify yourself with a relevant name so that your users will recognise that the email is coming from you.
When you are ready with all the info for this section click on CONTINUE and in the next section click on SKIP TEST (top right). The reason we are skipping the test is that we received dummy data when we set up the Catch Hook trigger. So if we actually try to send the email at this stage, we will receive a dummy URL.
Click on Done Editing and switch ON the Zap using the switch button at the bottom of the workflow editor page
Congrats! The integration is now ready to be tested.
Test the integration
To test the integration use your Pipe recorder to submit a recording. Make sure the pipe-payload attribute is properly populated with the email of the user who should receive the email. Once the recording is processed and stored by Pipe, Zapier will be notified through the webhooks and the user will receive the email sent out by Zapier.
