How to push Pipe video, audio and screen recordings to Box using Zapier Webhooks
This is part 1 of our Zapier series. In the next parts, we are going to cover how to use Zapier to send an outbound email to your users when the recording is ready for playback and how to save the data in a Google Spreadsheet
So far we have built several direct integrations with popular apps, such as Dropbox (built-in), YouTube (built-in), Amazon S3 (built-in), DigitalOcean Spaces (tutorial) and Google Cloud Storage (tutorial) and we will continue to build more direct integrations in the future depending on the feedback.
But it is impossible for us to integrate directly with all possible platforms and apps. That’s why for a while now we’ve been looking at ways to use Zapier to integrate with the library of more than 2000 Zapier integrated apps.
This effort has resulted in several tutorials on how to use Pipe with Zapier and we are going to start with how to use Zapier webhooks to automatically push your new Pipe recordings to your Box account.
This is part 1 of our Zapier series. In the next parts, we are going to cover how to use Zapier to send an outbound email to your users when the recording is ready for playback and how to save the data in a Google Sheets spreadsheet.
Requirements
To follow along with this tutorial we will need to create an account with:
Zapier offers a free plan which for the first 14 days will grant you access to features that are normally available only on paid plans. One of these features is the possibility to use Premium Apps, which is what we are going to use in this tutorial. So, to push recordings from Pipe to Box through Zapier, you will need to eventually upgrade to a paid plan. The cheapest option offered by Zapier to access this feature is the Starter plan at $24.99/month.
Box offers a free plan for individual use which allows you to store up to 10GB of data.
Pipe offers 14 days free trial. Signing up takes 1 minute and no credit card is required.
Overview
The way Zapier enables different apps to interact with each other is through a workflow which consists of at least one trigger and one action.
In our case, the trigger will be an event happening on the Pipe platform, for example, a new recording is made on your account. When such an event happens, we’ll send the data from Pipe to Zapier using webhooks, and use the data to set up an action, like pushing the recording to Box.
Connecting your Pipe account to Zapier
Obtaining the webhook URL from Zapier
To set up the trigger we will need to use an app called Webhooks by Zapier (which is a premium app, that’s why a paid Zapier account is required). This app will give us an URL which we will use to set up a webhook in our Pipe account. This way Zapier can listen to Pipe events ( we will decide later which events to use ) and trigger the push to Box action that we will set up later on in this tutorial.
To use the Webhooks by Zapier app:
- Go to your Zapier Dashboard
- Click on the MAKE A ZAP button on the top left corner of the page.
- Choose an App & Event. Use the search bar to type Webhooks by Zapier
- Click on the app that will appear in the search result section.
- In the Choose Trigger Event dropdown, select the Catch Hook option
- Click on the CONTINUE button.
You should now have access to the Custom Webhook URL generated by the app. The Custom Webhook URL will look something like this:
https://hooks.zapier.com/hooks/catch/78445695/oqweooa/
Copy the URL generated by the Zapier app for you and click on the CONTINUE button. You will be taken to a section where you can (and will need to) to test the trigger. Testing the trigger is needed to allow Zapier to map the data that will be sent by Pipe. But before testing the trigger we need to configure Pipe to send the data to Zapier in the 1st place. That’s what the next section is about.
Sending the data from Pipe to Zapier using Webhooks
- Go to your Pipe account
- Click on the Webhooks tab
- In the webhooks section click on the Add New Webhook button
- Paste the URL you got from Zapier in the Webhook URL input field.
- Check the video_copied_pipe_s3 event
- Click on the Save Webhook button
We will use the video_copied_pipe_s3 event because this is the moment when the recording has been fully processed and stored by Pipe, thus it can be copied over to Box from the Pipe storage.
Integrating the Pipe data with Zapier triggers
We’re now ready to send the data to Zapier and test the trigger. For that, we will use the Simulator tool from the Pipe account area.
In the Webhooks section of your Pipe account area:
- Go to the Actions column of the Webhook that we just set up
- Click on the Simulator button.
- In the Simulator section, click on the Webhook Event dropdown
- Select the event called video_copied_pipe_s3 (with video specific data)
- Click on the Send Data button at the bottom of the page.
Now you can go back to the Zapier workflow editor and click on the Test Trigger button.
If everything works as expected you should be able to see all the data sent by Pipe through the Webhook Simulator in the Zapier workflow editor. The last step is to click on the CONTINUE button and the trigger will be successfully set up!
Congrats! You now have a working trigger and have successfully established a real-time communication channel between your Pipe account and Zapier.
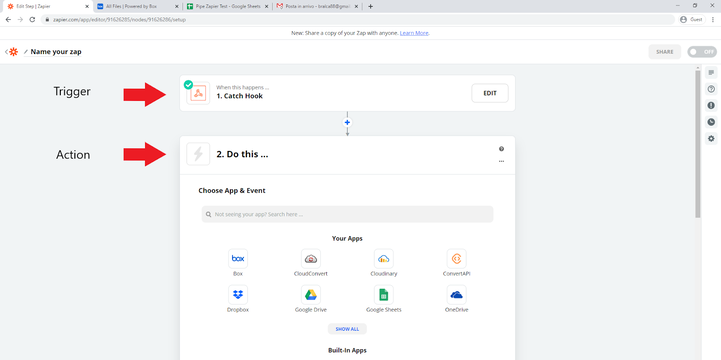
Now that the trigger is ready, Zapier is prompting us with a Do this … task. As you can see in the picture below it’s now more clear how triggers and actions allow us to build a workflow.
Push recordings to Box
To add an action to the workflow click on the + button below the trigger we just set up in the Zapier account area. Search for the Box app in the search box that will appear in the workflow editor, select Upload File from the Choose Action Event dropdown menu and click on CONTINUE.
In the next section, you will need to connect your Box account. Click on Sign In to Box and grant Zapier permission to access your Box account.
Now we can set up which data to send to Box. We will have to set up the following fields:
- Folder: if you want to save the recordings in a specific folder you can choose from here. I have decided to save it in the main Box folder called All Files.
- File: In this field, we have to insert the recording URL received from our Pipe account. To insert the correct information click on the File input field so that you will be able to access all the data retrieved from the Catch Hook step. Click on the Show all options button and select Payload Data URL, which is the variable that contains the URL of the recording.
- Name: This field is optional. If you leave this field empty Zapier will assign the default name created by Pipe. We will cover at the end how to assign a custom name of your choice for the videos you will be pushing to Box, so you can leave this field empty for now.
Click on CONTINUE and in the next step click on SKIP TEST button. The reason we are skipping the test is that we received dummy data when we set up the Catch Hook trigger. So if we actually try to save the data in Box at this stage it will give us an error, because it won’t find an actual recording to upload.
Congrats! The integration is now ready to be tested. Click on Done Editing and switch ON the Zap using the switch button at the bottom of the workflow editor page
Test the integration
To test the integration, record a video using the Pipe recorder (there’s always one you can use in the embed section of the Pipe account area). Once the recording will be processed by Pipe and pushed to Pipe’s storage, the webhook will be fired with data about the newly stored recording, Zapier will receive the data, pull the recording from our storage and push it to Box’s storage. Box will notify you and the file will now be available through Box’s app on all of your devices.
Bonus: Assign a custom name to your recordings
To assign a custom name to each recording we need a way to pass the custom name from the Pipe recorder all the way to Zapier. We’ll use a custom payload for that. The Pipe recorder supports attaching custom data (a custom payload) to recorders, data that then gets attached to every recording made with that recorder and that gets sent with all the webhooks and thus it will be available to Zapier.
Normally when you integrate the Pipe client in your website you just need to copy and paste the embed code provided by us in your account area which looks something like this:
Head (2.0 embed code)
<link rel="stylesheet" href="//cdn.addpipe.com/2.0/pipe.css"><script type="text/javascript" src="//cdn.addpipe.com/2.0/pipe.js"></script>
Body (2.0 embed code)
<piperecorder id="custom-id" pipe-width="640" pipe-height="390" pipe-qualityurl="avq/360p.xml" pipe-accounthash="e46b2e13d3f99a691b00c" pipe-eid="RmSasefdv" pipe-mrt="120"></piperecorder>
To add a custom payload you will need to add the pipe-payload attribute in the second part of the code (Body) and assign a string to it as the value.
For our purpose case, the value of this new attribute will be the custom name we want to assign to the recording when pushing it to Box. We don’t have to add an extension since Pipe and Zapier will take care of that for us.
This is how the code will look like after adding the pipe-payload attribute and it’s value
<piperecorder id="custom-id" pipe-width="640" pipe-height="390" pipe-qualityurl="avq/360p.xml" pipe-accounthash="e46b2e13d3f99a691b00c" pipe-eid="RmSasefdv" pipe-mrt="120" pipe-payload="my-custom-video-name"></piperecorder>
Pro Tip: Make sure to use a custom name without spaces in it, otherwise Zapier will cut it. You can use dashes or underscores instead of spaces.
Now that we have the custom payload set up
- Go back to the Zapier workflow editor
- Click on the Name input field
- Select the Payload Data Payload variable from the list and the Payload Data ID variable
- Submit another recording using the Pipe client where you just added the custom payload.
If everything is working you should see the new recording in your box account named with your custom name and the video id.
If you’re concerned about privacy and do not want Pipe to store the recording for you, you can use Pipe’s REST API to delete the recording stored by Pipe. Pipe’s DO NOT STORE setting is also an option but then we would have no place to copy it from. For more details, reach out to us.