
Converting FLV to MP4 With FFmpeg The Ultimate Guide [Conversion series Ep. 3]
As promised, we’re back with another episode of our Conversion Series. This time, it is going to be more technical than usual because I’m going to teach you everything you need to know about how to convert an FLV file to an MP4 with FFmpeg.
Introduced in 2002, the .flv container was the first ubiquitous file format for video over the Internet.
I still remember the dark days of Internet video, before .flv’s introduction by Macromedia, when playing a video resulted in much frustration. Three competing formats dominated the market at the time:
- Real Video,
- Quicktime
- Windows Media Video
each with their own quirks and flaky cross platform support.
Thus, when Macromedia introduced .flv videos in 2002, it quickly and surely took off as the default video format for the web which is why all the video content was stored in .flv files.
Fast forward 13 years later the landscape has changed dramatically with mobile devices being the preferred way to access the Internet, HTML5 replacing Flash for most video delivery scenarios and MP4 replacing the FLV container as the de facto standard for video.
This landscape presents a challenge: the .flv files only play in Flash based video players and will not work natively on mobile devices or in newer browsers (without Flash). Luckily there’s a (simple and free) solution.
In this article we’re going to explain in detail how to use the free and open source FFmpeg software to convert your old flv files to mp4 files that will work on any device and browser.
Although specific to the flv to mp4 conversion, the information in this article can be used to convert to and from all types of video files including webm, avi and wmv.
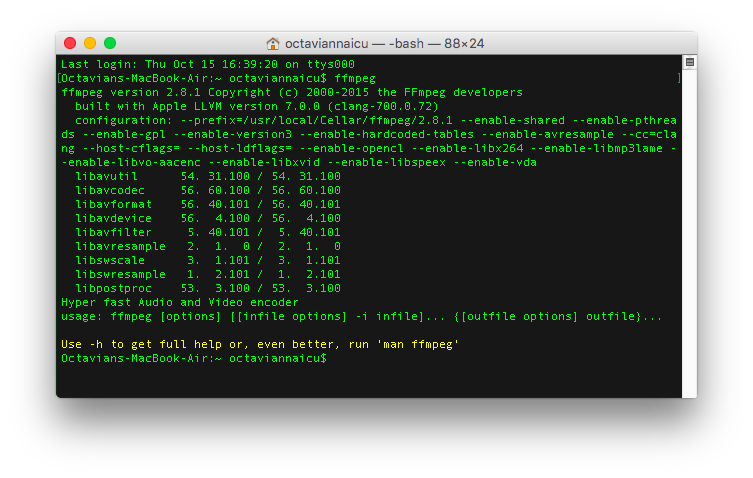
This article assumes yo’ve downloaded and installed (or compiled) FFmpeg and you can access it from the command line. To check just type ffmpeg in the command line or Terminal, you should get the following:
The mp4 file we’re targeting
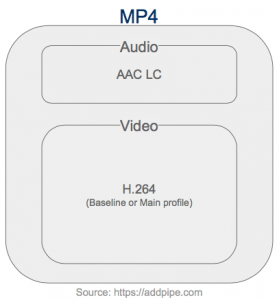
For that to happen we need to ensure the .mp4 file contains AAC-LC sound and H.264 video. On top of that, to ensure our video can be played on older devices like the iPhone 3GS, we’ll show you how to use H.264’s baseline profile and level 3 but more on that later.
Flv format
Flv files are complex containers (Version 10 of the flv container specification pdf on adobe.com mentions no less than 16 types of supported audio data) but usually they store just the following type of data:
- audio: - Nellymoser Asao,
- Speex
- mp3
- video: - Sorenson Spark
- ON2’s VP6
- H.264
Depending on the audio/video data types in a .flv file, in our mission to convert the .flv to .mp4, we might get away with transcoding just the sound part. More on that below.
AAC and H.264 encoders in FFmpeg
Four AAC libraries
FFmpeg includes a default AAC encoding library (experimental, part of libavcodec) but it also supports 3 other AAC encoding libraries including the Fraunhofer FDK AAC library (libfdk_aac) which was originally developed for Android and it’s currently the highest-quality AAC encoder available with FFmpeg. Details on how to use each one individually are available in this AAC Encoding Guide.
H.264
Video LAN’s libx264 is the default H.264 video encoding library and a very good one too. I haven’t seen a FFmpeg build that doesn’t include it so you should have no problems using it.
Converting .flv to .mp4
Depending on the type of audio & video data inside the flv, to obtain an .mp4 with AAC sound and H.264 video, we’ll have to:
- copy the video data over and transcode just the audio data
OR - transcode both video and audio
1. Copying video over and transcoding audio
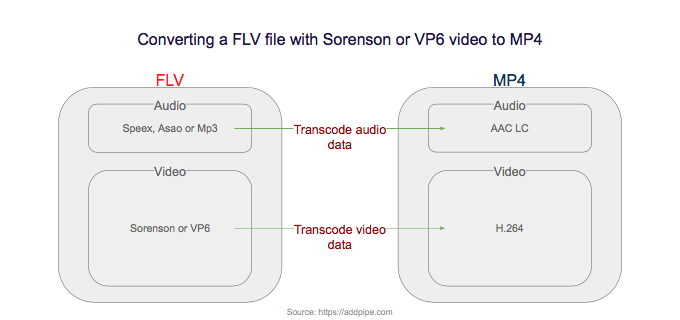
Some .flv files contain H.264 video and Speex, Nellymoser Asao or mp3 audio.
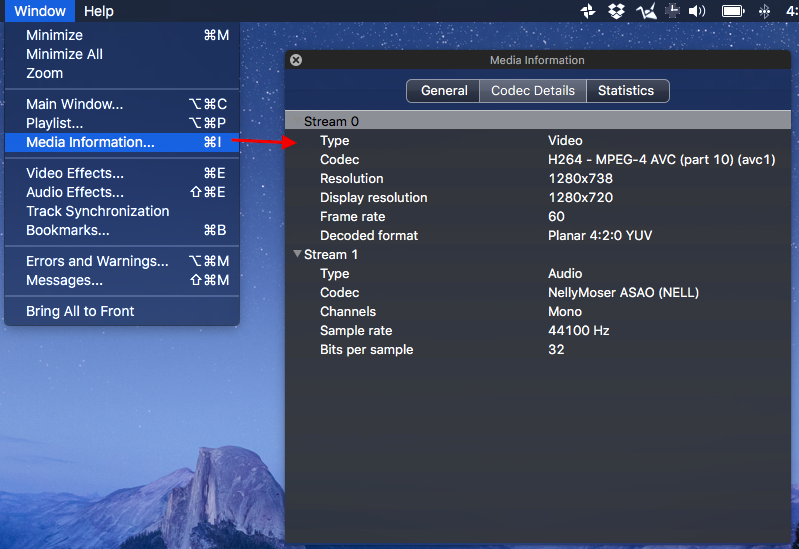
VLC‘s Media Information window is very good in providing you with quick information about the number and types of streams available in a video:
With such files there’s no point in re-encoding the video data since it’s already in the format we need it: H.264. If you reencode something that’s already been encoded/compressed you will loose even more data and it also takes a lot longer.
Thus in this case we will leave the video data untouched (copy it) and transcode just the audio data as shown in this scheme:

Here’s the FFmpeg command to transcode the audio data to AAC while keeping the original H.264 video data:
ffmpeg -i video.flv -vcodec copy video.mp4
If you’re particular about the audio data you can use -ar to specify the audio sample rate (kHz) and -ac to specify the number of channels (1 for mono, 2 for stereo).
ffmpeg -i video.flv -ar 44100 -ac 2 -vcodec copy video.mp4
Flv files might contain sound encoded with the following codecs and sample rates:
- Nellymoser Asao at 44.1 , 22 , 11 , 8 and 5 kHz ,
- Speex at 16 kHz
- mp3 at 11 , 22 or 44.1 kHz
For reference typical CD audio is sampled at 44.1 kHz (or 44100 samples/second).
2. Transcoding both video and audio
In those cases where the video data in the .flv is not encoded using H.264 you’ll have to transcode both audio and video. This is a lengthy and CPU intensive process since it involves transcoding all the data in the .flv file.
The FFmpeg command becomes the following:
ffmpeg -i video.flv video.mp4
Video quality
When encoding H.264 video, the video quality is specified using the a quantizer scale (crf value) from 0 to 51 where:
- 0 is lossless
- 23 is default
- 51 is worst possible
From FFmpeg’s H.264 Encoding Guide:
The range is exponential, so increasing the CRF value +6 is roughly half the bitrate while -6 is roughly twice the bitrate.
You can leave the default crf value (23) or, if you want a smaller bitrate video, you can raise it:
ffmpeg -i video.flv **-crf 26** video.mp4
More details at FFmpeg and H.264 Encoding Guide.
A note about -sameq
Older builds of FFmpeg suppored a flag named -sameq that has been confused in many tutorials with “same quality”. Unfortunately -sameq does not mean same quality thus, to avoid the confusion, it has been removed in recent versions of FFmpeg.
From the FFmpeg FAQ:
The
-sameqoption meant “same quantizer”, and made sense only in a very limited set of cases. Unfortunately, a lot of people mistook it for “same quality” and used it in places where it did not make sense: it had roughly the expected visible effect, but achieved it in a very inefficient way.
More info on -sameq and how video compression works in this awesome answer on superuser.com.
Placing the MOOV atom at the beginning
All mp4 files contain a moov atom (flvs do not). The moov atom contains information about the length of the video and the audio and video tracks available in the .mp4 container. It acts as an index of the video data and the information in it enables the video player to play and scrub the .mp4 file.
An mp4 video will not play until the player can access this index. If it’s at the end of an .mp4 file delivered over the Internet the browser needs to download the entire file before playback can start. Thus the moov atom in mp4 files should be placed at the beginning.
By default FFmpeg places the moov atom at the end of the mp4 file. FFmpeg can place the mov atom at the beginning with the -movflags faststart option like this:
ffmpeg -i video.flv -movflags faststart video.mp4
Ensuring your new mp4 videos play on iOS and Android devices
H.264 Profiles and Levels
H.264 encoders (including FFmpeg) support something called encoding profiles: Baseline, Main, High, High 10, Extended, etc. .
Each profile contains increasingly advanced encoding techniques which allow for better compression & quality but in turn, require more CPU power during encoding (on the encoder side) and decoding (on the player side).
If profiles deal with the problem of code complexity and processing power, encoding levels deal with the problem of bandwidth, max resolution, and memory issues on the decoder side:
- Level 3.1 and above includes HD videos (1280×720@30 fps)
- Level 4 includes FullHD video (1920×1088@30 fps)
- Level 5.1 includes 4k video (4096×2048@30.0 fps)
A device capable of playing a certain level can also play all the levels below.
For more info on profiles and levels check out article 1 & article 2.
Profiles and Levels supported by iOS devices
| Profile | Level | Support | Options |
|---|---|---|---|
| High | 4.2 | iPad Air and later, iPhone 5s and later | -profile:v high -level 4.2 |
| High | 4.1 | iPad 2 and later, iPhone 4s and later, iPhone 5c and later | -profile:v high -level 4.1 |
| High | 4.0 | Apple TV 3 and later, iPad 2 and later, iPhone 4s and later | -profile:v high -level 4.0 |
| Main | 4.0 | Apple TV 3 and later, iPad 2 and later, iPhone 4s and later | -profile:v main -level 4.0 |
| Main | 3.1 | iPad (all versions), Apple TV 2 and later, iPhone 4 and later | -profile:v main -level 3.1 |
| Baseline | 3.1 | iPhone 3G and later, iPod touch 2nd generation and later | -profile:v baseline -level 3.1 |
| Baseline | 3.0 | All devices | -profile:v baseline -level 3.0 |
Source: Preparing Media for Delivery to iOS-Based Devices (apple.com)
Android
The Android documentation recommends the Baseline Profile in Video Encoding Recommendations (android.com).
However it doesn’t mention any levels. Because of the wide variety of Android devices, Google cannot guarantee that a particular level will work across all those devices. In fact, if you look at the Video Encoding Recommendations they can’t even guarantee 2 Mbps HD 720p @ 30 fps (level 3.1). It’s marked N/A on all devices.
This doesn’t imply there are no Android devices that can play levels 3.2+ and even Main, High profiles etc. But if you need wide availability you need to target the lowest common denominator.
Using Levels and Profiles with FFmpeg
Ensuring Compatibility
Thus if you want your videos to have highest compatibility with target devices (older iOS versions or all Android devices) you need to use the baseline profile and level 3:
ffmpeg -i video.flv -movflags faststart -profile:v baseline -level 3.0 video.mp4
The baseline profile disables some advanced features in main and high profiles but provides for better compatibility. Typically you may not need this setting (and therefore avoid using -profile:v and -level), but if you do use this setting it may increase the bit rate quite a bit compared to what is needed to achieve the same quality in higher profiles.
Converting HD and FullHD videos
If you have HD videos you’ll need at least level 3.1 and you’ll be able to safely target the iPhone 3G and later:
ffmpeg -i hd_video.flv -movflags faststart -profile:v baseline -level 3.1 video.mp4
Switching to main profile will result in lower bitrate videos but will raise the device target up to the iPhone 4 (Released on June 24, 2010):
ffmpeg -i hd_video.flv -movflags faststart -profile:v main -level 3.1 video.mp4
If you have FullHD videos you’ll need at least level 4 and you’ll be able to safely target the iPhone 4S while using the high profile:
ffmpeg -i fullhd_video.flv -movflags faststart -profile:v high -level 4.0 video.mp4
Level and video data is copied together with the H.264 video data when you copy the video data from flv to mp4 without transcoding.
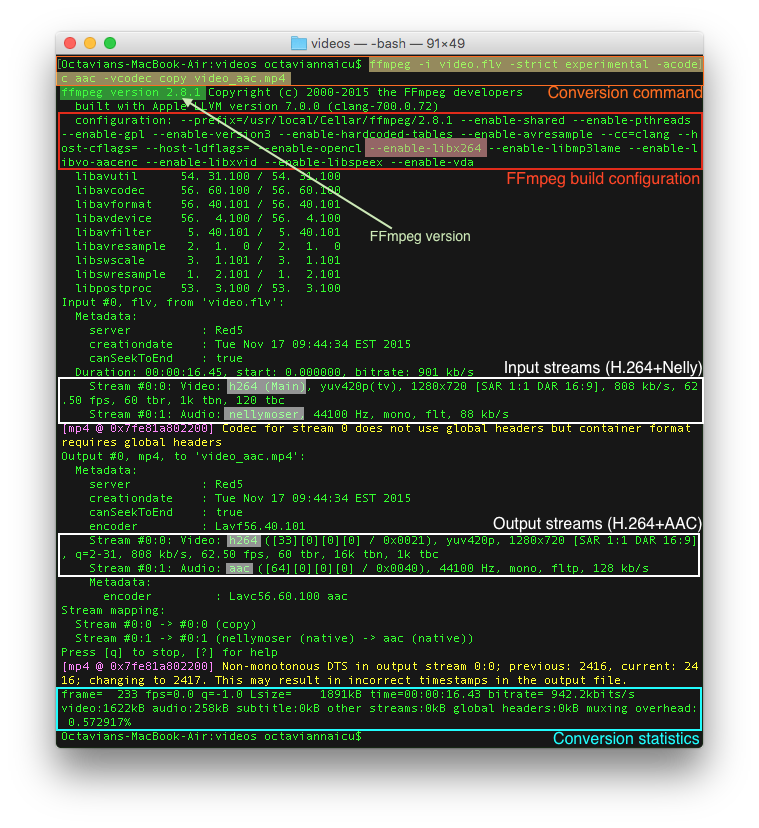
An analysis of FFmpeg output
When used, FFmpeg outputs a boatload of information including:
- FFmpeg version and build command (you can use it to spot encoding libraries like the libx264 H.264 video encoding library)
- input streams with details (type, bitrate, framerate, sample rate, channels)
- output streams with details
- stream mapping (what was copied, what was transcoded)
- conversion statistics (time, bitrate,etc.)
To summarize:
- A general catch-all multi purpose FFmpeg command to convert .flv to .mp4 is:
ffmpeg -i video.flv video.mp4
- If you want to put the MOOV file at the beginning (and save bandwidth by not having to download the entire file upfront in the viewer’s browser) use this:
ffmpeg -i video.flv -movflags faststart video.mp4
- If you want to maximize smartphone compatibility use this:
ffmpeg -i hd_video.flv -movflags faststart -profile:v baseline -level 3.1 video.mp4
That’s it for today guys, stay tuned for the next episode of our conversion series. If you missed the previous ones, you can check out all our conversion tutorials here.