Using WebAudioRecorder.js to Record MP3, Vorbis and WAV Audio on Your Website
This is the 2nd post in our new recording audio in HTML5 series. In the 1st we’ve discussed Recorder.js.
In this blog post, we’ll cover using WebAudioRecorder.js to record mp3, vorbis and wav audio on your website.
We’ll be building a simple demo to help you get started with the library. There are 2 demos available for WebAudioRecorder (the main one linked from GitHub that’s not working and a functioning one) but they’re fairly complex implementations and thus hard to get started with.
The project is available on GitHub, link at the bottom, live demo here.
Intro to Web Audio Recorder
WebAudioRecorder.js is a JavaScript library written in 2015 by higuma that can record audio and encode to common formats directly in the browser.
When used in conjunction with getUserMedia() it can record the audio from the user’s microphone or webcam.
It supports 3 encoding formats:
- Uncompressed waveform audio (.wav)
- Vorbis audio in ogg container (.ogg)
- MP3 (MPEG-1 Audio Layer III) (.mp3)
Libraries for encoding audio
WebAudioRecorder.js uses external JavaScript libraries to convert the raw audio to mp3 and Vorbis. These libraries are Java Script versions of the popular LAME mp3 encoder and libogg/libvorbis encoders obtained by compiling the original C code using Empscripten as (the asm.js subset of) JavaScript. Since JavaScript is slower than native code you should expect your encoding times to be higher.
These libraries are loaded and used as Web Workers which prevents the browser tab from becoming unresponsive while the audio encoding is underway.
Even though the main WebAudioRecorder.min.js JS file comes in at just 3.6KB when minified (and 1.21 KB when gzipped) unless you’re recording to wav, you do have to make extra HTTP requests and load the external libraries, and these libraries are quite big:
For encoding MP3
WebAudioRecorderMp3.min.js386 KB minified and 114 KB gzippedMp3LameEncoder.min.js.mem96 KB minified and 12 KB gzipped
That’s 2 HTTP requests and 126KB in total when gzipped.
The MP3 encoder is locked at recording 2 channels but you can configure the bitrate from 64 to 320. The current implementation supports LAME CBR encoding only, no VBR (variable bit rate).
For encoding Vorbis in ogg container
WebAudioRecorderOgg.min.js311 KB minified and 95 KB gzippedOggVorbisEncoder.min.js.mem553 KB minified and 114KB gzipped
That’s 2 HTTP requests and 209KB in total when gzipped.
The Vorbis encoder can encode mono or stereo sound and you can configure the bitrate from 45kb/s to 500kb/s. Also, keep in mind that Vorbis is mostly aimed at compressing music and audio in general, it’s not aimed at compressing speech like the way Speex is.
Uncompressed wav sound
The small code for capturing data as uncompressed wav is located separately in WebAudioRecorderWav.min.js which comes in at just 2.6 KB minified and 1 KB gzipped. No need for large libraries here.
When recording to wav, audio data is recorded as 2 channel 16bit audio (CD quality) and thus will be exactly 10.582MB/minute at 44.1kHz but you can lower the number of channels from the WebAudioRecorder constructor to halve that size.
Sampling rate
Regardless of the library, the sample rate used will be the one set in your OS for your playback device (as per the spec). In practice, you’ll mostly see sample rates of 44100 (44.1kHz) and 48000 (48kHz).
Project Folder
To use the library you must 1st download the latest release (0.1.1 from 2015) from GitHub and set up your project folder. Here’s how I set up mine:
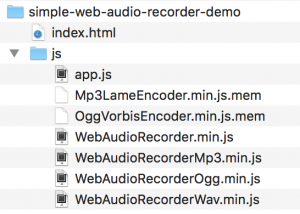
I’m using index.html for a simple record/stop UI and app.js to host the code for the interface.
HTML File
In index.html we need a select for the type of encoding, 2 buttons: start and stop, a list for showing the recorded files and a visible log too keep track of what’s happening. Here’s how my index.html looks:
Convert audio to:
<select id="encodingTypeSelect">
    <option value="wav">Waveform Audio (.wav)</option>
    <option value="mp3">MP3 (MPEG-1 Audio Layer III) (.mp3)</option>
    <option value="ogg">Ogg Vorbis (.ogg)</option>
</select>

<button id="recordButton">Record</button>
<button id="stopButton" disabled>Stop</button>

<h3>Log</h3>
<pre id="log"></pre>

<h3>Recordings</h3>
<ol id="recordingsList"></ol>

<!-- inserting these scripts at the end to be able to use all the elements in the DOM -->
<script src="js/WebAudioRecorder.min.js"></script>
<script src="js/app.js"></script>
We’re insertingWebAudioRecorder.min.js andapp.js at the end to make sure they have access to all the DOM elements when run.
JavaScript File
Now let’s move on to app.js and build our web based audio recorder.
We’ll start out by defining a few variables and setting up references to those DOM UI elements. The comments describe each variable in detail:
var gumStream;
//stream from getUserMedia()
var recorder;
//WebAudioRecorder object
var input;
//MediaStreamAudioSourceNode we'll be recording var encodingType;
//holds selected encoding for resulting audio (file)
var encodeAfterRecord = true;
// when to encode
var audioContext = new AudioContext;
//new audio context to help us record
var encodingTypeSelect = document.getElementById("encodingTypeSelect");
var recordButton = document.getElementById("recordButton");
var stopButton = document.getElementById("stopButton");
With our record & stop buttons referenced in JS we can add event listeners for when they’re clicked:
recordButton.addEventListener("click", startRecording); stopButton.addEventListener("click", stopRecording);
Code for starting a recording
The startRecording() function will do most of the heavy lifting in this demo.
In it we first:
- set up the constraints object for audio only (see our audio constraints article for toggling advanced options like noise reduction and echo cancellation)
- call the promise based
navigator.mediaDevices.getUserMedia()
Only if getUserMedia() succeeds (user grants microphone access) we trigger the rest of the code.
var constraints = {
    audio: true,
    video: false
}
navigator.mediaDevices.getUserMedia(constraints).then(function(stream) {
    //most of the code
}).catch(function(err) {});
In getUserMedia‘s success function we’ll start by booting up a new WebAudioRecorder object taking care to provide the function for the onEncoderLoading event directly in its constructor. onEncoderLoading is the only event to be fired during construction process so to catch the first event correctly, it should be set from constructor parameter.
The JS worker files for converting audio to mp3 and Vorbis are loaded when creating a recorder object or when changing encoding with setEncoding(). To correctly load those worker files we must set the worker directory from the constructor object using workerDir (“/js” in our case because that’s where we’ve put all the WebAudioRecorderfiles).
The last property we’ll be setting in the constructor object is the encoding property (mp3, wav or ogg). We’ll use the value from our encodingTypeSelect drop down menu.
 //assign to gumStream for later use
 gumStream = stream;
 /* use the stream */
 input = audioContext.createMediaStreamSource(stream);
 //stop the input from playing back through the speakers
 input.connect(audioContext.destination) //get the encoding
 encodingType = encodingTypeSelect.options[encodingTypeSelect.selectedIndex].value;
 //disable the encoding selector
 encodingTypeSelect.disabled = true;
 recorder = new WebAudioRecorder(input, {
     workerDir: "js/",
     encoding: encodingType,
     onEncoderLoading: function(recorder, encoding) {
         // show "loading encoder..." display
         __log("Loading " + encoding + " encoder...");
     },
     onEncoderLoaded: function(recorder, encoding) {
         // hide "loading encoder..." display
         __log(encoding + " encoder loaded");
     }
 });
With the new recorder object initialised we can use the onComplete event to trigger what happens when the encoding is done – basically we just pass the blob to the createDownloadLink(blob,encoding) function but more on that later. We could have set up this event in the constructor but for this demo we’ll just add it after:
recorder.onComplete = function(recorder, blob) {
    __log("Encoding complete");
    createDownloadLink(blob, recorder.encoding);
    encodingTypeSelect.disabled = false;
}
Before starting the recording we configure the recorder object to:
- record for maximum 120 seconds
- encode the audio data AFTER the recording process is stopped
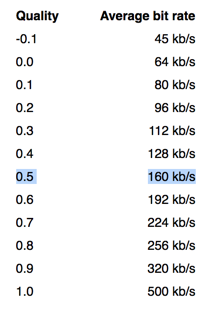
- we set the quality for Vorbis recodings to 0.5 which means abut 160kbps
- we set the bitrate for mp3 encodings to 160 (kbps)
recorder.setOptions({
    timeLimit: 120,
    encodeAfterRecord: encodeAfterRecord,
    ogg: {
        quality: 0.5
    },
    mp3: {
        bitRate: 160
    }
});
For the mp3 bitRate you can use values from 64 to 320 while for the Vorbis quality you can use values from -0.1 to 1.0.
This is the average bitrate each Vorbis quality value corresponds to:
We’re now ready to start the recording process:
//start the recording process
recorder.startRecording();
Here’s how the entire startRecording() function looks from start to end:
function startRecording() {
    console.log("startRecording() called");
}
// We'll us a simple constraints object, for more advanced features see https://blog.addpipe.com/audio-constraints-getusermedia/

var constraints = {
    audio: true,
    video: false
}
/* We're using the standard promise based getUserMedia() https://developer.mozilla.org/en-US/docs/Web/API/MediaDevices/getUserMedia */
navigator.mediaDevices.getUserMedia(constraints).then(
    function(stream) {
        __log("getUserMedia() success, stream created, initializing WebAudioRecorder...");
        //assign to gumStream for later use
        gumStream = stream;
        /* use the stream */
        input = audioContext.createMediaStreamSource(stream);
        //stop the input from playing back through the speakers
        input.connect(audioContext.destination)
        //get the encoding
        encodingType = encodingTypeSelect.options[encodingTypeSelect.selectedIndex].value;
        //disable the encoding selector
        encodingTypeSelect.disabled = true;
        recorder = new WebAudioRecorder(input, {
            workerDir: "js/",
            encoding: encodingType,
            onEncoderLoading: function(recorder, encoding) {
                // show "loading encoder..." display
                __log("Loading " + encoding + " encoder...");
            },
            onEncoderLoaded: function(recorder, encoding) {
                // hide "loading encoder..." display
                __log(encoding + " encoder loaded");
            }
        });
        recorder.onComplete = function(recorder, blob) {
            __log("Encoding complete");
            createDownloadLink(blob, recorder.encoding);
            encodingTypeSelect.disabled = false;
        }
        recorder.setOptions({
            timeLimit: 120,
            encodeAfterRecord: encodeAfterRecord,
            ogg: {
                quality: 0.5
            },
            mp3: {
                bitRate: 160
            }
        });
        //start the recording process
        recorder.startRecording();
        __log("Recording started");
    }).catch(function(err) { //enable the record button if getUSerMedia() fails
    recordButton.disabled = false;
    stopButton.disabled = true;
});
//disable the record button
recordButton.disabled = true;
stopButton.disabled = false;
}
Code for stopping a recording
Our stopRecording() function in comparison is quite simple:
- it stops the microphone access
- it tells the recorder object to finish the recording which means stop capturing new data and encode existing data
- toggle the record/stop buttons
function stopRecording() {
    console.log("stopRecording() called");
    //stop microphone access
    gumStream.getAudioTracks()[0].stop();
    //disable the stop button
    stopButton.disabled = true;
    recordButton.disabled = false;
    //tell the recorder to finish the recording (stop recording + encode the recorded audio)
    recorder.finishRecording();
    __log('Recording stopped');
}
Playback and download the new recording
Once the recorder object finishes encoding the data, it’s onComplete(recorder,blob) event function will be called. Theblob argument contains the actual audio data encoded as mp3, Vorbis or just raw audio (wav). This blob, together with the encoding type, is passed on to createDownloadLink(blob,encoding) which does 2 things:
- creates an
<audio>element linked to the recorded audio data for playback inside the web page - creates a download link
function createDownloadLink(blob, encoding) {
    var url = URL.createObjectURL(blob);
    var au = document.createElement('audio');
    var li = document.createElement('li');
    var link = document.createElement('a');
    //add controls to the "audio" element
    au.controls = true;
    au.src = url; //link the a element to the blob
    link.href = url;
    link.download = new Date().toISOString() + '.' + encoding;
    link.innerHTML = link.download;
    //add the new audio and a elements to the li element
    li.appendChild(au);
    li.appendChild(link); //add the li element to the ordered list
    recordingsList.appendChild(li);
}
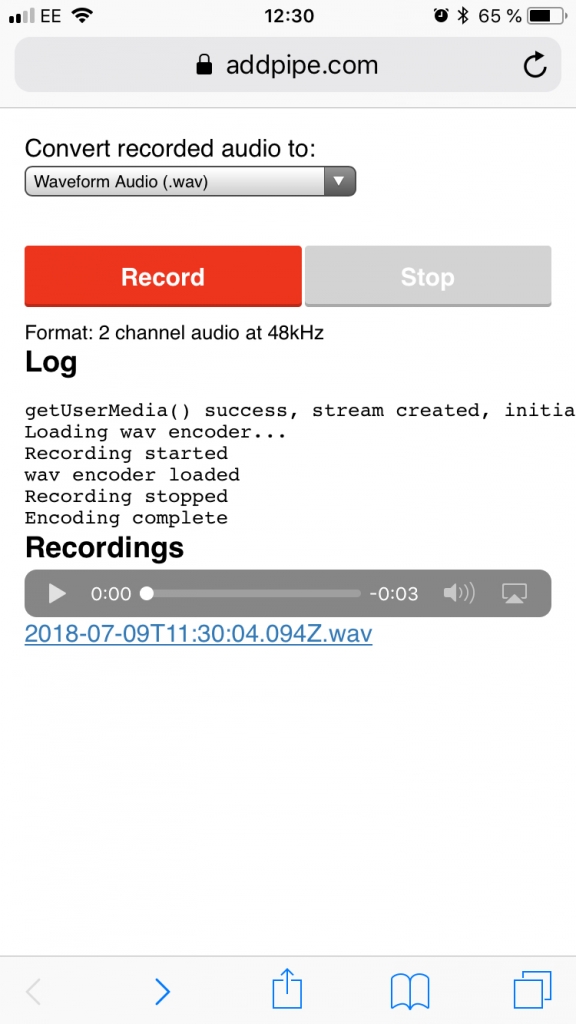
Working Demo
You can check out the live demo in your desktop or mobile browser. The entire project is available on GitHub.
Playback Support
If your plan is to play those recorded files inside the browser targeting mp3 will ensure the resulting file will work in all browsers.
- .ogg files with Vorbis audio will play in Chrome, Firefox and Edge but not in Safari and IE
- .mp3 is supported for playback by all browsers
- .wav is curiously not supported by IE
Strangely enough, we can now record Vorbis audio in Safari but we can not play it back. This is what the Safari player will show when attempting to play Vorbis audio in Safari:

Legal
MP3
On April 23 2017 the last of the core mp3 patents which were part of the licensing program by Fraunhofer and Technicolor, expired.
The MP3 encoder part of this library uses JavaScript-converted code of LAME. LAME is licensed under the LGPL. MP3 encoder part of the WebAudioRecorder library follows the same license.
OGG Vorbis
Vorbis is a fully open, non-proprietary, patent-and-royalty-free, general-purpose compressed audio format.
The Ogg Vorbis encoder part of the library uses JavaScript-converted code of libogg and libvorbis. They are released under Xiph’s BSD-like license. Ogg Vorbis encoder part of the WebAudioRecorder library follows the same license.
WebAudioRecorder library
All other parts of the library are released under MIT license.
Next, we’ll cover using vmsg, the opus-recorder and the MediaRecording API.